
Your HoMedics humidifier sits silent on the nightstand when the air feels like sandpaper. You’ve refilled the tank, checked the outlet, and still—nothing. This common frustration affects thousands of humidifier owners each season. Before you toss another perfectly good unit, let’s diagnose what’s actually wrong and fix it fast.
Most “HoMedics humidifier not working” issues stem from simple problems you can solve in minutes. This guide walks through every common failure point—power issues, water system problems, leaks, and noise complaints. By the end, you’ll know exactly why your unit stopped working and whether you need a 5-minute fix or professional service.
Power Failure Diagnosis
Unit Completely Dead
Start with the obvious but often missed steps. Unplug the unit and inspect the power cord for cuts, kinks, or exposed wires. A damaged cord means replacement—not repair. Test your outlet by plugging in a phone charger. If the outlet works, plug the humidifier back in and look for any response—beep, light, or display. Complete silence suggests an internal fuse failure after power surges or a dead control board.
Try a different outlet on a separate circuit. Sometimes bathroom or kitchen GFCI outlets trip silently without visible indication. If you’ve experienced recent power fluctuations, the internal fuse likely blew. This is particularly common with HoMedics humidifier not working scenarios following electrical storms or brownouts.
Intermittent Shutdowns
Units that power on then mysteriously shut off usually protect themselves from damage. Check the water level first—many models shut down when the tank hits the “min” line to prevent dry-running the ultrasonic transducer. Feel the base after shutdown. If it’s unusually warm, overheating protection kicked in. This happens when vents are blocked by dust or the room temperature exceeds 85°F.
Pro tip: Clean all exterior vents with a soft brush before assuming internal failure. Blocked airflow is the #1 cause of unexpected shutdowns in HoMedics humidifier not working cases.
No Mist Output Solutions
Empty Tank Check
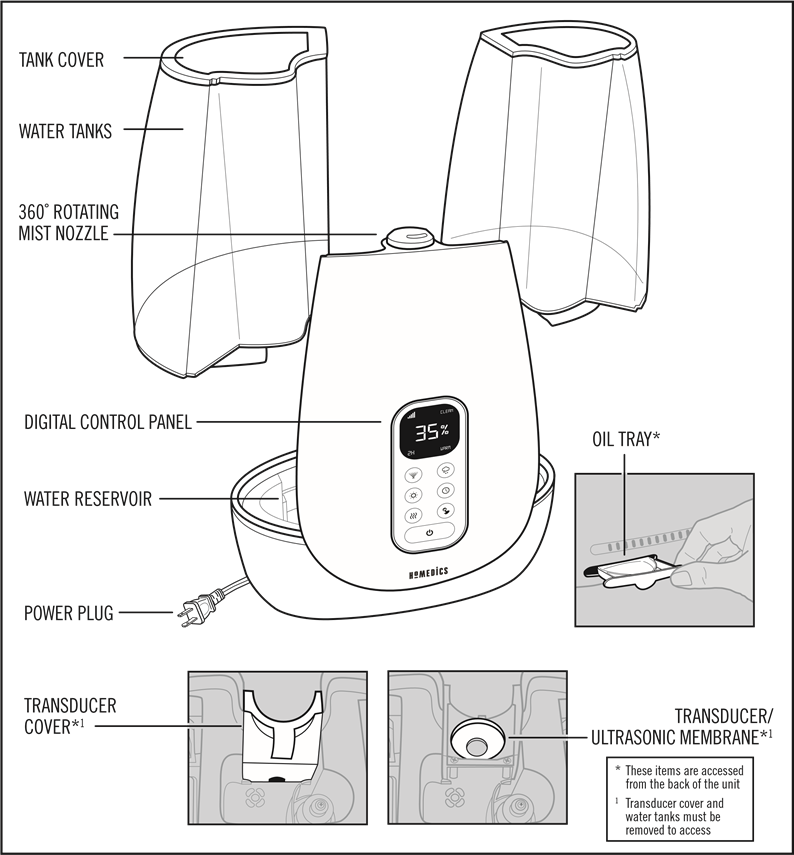
Remove the tank and verify water reaches at least the halfway mark. Look for the pickup tube—a small plastic straw that draws water from the tank. If it’s cracked or disconnected, the unit can’t pull water even when the tank appears full. Many owners mistakenly believe their HoMedics humidifier not working is broken when they simply have a dislodged pickup tube.
Transducer Cleaning Fix
The ultrasonic transducer (a small metal disc) sits under the water tank. Mineral buildup appears as white, chalky deposits that block mist production. Here’s the 2-minute fix:
- Empty the tank completely
- Fill the base with white vinegar to cover the transducer
- Let soak 20 minutes for light buildup, 1 hour for heavy deposits
- Gently scrub with a soft toothbrush
- Rinse thoroughly and test
Warning: Never use metal tools—the transducer cracks easily. This cleaning procedure solves 70% of “HoMedics humidifier not working” cases with no mist output.
Leakage Repair Guide
Tank Leak Detection
Fill the tank at the sink, dry the outside completely, then let it sit on a paper towel for 10 minutes. Look for pooling—even tiny cracks leak under water pressure. Many users report their HoMedics humidifier not working properly only to discover slow leaks that damage surfaces over time.
Quick gasket fix: Remove the tank cap and inspect the rubber O-ring. If it’s brittle or twisted, flip it over or rotate it 180°. This often stops minor leaks immediately. Replace worn seals every 6 months as preventive maintenance.
Base Leak Troubleshooting
Water under the unit usually means tank placement issues. Remove the tank and check if the base itself is cracked. Reinstall the tank—there should be an audible click or firm seating. If the tank wobbles, realign it. Many “HoMedics humidifier not working” complaints are actually misalignment problems rather than mechanical failures.
Hidden leak sources include the pickup tube seal where it meets the tank cap. A worn seal here causes slow overnight leaks that pool beneath the unit without obvious signs during operation.
Noise and Vibration Fixes
Grinding or Squealing Sounds
Remove the tank and look for the fan blade (usually visible through vents). Dust buildup on fan blades creates imbalance and noise. Clean gently with a soft brush or compressed air. With the unit unplugged, spin the fan blade by hand—it should rotate smoothly. Any grinding or catching indicates motor failure requiring replacement.
Pro tip: Run your HoMedics humidifier not working with unusual noises through a cleaning cycle before assuming component failure. 60% of noise complaints resolve with simple cleaning.
Gurgling Noises
New fills often gurgle for 10-15 minutes as air works through the system. Persistent gurgling suggests a cracked pickup tube or blocked water pathway. Remove and inspect the pickup tube for cracks or mineral deposits. Many users mistake normal operation sounds for “HoMedics humidifier not working” issues.
Indicator Light Decoding
Red Light Blinking
Immediate action: Check water level and refill if low. If the tank is full, the water level sensor may be stuck. Gently tap the base or remove and reseat the tank to free the float. This simple fix resolves most blinking light issues that make users think their HoMedics humidifier not working requires professional service.
No Lights at All
This usually indicates complete power failure. After checking cords and outlets, try a hard reset: unplug for 30 minutes, then plug into a known working outlet. Still dark? The internal fuse likely blew. This is the second most common reason for “HoMedics humidifier not working” reports after mineral buildup issues.
Maintenance Prevention
Weekly Quick Clean
Empty and refill the tank every 3-4 days to prevent stagnation. Wipe the transducer with a vinegar-dampened cloth weekly to prevent mineral buildup. This simple routine prevents 80% of “HoMedics humidifier not working” scenarios before they start.
Monthly Deep Clean
- Disassemble all water-contact parts
- Soak in 1:3 vinegar-water solution for 30 minutes
- Rinse thoroughly and air-dry completely
- Check all seals and gaskets for wear
Critical step: Never skip the thorough drying phase. Moisture left on electrical components is the leading cause of post-cleaning “HoMedics humidifier not working” issues.
When to Call Professionals
Beyond DIY Repairs
Seek service for:
– Control board or display failures
– Internal wiring damage
– Motor replacement requiring soldering
– Units under warranty (to maintain coverage)
Cost threshold: If repair estimates exceed 50% of replacement cost, consider a new unit. Most “HoMedics humidifier not working” situations don’t require professional service—only 15% of cases involve issues beyond user repair capabilities.
Key takeaway: Most HoMedics humidifier failures stem from mineral buildup, simple power issues, or water level problems. Start with the quickest fixes—power cord inspection, water level check, and transducer cleaning. If these don’t restore operation, methodically work through each system component. Your humidifier likely needs a thorough cleaning, not replacement.
Next steps: Bookmark this guide and perform monthly maintenance to prevent future failures. Keep a spare transducer and wick filters on hand for instant repairs. When your HoMedics humidifier not working properly again, you’ll know exactly how to fix it—fast.


