
Your Aprilaire humidifier has stopped adding moisture to your home, leaving you with uncomfortably dry air, annoying static shocks, and possibly even irritated sinuses. When your whole-house humidifier fails during cold weather, it’s more than just an inconvenience—it affects your entire household’s comfort and health. Whether your unit is completely silent, running but not humidifying properly, or worse—leaking water onto your furnace room floor—this guide will help you systematically diagnose and fix the most common Aprilaire humidifier problems without needing an expensive service call.
Identify Your Aprilaire Model Before Troubleshooting

Jumping into repairs without knowing your specific Aprilaire model wastes time and can lead to ordering wrong parts. Aprilaire manufactures four main product lines, each with unique components and failure patterns that require different diagnostic approaches.
Quick Model Identification Guide:
– 400 Series: Bypass style units typically mounted on return air ducts
– 500 Series: Compact models featuring side-mounted water panels
– 600 Series: Larger bypass units with top-mounted evaporation panels
– 700 Series: Power humidifiers with built-in fans that force air through the system
Look for the metal nameplate on your humidifier unit or check the model number printed on your humidistat. This critical first step ensures you’re following the correct troubleshooting path for your specific equipment, preventing wasted effort on irrelevant procedures.
No Water Flow Through Your Humidifier
When your Aprilaire runs but the water panel remains bone dry, you’re dealing with a water supply issue rather than an electrical problem. This common failure leaves your home uncomfortably dry despite the humidifier appearing to operate normally.
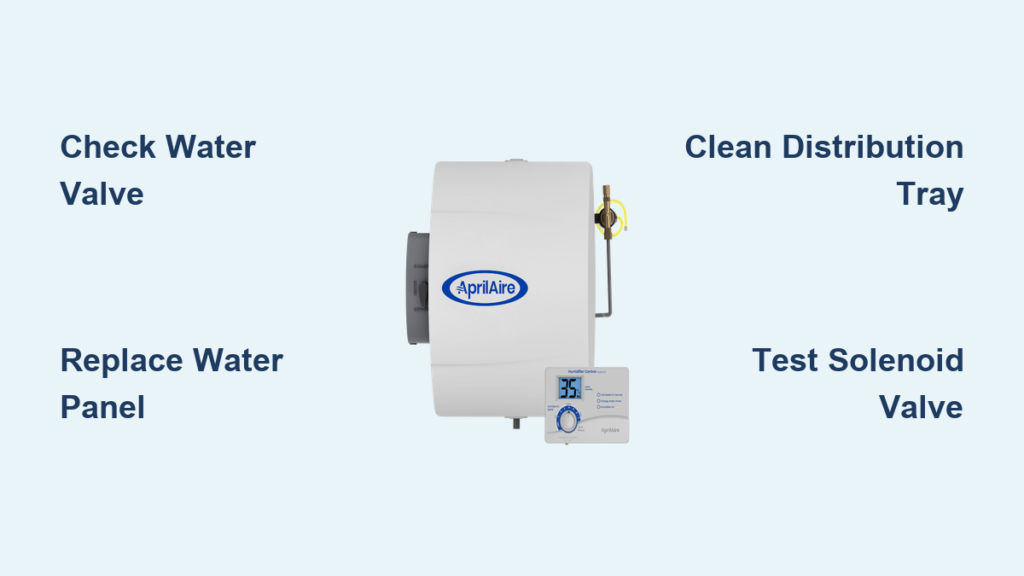
Check Water Supply Valve Position Immediately
Locate the saddle valve connected to your copper water line—the small valve that feeds water to your humidifier. This valve frequently gets accidentally bumped closed during furnace maintenance or storage activities in the utility room. Turn the valve counterclockwise until it stops—this fully opens the water flow. If the valve turns without resistance or feels stuck, the saddle valve likely needs replacement, as it may no longer properly control water flow.
Inspect Water Supply Line for Obstructions
Carefully trace the 1/4-inch copper or plastic water line from your humidifier back to the main water connection. Look for sharp bends, flattened sections, or areas where the line passes through tight spaces. Even a partially kinked line reduces water pressure below the 20 PSI minimum required for proper humidifier operation. Gently straighten any kinks you find, but replace any sections showing significant damage or compression.
Test Solenoid Valve Functionality
The solenoid valve controls water entry into your humidifier. To properly test this crucial component:
- Turn off power to your furnace and humidifier at the circuit breaker
- Locate and disconnect the two low-voltage wires from the solenoid terminals
- Restore power and set your humidistat to call for humidity
- Use a multimeter to verify 24VAC is reaching the solenoid when activated
- If voltage is present but no water flows, the solenoid has failed
Pro tip: If you detect voltage but no water flow, gently tap the solenoid body with a screwdriver handle—mineral deposits sometimes temporarily jam the valve mechanism, and light vibration can free it for immediate operation.
Humidifier Running But Not Increasing Home Humidity

Your Aprilaire shows signs of operation with water flowing and the fan running, yet your home still feels like a desert. This frustrating situation typically points to maintenance issues rather than component failures.
Replace Water Panel Without Delay
The water panel (evaporator pad) is your humidifier’s primary component for adding moisture to your air. These panels require replacement at least once per heating season, with more frequent changes needed if you have hard water. A clogged or deteriorated panel prevents proper evaporation even when water flows correctly.
Critical replacement indicators:
– White mineral deposits covering more than half the panel surface
– Panel material feeling stiff or brittle to the touch
– Visible tears, gaps, or deterioration in the mesh material
– Water running through without being properly absorbed
Clean Distribution Tray Thoroughly
Mineral buildup in the distribution tray creates uneven water flow across your panel, significantly reducing evaporation efficiency. Remove the tray (typically sliding out after lifting the access cover) and soak it in undiluted white vinegar for 30 minutes. Use a soft-bristled brush to gently remove stubborn deposits, paying special attention to the small holes where water drips onto the panel.
Verify Bypass Damper Positioning
For bypass model humidifiers, the damper position controls airflow through the system. During heating season, this damper must be open (handle parallel to the duct). Many homeowners accidentally close it during summer months and forget to reopen it when heating season begins, effectively disabling the humidifier despite other components functioning properly.
Continuous Water Flow and Drainage Problems
Discovering water constantly running through your humidifier isn’t just wasteful—it risks significant water damage to your home. This serious failure requires immediate attention to prevent costly repairs.
Test Humidistat Accuracy First
Your humidistat may be incorrectly calling for humidity even when levels are adequate. Remove the humidistat cover and set it to the lowest setting (typically 15%). Listen carefully for the solenoid to click off. If water continues flowing, the humidistat has failed and needs replacement—this is a common failure point that homeowners can typically address themselves.
Inspect Solenoid Valve Seating Issues
Even when the humidistat indicates “off,” a worn solenoid valve can allow continuous trickle flow. After confirming the humidistat is set to minimum, check for water movement in the drain tube. Any persistent flow indicates the solenoid valve requires replacement—this isn’t a repairable component and must be swapped out entirely.
Clear Drain Line Blockages Immediately
A clogged drain line causes water to back up and continuously flow through the humidifier system. Disconnect the drain line from your unit and blow through it forcefully. If air won’t pass freely, use a straightened coat hanger to carefully clear debris from the line, or replace the plastic tubing entirely—it’s inexpensive and prevents future clogs.
Electrical System Troubleshooting Steps
When your Aprilaire shows no signs of life—no lights, no sounds, no operation—electrical issues rather than water problems are likely causing the failure.
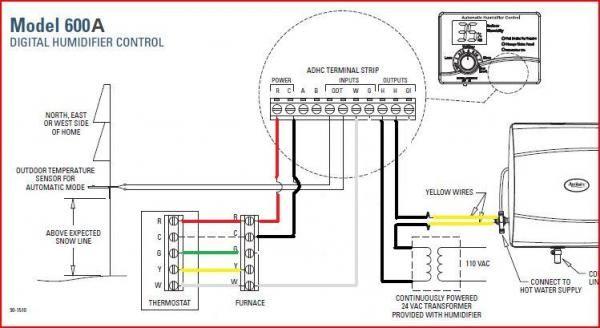
Confirm 24VAC Power Supply Availability
Your humidifier requires 24 volts AC from your furnace’s transformer to operate. Test between the R and C terminals on your humidistat with a multimeter set to AC voltage. No reading indicates either a blown fuse in your furnace control panel or a wiring problem between the furnace and humidifier that needs correction.
Check Humidistat Wiring Connections
Loose or corroded connections prevent proper electrical flow to your humidifier. Turn off power at the circuit breaker and inspect all wire connections. Look specifically for green corrosion on copper wires, loose wire nuts that pull off easily, frayed wires near sharp metal edges, or disconnected transformer wires that need reattachment.
Test Transformer Output Voltage
The small transformer mounted near your furnace converts household 120VAC to the 24VAC required by your humidifier. Test the output side of this transformer—if it’s not providing approximately 24 volts, replacement is necessary. This component commonly fails after power surges or as it ages, and replacement is typically a straightforward DIY project.
Seasonal Startup Checklist to Prevent Failures
Many “humidifier not working” issues are simply oversights during seasonal transitions. Following this comprehensive startup checklist each fall prevents unnecessary service calls and ensures reliable operation.
Essential Fall Restart Procedures
- Open bypass damper completely (handle parallel to duct)
- Turn on water supply valve fully (saddle valve counterclockwise)
- Set humidistat to 35-45% based on current outdoor temperature
- Replace water panel regardless of appearance—start fresh each season
- Test operation by temporarily lowering humidistat setting below current humidity
- Check for leaks around all connections during first complete run cycle
Critical Winter Maintenance Schedule
- Monthly: Visually inspect water panel for mineral buildup
- Every 2 months: Remove and clean distribution tray with vinegar solution
- As needed: Replace water panel if humidity output noticeably decreases
- Spring: Perform complete shutdown, cleaning, and storage preparation
Prevent Future Aprilaire Humidifier Failures
Stopping problems before they start saves money and maintains consistent home comfort throughout the heating season.
Install Water Treatment System
Hard water is the primary cause of Aprilaire component failures. Consider installing:
– Water softener: Significantly reduces mineral buildup in all components
– Inline sediment filter: Removes particles before they reach the solenoid
– Scale inhibitor system: Prevents minerals from adhering to internal surfaces
Establish Maintenance Reminders
Set recurring phone or calendar reminders for:
– October 1st: Seasonal startup and mandatory water panel replacement
– December 1st: Mid-season check and distribution tray cleaning
– February 1st: Late-season maintenance before temperatures rise
– April 15th: Complete seasonal shutdown and thorough cleaning
Monitor Home Humidity Levels
Purchase an inexpensive digital hygrometer and place it in your main living area. Target 35-45% relative humidity during winter months. Levels consistently above 50% create window condensation and potential mold issues, while readings below 30% indicate your humidifier needs immediate attention.
Your Aprilaire humidifier should provide reliable service for many years with proper maintenance. Most “not working” issues stem from neglected water panels, accidentally closed dampers, or minor water supply problems—fixes any homeowner can handle in under an hour. Keep spare water panels on hand, mark your calendar for seasonal maintenance, and you’ll rarely face another uncomfortably dry winter day.


