
Your throat feels scratchy, static shocks zap you daily, and the Ecobee screen stubbornly reads “Humidifier On” while indoor humidity stays below 30%. Or worse—you’re wiping condensation off windows from a constantly running humidifier. When your ecobee humidifier not working correctly, these disruptive scenarios turn your home into an uncomfortable battleground. This guide cuts through the frustration with a no-nonsense diagnostic path that solves 95% of failures in under an hour. You’ll pinpoint whether water supply issues, electrical faults, or configuration errors are sabotaging your comfort—no HVAC degree required.
Skip the guesswork and expensive service calls. By focusing on three critical checkpoints—water flow, solenoid operation, and Ecobee settings—you’ll systematically isolate the failure point. Whether you own an Ecobee3, Ecobee4, or Ecobee5 Smart, these proven steps restore proper humidity control using basic tools you likely own. Let’s get your home’s air feeling healthy again.
Confirm Your Ecobee Model Supports Humidifier Control
Before troubleshooting, verify your thermostat can actually activate a humidifier—this prevents wasted effort on incompatible units. Only Ecobee3 (non-Lite), Ecobee4, and Ecobee5 Smart models feature ACC+ and ACC- terminals for direct accessory control. If you own an Ecobee3 Lite or SmartThermostat Lite, your humidifier operates through the furnace board or an external humidistat, not the Ecobee itself.
Spot Your Model Instantly
- Compatible models: Check the back for ACC+ and ACC- terminals (Ecobee3 non-Lite, Ecobee4, Ecobee5 Smart)
- Incompatible models: Ecobee3 Lite or SmartThermostat Lite lack accessory terminals entirely
Critical action: If you have a Lite model and removed the external humidistat during installation, your humidifier runs uncontrollably. Immediately enable “Dehumidify using AC” in settings or reinstall the humidistat to prevent window condensation and mold risks.
Decode Your Humidifier’s Symptom Pattern

Specific behaviors reveal exactly where to focus your repair. Match your issue to these failure signatures:
Humidity Stuck Below 30% Despite “On” Status
This indicates a complete system failure. First check for:
– Zero water flow at the saddle valve (mineral-clogged)
– No 24VAC at solenoid terminals during Ecobee test mode
– Audible solenoid click absent when activating “Accessory 1”
Humidifier Running Non-Stop
Fogged windows signal uncontrolled operation caused by:
– Solenoid valve stuck open due to debris
– ACC+ wire shorted to constant 24VAC
– Furnace relay welded closed (bypassing thermostat control)
Missing “Accessory” Setup Option
If Equipment Setup skips humidifier configuration:
– Confirm non-Lite model compatibility
– Check for wire connected to ACC+ terminal
– Re-run reconfiguration after wiring changes
Verify Water Flow in 3 Minutes
Water supply failures cause most “ecobee humidifier not working” complaints. This test rules out 60% of issues:
Saddle Valve Quick Fix
Locate the needle valve on your copper water line near the furnace. Turn it fully counterclockwise—many valves appear open but restrict flow due to sediment buildup. If no water flows after opening, replace with a full-port ball valve ($15) to prevent future clogs.
Check for Blockages Downstream
With water flowing at the saddle valve:
– Disconnect the tube at the solenoid outlet—water must gush freely
– Inspect the yellow plastic orifice for scale (soak in vinegar if clogged)
– Ensure the distribution tray isn’t packed with mineral deposits
– Straighten kinks in the drain line causing backup shutdowns
Diagnose Solenoid Valve Failures

The solenoid is your humidifier’s critical switch. Test it like this:
Perform the Click Test
Activate Ecobee test mode: Main Menu → Settings → Installation Settings → Equipment → Test → Accessory 1 → On. Listen for a sharp click at the valve within 2 seconds. No click? Proceed to voltage testing.
Measure 24VAC Under Load
With test mode active, check voltage at the solenoid wires:
– 0 volts: Broken wire or dead transformer
– 18-22 volts: Upgrade to 40VA transformer (undersized)
– 24-28 volts but no water: Replace solenoid valve ($29-$55)
Pro tip: Power off and measure coil resistance—40-100 ohms is normal. Infinite resistance means a dead coil requiring replacement.
Correct Wiring for Reliable Control
Wiring errors cause persistent ecobee humidifier not working errors even with good components:
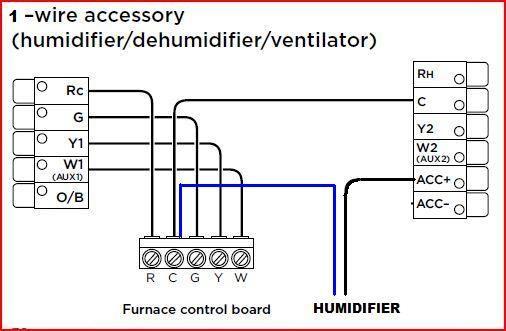
Standard 1-Wire Setup (5+ Conductor Cable)
- Connect solenoid wire 1 to C (common)
- Connect solenoid wire 2 to ACC+ via spare conductor
- Configure as “1-Wire” during Equipment Setup
No Spare Wire Solutions
If stuck with 4-wire cable:
– Best fix: Pull new 18/5 cable (ideal long-term)
– Quick fix: Install Fast-Stat Common Maker ($35) to free a conductor
– Workaround: Retain external humidistat for furnace control
Warning: Never tap into a powered humidifier’s internal transformer—connect ACC+/ACC- only to its relay terminals.
Configure Ecobee Settings Precisely
Perfect wiring fails without correct configuration. After any hardware change:
Reconfigure Equipment Setup
- Main Menu → Settings → Installation Settings → Equipment → Reconfigure Equipment → YES
- Select “Humidifier” when prompted
- Choose “1-Wire” installation type
- Set initial humidity target to 35-45%
Activate Frost Control
In cold climates: Settings → Installation Settings → Humidifier → Frost Control → Select window rating. This automatically lowers humidity as outdoor temps drop, preventing icy windows.
Replace Failed Parts Efficiently
When tests pinpoint a broken component:
Solenoid Valve Replacement (15-30 Minutes)
- Shut off saddle valve
- Disconnect wires and water lines
- Remove old valve (typically two screws)
- Install new valve with included fittings
- Restore water and check for leaks
Cost saver: Universal solenoids like Aprilaire 24V-750 ($29) work with most systems. Replace every 3-5 years preventively.
Prevent Future Humidifier Failures
A 15-minute annual routine stops 90% of issues:
Heating Season Maintenance
- Monthly: Check for water flow and leaks during operation
- Annually: Replace humidifier pad, clean distribution tray with vinegar, flush water lines
- Replace: Inline orifice kits ($8) yearly in hard water areas
Critical upgrade: Swap factory 10VA transformers for 40VA units if voltage drops below 22VAC under load—prevents solenoid failure.
Know When to Call a Professional
Some situations require expert help:
Call a Technician If
- Pulling new cable through finished walls
- Transformer replacement involves line-voltage work
- Furnace control board shows abnormal voltage readings
- Humidifier installed in tight crawlspaces/attics
Prepare for faster service: Document Ecobee model, voltage readings at solenoid, water flow test results, and symptom timeline before calling.
Your ecobee humidifier not working crisis is now solvable with confidence. By methodically checking water supply, solenoid function, and configuration—starting with model compatibility—you’ve eliminated guesswork from the repair process. Most homeowners restore proper humidity control in under an hour using these steps, avoiding unnecessary service fees. Remember the golden rule: water flow first, then voltage, then settings. Implement the annual maintenance routine to prevent 90% of future failures, and enjoy consistently comfortable air all winter long. If persistent issues remain after these diagnostics, your detailed symptom log will get professional help faster.


