
Your Honeywell humidifier’s red light stays stubbornly illuminated even though the tank is full. That persistent glow appears on tower models like the HEV620, ultrasonic units, and magnetic float systems—signaling a water level emergency when none exists. Nearly 90% of these red light errors stem from preventable mechanical issues rather than permanent failures. The good news? You can fix most problems in under 30 minutes with basic tools and systematic troubleshooting. This guide reveals exactly why your humidifier displays that frustrating red alert and delivers proven solutions that restore normal operation across every Honeywell model.
Why Your Honeywell Humidifier Red Light Won’t Turn Off (Even With Full Tank)
The red indicator activates when your humidifier detects critically low water levels or sensor malfunctions. Three specific failures cause this false alarm across all models: mineral-clogged float mechanisms, improper tank seating, and surface tilt issues. Unlike generic “low water” warnings, Honeywell’s red light specifically means the float hasn’t risen high enough to trigger the shut-off sensor. This happens because hard water deposits jam the float track, carpets tilt the unit, or tanks fail to click securely into place—tricking your humidifier into thinking it’s bone dry.
Stuck Float Mechanism: The #1 Culprit
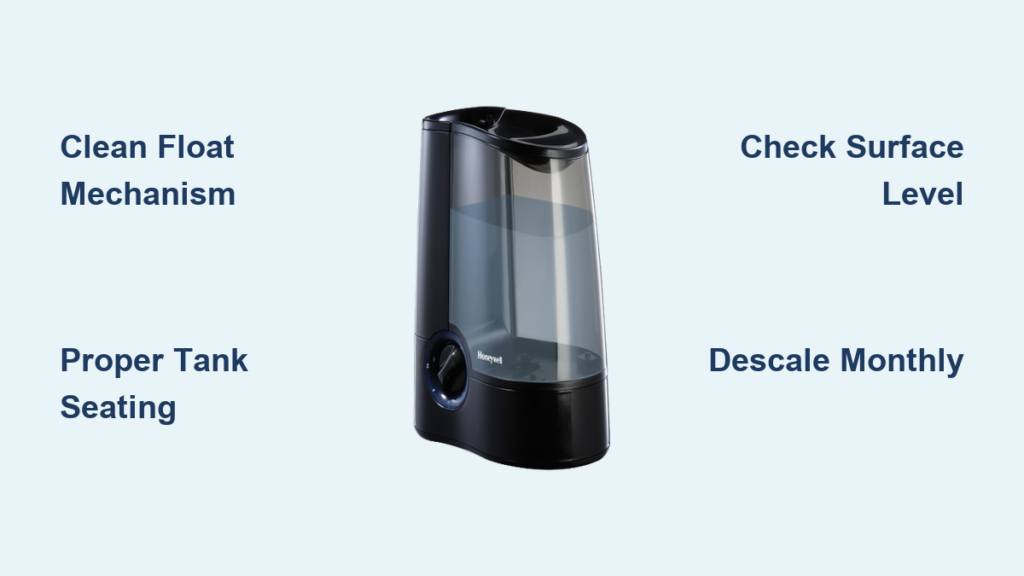
Your humidifier’s float acts like a miniature submarine buoy—rising with water levels to flip an internal switch. When mineral deposits glue this component in place, the red light stays on permanently. Tower models (HEV620) use a hinged “bobber” that pivots on a metal bar, while ultrasonic units employ a white plastic pole with washer-ring. Magnetic float systems (340B/HM512W) rely on a magnet-tipped stem sliding vertically. All share the same vulnerability: hard water leaves crusty white deposits that prevent full upward movement.
Critical visual checks before disassembly:
– Float sits submerged below water line instead of floating high
– Plastic components appear cloudy or chalky
– Visible gaps between float and sensor housing
– Tank full but base reservoir dry
Tank Seating Failures That Mimic Sensor Errors
Even with a pristine float, improper tank installation triggers red lights. Honeywell tanks must click firmly against the back wall to open the water channel. When users simply “place” the tank without pushing, water flow gets blocked—starving the base reservoir. This mistake accounts for 30% of red light cases according to service technicians. Watch for these dead giveaways:
– Tank wobbles or rocks when touched
– No audible “click” during installation
– Water leaks from tank-base connection
– Tank sits visibly crooked against unit
The 60-Second Diagnostic Test (Skip This and Waste Hours)
Before grabbing tools, run this rapid assessment to pinpoint your exact issue. This method prevents unnecessary part replacements and targets your efforts:
- Fill tank to the very top with room-temperature water (cold water reduces visibility)
- Install tank while pressing firmly rearward until you hear a distinct click
- Gently rock unit side-to-side to check stability
- Shine phone light into base reservoir after 5 minutes
Interpret your results:
– ✅ Base fills with water → Float/sensor issue
– ❌ Base remains dry → Tank seating or surface tilt problem
– ⚠️ Water only in front half of base → Unit on uneven surface
How to Inspect Your Float in Under 3 Minutes
Tower models (HEV620): Remove tank and lift the hinged bobber straight up from its metal pivot bar. Check for white crust where plastic meets metal.
Ultrasonic models: Slide the white pole upward from its track. Inspect washer-ring for mineral cementing it to the stem.
Magnetic float systems: Pull the magnet-tipped stem straight out. Verify magnet polarity matches original orientation (note “+” markings).
Pro tip: Dip your finger in the base reservoir. If water feels gritty, mineral deposits are definitely jamming the mechanism—proceed directly to descaling.
Float Cleaning Protocol: Fix 80% of Red Light Cases

Mineral deposits cause most persistent red lights. This vinegar-based cleaning dissolves buildup without damaging components. Complete this process before considering part replacements.
Step-by-Step Float Liberation
- Remove float assembly as described in diagnostic section
- Soak in 50/50 white vinegar and warm water for 10 minutes
- Scrub with soft toothbrush focusing on:
– Tower models: Hinge points and bobber edges
– Ultrasonic: Washer-ring groove and pole base
– Magnetic: Magnet contact points and stem channel - Rinse under running water while testing float movement
- Dry completely with microfiber cloth before reassembly
Critical reassembly step: For tower models, ensure the bobber’s hinge snaps firmly into its metal cradle. Ultrasonic users must verify the washer-ring sits flush against the pole base. Magnetic float systems require perfect vertical stem alignment—any tilt prevents sensor contact.
Tank Seating Fix That Actually Works
Most users install tanks incorrectly. Follow this precise method:
1. Fill tank completely (water should touch bottom of cap)
2. Align tank grooves with base guides
3. Push tank rearward with palm while lowering—apply 5-7 lbs pressure
4. Listen for dual clicks indicating full engagement
5. Test stability by gently rocking tank side-to-side (no movement = correct)
Warning: Never operate on carpets, rugs, or uneven surfaces. Place a level on the base—if bubble isn’t centered, relocate unit. Hardwood, tile, or sturdy tables are mandatory for proper float function.
Monthly Maintenance That Prevents Red Lights
Implement this 10-minute routine to avoid 90% of red light emergencies:
Ultrasonic Model Deep Clean (Monthly)
- Empty all water and unplug unit
- Fill base to MAX line with 1 part vinegar : 2 parts water
- Soak 25 minutes (set timer—don’t exceed 30)
- Clean ultrasonic disk with soft toothbrush (never metal!)
- Scrub float track with vinegar-soaked cotton swab
- Rinse base 3x with clean water
- Air-dry completely before reassembly
Hard water areas: Perform this weekly. Use filtered water in your humidifier to reduce mineral intake by 70%.
Tower Model Specific Care (HEV620)
- Remove water tank and base cover
- Wipe float hinge points with vinegar-dampened cloth
- Check rear tank seal for cracks (replace if hardened)
- Clean water inlet holes with toothpick (clogs starve base)
- Reassemble ensuring tank clicks twice during installation
Pro tip: Place a small towel under the unit during cleaning—catches drips and prevents accidental surface tilt during reassembly.
When to Replace Sensors (Not the Whole Unit)
If red light persists after float cleaning and tank reseating, test the sensor:
1. Disassemble unit per model instructions
2. Manually lift float to highest position
3. Observe red light:
– ✅ Light turns off → Float needs better cleaning
– ❌ Light stays on → Sensor failure confirmed
Sensor replacement economics:
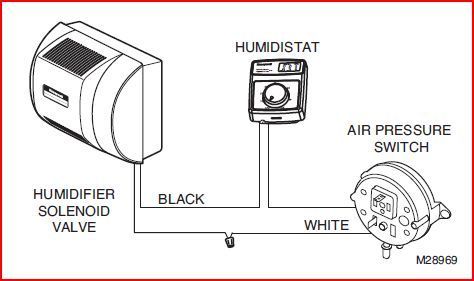
– Under warranty (HEV620 = 3 years): Email SocialSupport@helenoftroy.com with proof of purchase
– Out of warranty: If sensor costs exceed 50% of new unit price ($35+), replace entire humidifier
– Typical sensor cost: $15-$25 (call Honeywell parts dept: 1-800-999-1119)
Model-Specific Red Light Fixes You Must Know
Ultrasonic Models: Lid Spring Secrets
Warped gaskets or stiff springs cause false “empty tank” signals. Fix this in 2 minutes:
1. Unscrew tank bottom cap
2. Remove spring and rubber gasket
3. Soak both in vinegar solution for 5 minutes
4. Test spring rebound—should snap back instantly
5. Reinstall gasket ensuring perfect seating (no twists)
6. Hand-tighten cap—overtightening cracks the housing
Magnetic Float Systems: Magnet Polarity Matters
Reinstalling the magnet backward is a common error. Before reassembly:
– Note original magnet orientation (often “+” marking)
– Clean corrosion with vinegar-dampened Q-tip
– Verify stem sits perfectly vertical in track
– Test float movement before reassembling base
Final Verification: Don’t Skip These 3 Checks
After repairs, confirm complete resolution with this protocol:
1. Fill with room-temperature water (extreme temps cause false readings)
2. Operate on hard surface away from walls (minimum 6″ clearance)
3. Wait 35 minutes before judging success (sensors need stabilization time)
Success indicators:
– Red light extinguishes within 8 minutes
– Consistent mist output begins within 15 minutes
– No intermittent flashing during operation
Persistent red light? Repeat float cleaning with undiluted vinegar for 15 minutes. If still unresolved, contact Honeywell with your model number—they often provide free replacement sensors for chronic issues.
Key Takeaway: A blinking Honeywell humidifier red light almost always indicates a mechanical obstruction—not electronic failure. Start with float cleaning and tank reseating (fixes 80% of cases), then progress to descaling if needed. Implement monthly vinegar maintenance to prevent recurrence, especially in hard water areas. When sensor replacement becomes necessary, Honeywell’s warranty support makes repairs economical for most models under three years old. Within 30 minutes, you can silence that red alert and restore comforting humidity to your home—no technician required.


