You just replaced the battery in your smoke detector, but the chirping won’t stop. You expected silence after swapping in a fresh battery, yet the unit keeps beeping, often in the middle of the night. This is one of the most common complaints about smoke alarms, and the cause is rarely the battery itself. In most cases, a smoke detector beeping after new battery installation signals an installation error, a needed reset, or an alarm that has reached its expiration date. This guide covers every possible cause and solution so you can silence the chirp and restore reliable protection.
Check Battery Installation First
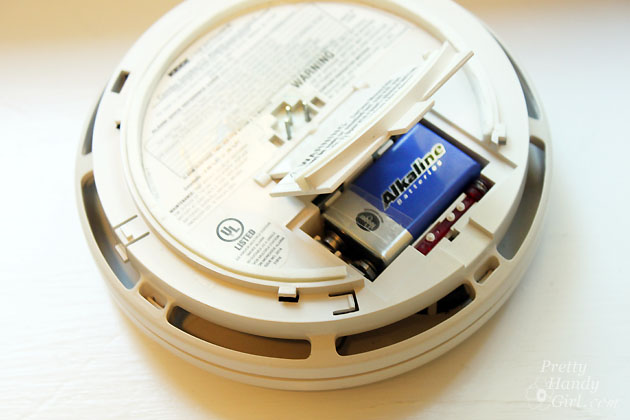
A brand-new battery cannot stop chirping if it is installed incorrectly. Many homeowners skip this step because they assume a new battery automatically works. Orientation, seating, and battery type all affect whether the alarm recognizes the power source.
Confirm Correct Battery Orientation
Open the battery compartment and verify the positive (+) and negative terminals match the markings inside the alarm. A reversed battery blocks power flow and triggers the same chirp as a dead battery. Flip the battery around and test the unit again.
Ensure Full Battery Seating
Press the battery firmly into place. It may look installed without making proper contact. Wiggle it slightly to confirm it is locked in. Bent or corroded spring contacts can also prevent a solid connection. Clean them gently with a dry cloth if needed.
Use the Right Battery Type
Check your manual for the recommended battery type, typically 9V or AA. Some models require a specific chemistry, such as alkaline only. Lithium or rechargeable batteries in incompatible units can cause erratic behavior. Always follow the manufacturer’s recommendation.
Close the Battery Drawer Completely
A battery drawer that is not fully latched is one of the most overlooked causes of continued chirping. Many alarms include a safety switch that triggers a chirp whenever the compartment is open or misaligned.
Inspect Drawer Alignment
Slide the drawer shut and listen for a click. If it feels loose or does not sit flush, realign it. A misaligned drawer prevents the internal switch from closing and keeps the alarm in low battery mode.
Reinstall the Alarm on the Mount
If you removed the entire unit from the ceiling to change the battery, twist it clockwise back onto the mounting bracket until it locks. An improperly seated alarm may not power on correctly, which can cause false chirps.
Reset the Smoke Detector
A new battery does not automatically clear the alarm’s internal memory. If the unit chirped for days before you replaced the battery, it may retain a stored low battery signal that keeps the alert going.
Discharge Residual Power on Battery-Only Alarms
For battery-powered units, follow these steps:
- Remove the alarm from the mount.
- Take out the battery.
- Press and hold the test or silence button for 15 to 30 seconds.
- Reinsert the battery.
- Reattach the unit and test it.
This drains residual power and clears the stored error flag.
Reset Hardwired Alarms Properly
Hardwired alarms require extra steps because they run on both AC power and a backup battery:
- Turn off the circuit breaker.
- Remove the alarm and disconnect the power harness.
- Take out the backup battery.
- Hold the test button for 15 to 30 seconds.
- Reconnect the battery and harness.
- Restore power and reattach the unit.
Skipping the power disconnect often leaves residual charge, allowing the chirp to return.
Follow First Alert Reset Steps
If you own a First Alert model, hold the test button for 15 seconds until the alarm beeps. Release the button and wait. The unit should reset and return to normal operation.
Test for End-of-Life Warning
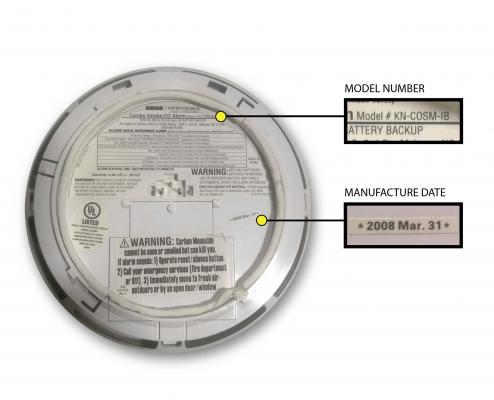
A new battery will not silence chirping from an expired alarm. Most smoke detectors last only 10 years. After that, they chirp to signal replacement regardless of battery condition.
Find the Manufacture Date
Flip the alarm over and look for the manufacture date label. If the unit is older than 10 years, replace it. Carbon monoxide alarms may expire sooner depending on sensor type.
Recognize End-of-Life Chirp Pattern
An expired alarm typically chirps once every 30 to 60 seconds. Battery changes will not stop this pattern. Replacement is the only fix.
Replace Sealed 10-Year Battery Units
Units with built-in batteries are not designed for battery swaps. If the alarm is chirping after 10 years, the entire unit must be replaced. Opening or modifying it can disable critical safety features.
Inspect Power and Wiring Issues
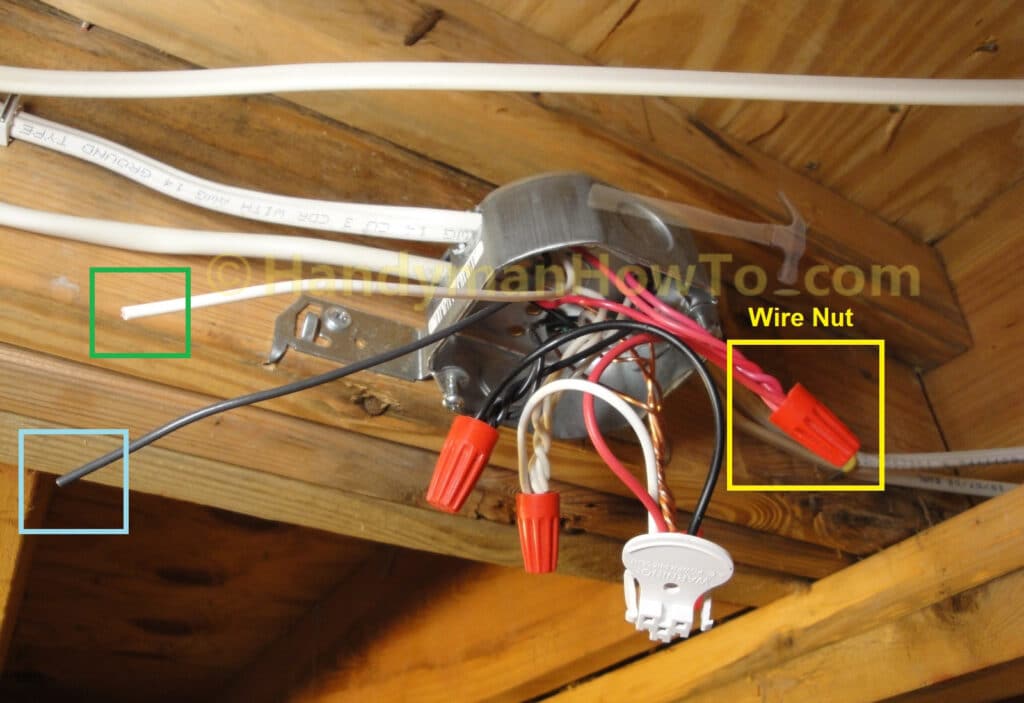
For hardwired alarms, chirping can come from AC power problems rather than the backup battery.
Check Circuit Breaker Status
Confirm the breaker is on. A tripped or turned-off breaker cuts power, forcing the alarm to rely on the backup battery and triggering low power chirps. Reset the breaker and test the unit.
Examine Wiring Connections
Remove the alarm and inspect the wiring harness. Look for loose, disconnected, or damaged wires. Reconnect any loose wires and confirm the harness is fully seated.
Test Outlet Power If Applicable
Some alarms connect to a junction box rather than a standard outlet. Use a voltage tester to confirm power reaches the unit. If no power is detected, contact a licensed electrician.
Clean the Detector
Dust, grease, or insects inside the sensing chamber can cause false alarms and erratic chirping, even with a fresh battery installed.
Vacuum the Vents
Use a vacuum with a brush attachment to gently clean the exterior vents. Repeat this monthly to prevent buildup.
Avoid Compressed Air
Never use canned air on a smoke detector. The high pressure can damage internal sensors or push debris deeper into the chamber.
Wipe the Exterior
Use a dry or slightly damp cloth to wipe the outside of the unit. Keep moisture away from all openings.
Verify LED Indicator Lights
Many alarms communicate status through LED lights. Knowing what each color means can help you diagnose the problem faster.
Solid Green Light
A solid green light indicates normal operation. If you see this after a battery replacement, the alarm is likely working.
Flashing Green Light
A flashing green light can indicate low battery or test mode. If it continues after installing a new battery, reset the unit.
Red Flash
A red flash signals an alarm event or system fault. Investigate the unit immediately.
When to Replace the Entire Alarm
Sometimes troubleshooting will not stop the chirp. Replacement is the safest option in these situations:
- The alarm is more than 10 years old.
- The manufacture label is faded or missing.
- The unit still chirps after reset, cleaning, and battery verification.
- It is a sealed battery unit past its service life.
Safety-First Replacement Rule
If you are unsure how old the alarm is, replace it. Smoke detectors degrade over time. Sensors lose sensitivity and electronics fail. A silent alarm is useless during a fire.
Prevent Future Beeping
A few simple habits can keep your smoke detector quiet and reliable.
Test Monthly
Press the test button every 30 days. A loud, clear beep confirms the unit is working.
Replace Batteries Proactively
Change the batteries twice a year even if the alarm is not chirping. Use daylight saving time changes as a reminder.
Mark Replacement Dates
Write the purchase date on the unit with a marker. Set a calendar alert for 10 years out.
Install Detectors Correctly
Place alarms on ceilings at least 4 inches from walls. Avoid kitchens, bathrooms, and vents to reduce false alarms.
Final Checklist: Stop the Chirp in 10 Minutes
Use this checklist to confirm you have addressed every common cause:
- Battery inserted correctly with positive and negative ends aligned
- Battery drawer fully closed and latched
- Alarm securely reinstalled on the mounting bracket
- Unit reset by holding the test button for 15 to 30 seconds
- Hardwired power restored with breaker on and wires connected
- Manufacture date checked and unit replaced if older than 10 years
- Vents cleaned with a soft brush or vacuum
- Test button pressed to confirm proper operation
Frequently Asked Questions About Smoke Detector Beeping After New Battery
Why is my smoke detector still beeping after I put in a new battery?
The battery may be installed backwards, the drawer may not be fully closed, the alarm may need a reset, or the unit may have reached end of life. A new battery alone does not always solve the issue.
Can a new battery still cause chirping?
Yes. A fresh battery can still cause chirping if it is the wrong type, installed incorrectly, or if the alarm is signaling an issue other than low battery, such as expired service life.
Do I need to reset my smoke alarm after changing the battery?
Sometimes. Many alarms store residual charge or a low battery flag that must be cleared by holding the test button for 15 to 30 seconds with the battery removed.
Why is my hardwired smoke alarm chirping with a new battery?
Hardwired alarms rely on both AC power and a backup battery. Chirping can come from a tripped breaker, loose wiring, power interruption, or an end-of-life warning. The battery is only one part of the system.
Will a new battery stop an expired alarm from chirping?
No. If the alarm has reached end of life, replacing the battery will not stop the chirping. The entire unit must be replaced.
How do I know if my smoke detector is expired?
Check the back of the alarm for the manufacture date. Most smoke detectors last 10 years. If the date is older than 10 years or the label is missing, replace the unit.
Key Takeaways for Silencing a Chirping Smoke Detector
A smoke detector beeping after new battery installation is almost never a battery problem. It usually points to an installation issue, a needed reset, or an expired alarm. Start with the simplest checks, battery orientation, drawer closure, and reset, before moving to wiring or cleaning. If the unit is more than 10 years old or still chirps after troubleshooting, replace it without hesitation. Your safety depends on a working alarm, not a quiet one.