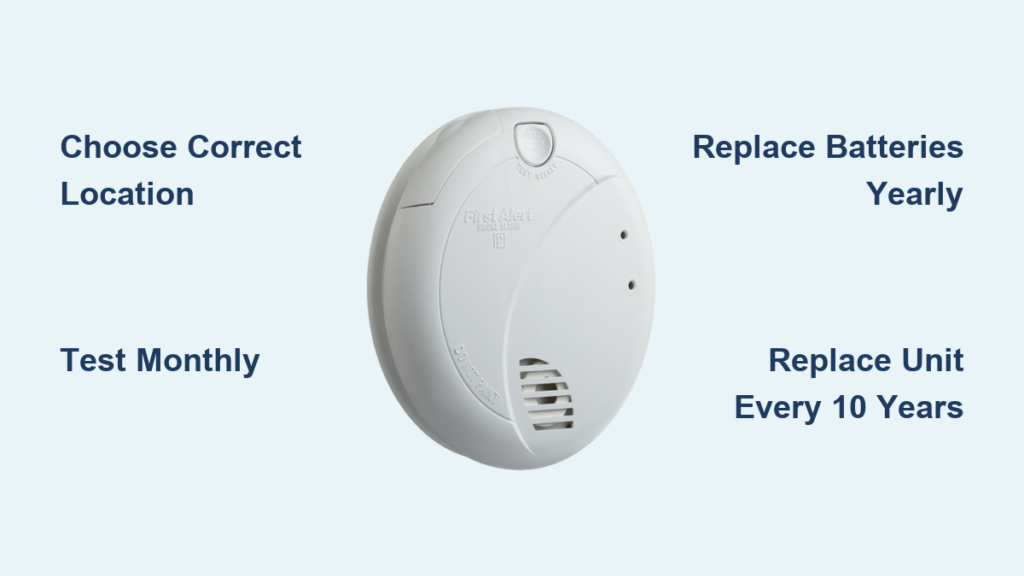
Installing a First Alert smoke detector is one of the most important safety upgrades you can make in your home. Fires can spread in minutes, and a working detector gives you the early warning needed to escape safely. Whether you choose a battery-operated or hardwired model, the process is straightforward with basic tools and a little preparation. This guide covers everything from choosing the right location to testing and maintaining your detector for long-term protection. You’ll learn step-by-step installation, troubleshooting tips, and how to avoid common mistakes.
Choose the Right Location for Your Smoke Detector
Avoid Airflow Interference
Install your First Alert smoke detector away from vents, ceiling fans, windows, and doors. Air currents can prevent smoke from reaching the sensor, delaying or completely blocking alarm activation. Even a gentle draft can compromise performance, so pick a stable, enclosed area.
Keep Detectors Away From Kitchens and Bathrooms
Steam from showers and cooking fumes are leading causes of false alarms. Place detectors at least 10 feet from kitchen appliances and bathroom doors. This reduces nuisance triggers while maintaining effective coverage throughout your home.
Optimal Ceiling Placement
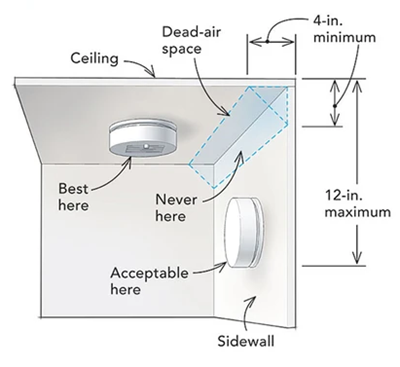
Mount the detector on the ceiling, preferably in a corner where walls meet. Heat and smoke rise and accumulate fastest in these areas, giving you the earliest possible warning. If ceiling mounting isn’t possible, install high on a wall, 4 to 12 inches below the ceiling.
Install Battery-Operated Models
Mount the Base Plate Securely
Position the mounting plate at your chosen location. Use the included plastic anchors and screws to attach it to drywall, and no pre-drilling is needed. Insert the first screw loosely, then add a second. For extra stability, use a third screw if your model allows it. A wobbly base can make it hard to snap the alarm unit in place.
Snap the Alarm Into Place
Align the smoke detector with the mounting plate. Rotate or press it until it clicks. You should feel and hear a firm snap confirming it’s locked in. Gently tug it to ensure it won’t come loose over time.
Insert Battery and Test
Open the cover, insert a fresh 9-volt battery, and close it. Press and hold the test button for 5 to 10 seconds. A loud, piercing beep means the unit is working. If silent, reseat the battery and try again. Some models require the battery to be installed before mounting, so check your manual.
Install Hardwired Detectors Safely
Turn Off Power First
Before touching any wires, turn off the circuit breaker that powers the detector line. Use a voltage tester to confirm no current is present. Never work on live wiring because this creates a serious electrical hazard.
Connect Wires Correctly
Match the wires using standard color coding:
• Black to black (hot)
• White to white (neutral)
• Green or bare copper to ground
Secure each connection with wire nuts and tuck them into the electrical box. Ensure no bare wire is exposed, then attach the detector’s mounting base to the box.
Attach and Power Up
Snap the alarm unit onto the base. Restore power at the breaker. Press the test button and the alarm should sound immediately. If not, double-check your connections and power supply.
Test Your Detector Every Month
Perform a Quick Button Test
Press and hold the test button for 5 seconds. A loud alarm confirms the speaker, battery, and circuitry are functional. Do this every month without exceptions. It takes less than a minute and could save your life.
Verify After Battery Replacement
After installing a new battery, press and hold the test button for 5 seconds to reset the system. This clears any low-battery memory and ensures the unit recognizes the fresh power source.
Replace Batteries Annually
Use a Fresh 9-Volt Battery
First Alert detectors use standard 9-volt batteries. Replace them once a year, even if the low-battery chirp hasn’t started. Set a reminder on a calendar date you’ll remember, like New Year’s Day or a family birthday.
Respond to Chirping Immediately
A single chirp every 30 to 60 seconds means the battery is dying. Replace it right away. Ignoring the chirp risks leaving your home unprotected. After replacement, reset the unit with the test button.
Clean Detectors Regularly

Vacuum Monthly
Dust and debris can clog the sensor chamber, leading to false alarms or failure to detect smoke. Use a vacuum with a soft brush attachment to gently clean the exterior vents once a month. This is especially important in dusty homes or near high-traffic areas.
Deep Clean Every 6 Months
Every six months, remove the detector and vacuum the openings more thoroughly. Wipe the exterior with a dry cloth. Avoid using cleaners, sprays, or water because these can damage internal components.
Replace the Unit Every 10 Years
Check the Expiration Date
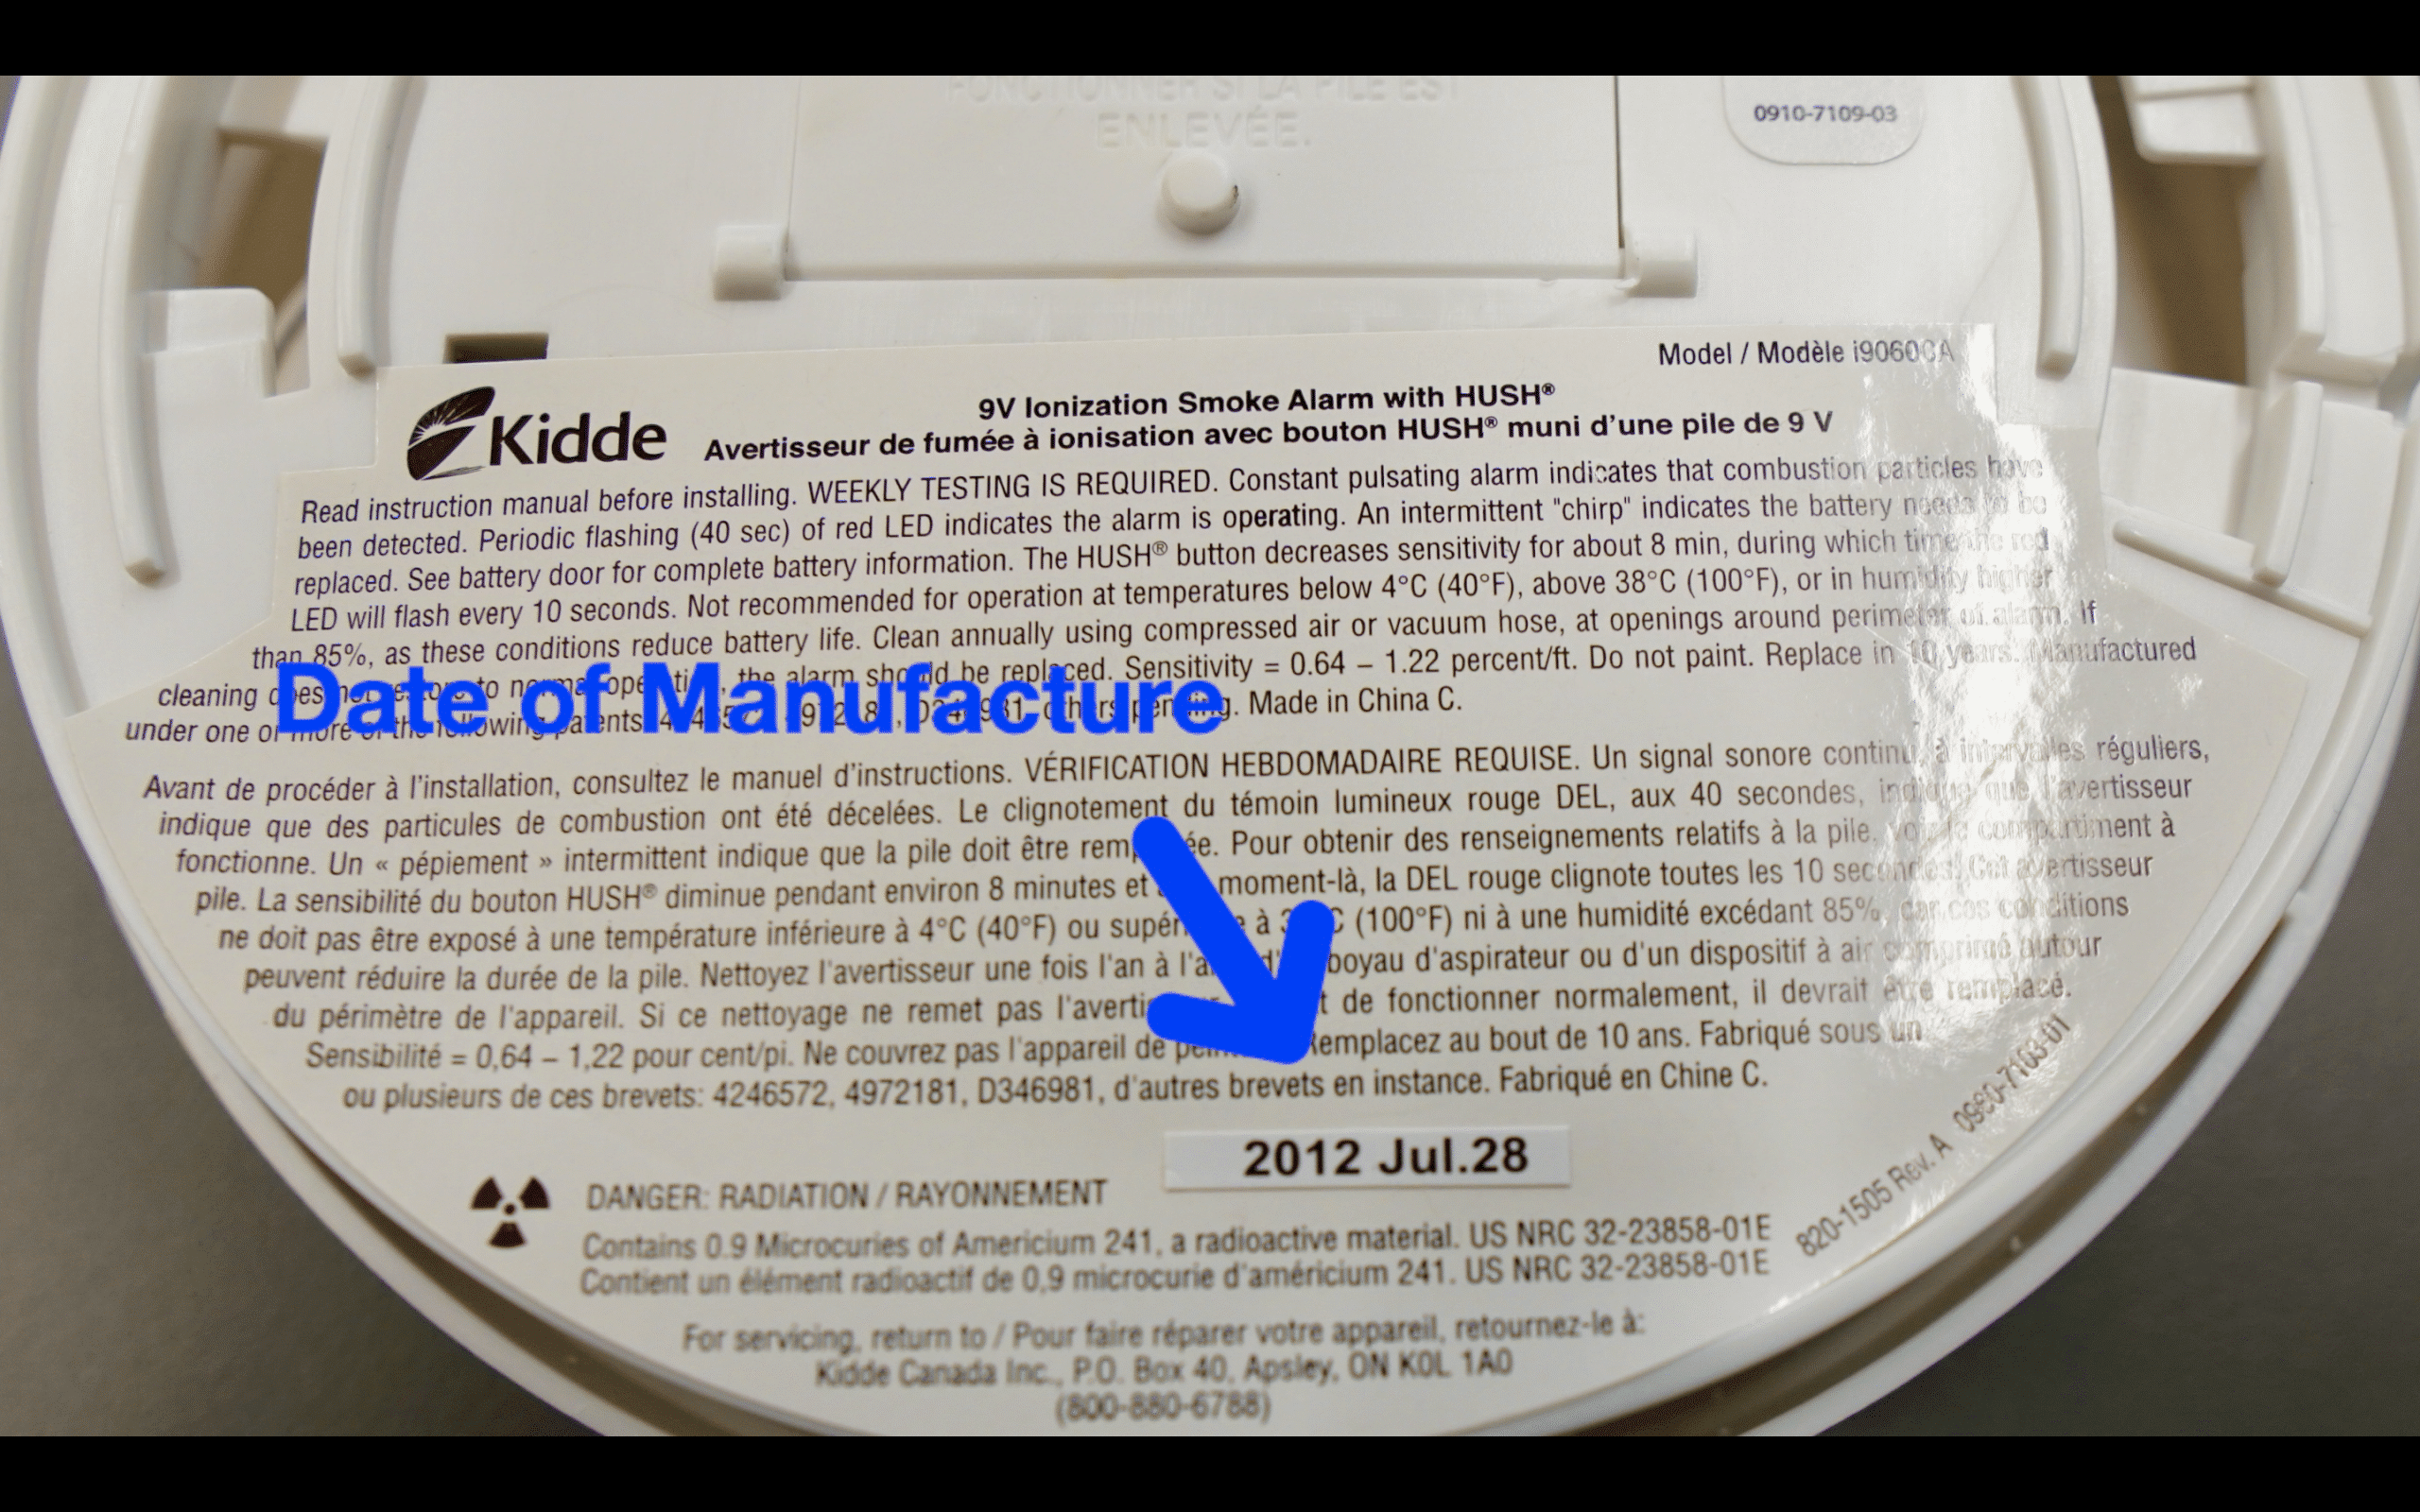
Every First Alert smoke detector has a manufacture date on the back. Replace the entire unit after 10 years, regardless of condition. Sensors degrade over time, and older units may not respond reliably in an emergency.
Mark Replacement Dates
Write the replacement date on the unit with a permanent marker or use a sticker. This makes it easy to identify outdated detectors during routine checks.
Troubleshoot Common Detector Issues
No Alarm During Testing
If pressing the test button produces no sound:
• Check battery orientation and replace if weak
• Reseat the unit on the mounting plate
• Ensure the battery cover is fully closed
• For hardwired units, verify power is on and connections are tight
Frequent False Alarms
False alarms are usually caused by:
• Steam or cooking fumes (move detector farther from kitchen or bathroom)
• Dust buildup (clean with vacuum)
• Insects in the chamber (cover during renovations)
• Improper placement near vents or fans
Relocate or clean the unit to resolve the issue.
Chirping After Battery Replacement
If chirping continues after a new battery:
• Ensure the battery is fully seated
• Press and hold the test button for 5 seconds to reset
• Check for AC power issues on combo models
• Verify the unit isn’t past its 10-year lifespan
Hardwired Detector Not Powering On
If the unit shows no signs of life:
• Confirm the circuit breaker is on
• Check wire connections at both the detector and junction box
• Test voltage at the wires
• If all else fails, contact a licensed electrician
Avoid Common Installation Mistakes
Skipping the Third Screw
Most mounting plates have three screw holes. Using only two can cause the base to tilt or loosen over time. Always use the third screw for maximum stability, especially on ceilings.
Ignoring Local Fire Codes
Some areas require detectors in every bedroom, outside sleeping areas, and on every level, including basements. Check your local fire safety regulations before finalizing placement.
Installing in Prohibited Zones
Avoid garages, attics, and crawl spaces unless the model is rated for extreme temperatures. Standard detectors can malfunction in very hot or cold environments.
Know When to Call for Help
Contact First Alert Support
If you can’t resolve an issue on your own, reach out for assistance:
• Phone: 1-800-223-2230
• Email: support@firstalert.com
• Website: www.firstalert.com/support
They offer troubleshooting help, replacement parts, and model-specific guidance.
Hire an Electrician for Wiring
If you’re uncomfortable working with electrical wiring, hire a licensed electrician. Hardwired detectors are safer and more reliable, but only if installed correctly.
Frequently Asked Questions About Installing First Alert Smoke Detectors
How long does it take to install a First Alert smoke detector?
A battery-operated model takes about 5 to 10 minutes to install. You only need a screwdriver to mount the plate and snap the alarm in place. Hardwired models take longer, typically 20 to 30 minutes, because you must turn off power and connect wiring safely.
Where should I not install a smoke detector?
Avoid placing detectors near vents, ceiling fans, windows, kitchens, bathrooms, garages, and attics. Airflow, steam, cooking fumes, and extreme temperatures can cause false alarms or prevent the sensor from working properly.
How often should I test my First Alert smoke detector?
Test your detector once every month by pressing and holding the test button for 5 seconds. A loud beep confirms the unit is working. Monthly testing ensures your detector will function during an actual emergency.
Why does my smoke detector chirp even with a new battery?
Chirping after a battery replacement usually means the unit needs to be reset. Press and hold the test button for 5 seconds to clear the low-battery memory. If chirping continues, check that the battery is fully seated and confirm the unit isn’t older than 10 years.
Do I need an electrician to install a hardwired First Alert detector?
If you’re comfortable working with electrical wiring and follow safety precautions, you can install it yourself. However, hiring a licensed electrician is recommended if you’re unsure about wiring connections or local electrical codes.
When should I replace the entire smoke detector unit?
Replace the entire unit every 10 years from the manufacture date printed on the back. Sensors degrade over time, and older detectors may not respond reliably. Mark the replacement date on the unit so you know when it’s time for a new one.
Key Takeaways for Installing Your First Alert Smoke Detector
Installing a First Alert smoke detector is a quick, essential task that protects your home and loved ones. Battery models are DIY-friendly and require only a screwdriver, while hardwired units offer added reliability but need electrical care. Always test monthly, replace batteries yearly, and retire the unit after 10 years. Proper placement, away from kitchens, bathrooms, and airflow sources, is critical for early detection. Start today by choosing the right location and gathering your tools.