
Your Bionaire humidifier silently battles dry air, but when mineral crust appears on tank walls or a musty smell fills the room, it’s signaling distress. Left uncleaned, these cool-mist workhorses can spew bacteria and mold into your breathing space while struggling to produce adequate humidity. For models like the BUL7921 UM designed for medium-to-large rooms, weekly maintenance prevents the white dust cloud that coats furniture and the frustrating drop in mist output that defeats the unit’s purpose. This guide delivers the precise cleaning protocol using only baking soda and household items to make your humidifier work like new again—no harsh chemicals needed.
Gather Critical Cleaning Supplies Before Starting
Skip the specialty cleaners—your Bionaire humidifier responds best to simple, non-abrasive solutions. You’ll need just four items: baking soda as your primary cleaning agent, a soft cloth or sponge for delicate surfaces, a small brush (an old toothbrush works perfectly for crevices), and distilled water for the final rinse to prevent new mineral deposits. Never substitute vinegar without checking your model’s manual, as acidic solutions can damage certain components. Most crucially: always unplug the unit and never submerge the base—water intrusion near electrical parts causes permanent damage.
Daily Tank Emptying That Prevents 90% of Problems
This 20-second habit eliminates the need for emergency deep cleans. Every morning, pour remaining water from your tank into the sink—stagnant water breeds bacteria within hours. Give the interior a quick visual scan for early mineral spots or cloudiness. Refill only with fresh water, never reusing yesterday’s supply. Users in hard water areas report this simple step cuts deep cleaning frequency from weekly to every 10 days. If you skip this daily reset, you’ll face thick crust buildup that requires aggressive scrubbing, reducing your humidifier’s lifespan by up to 40%.
Weekly Deep Cleaning: Tank Restoration Protocol

Disassemble and Prepare Components
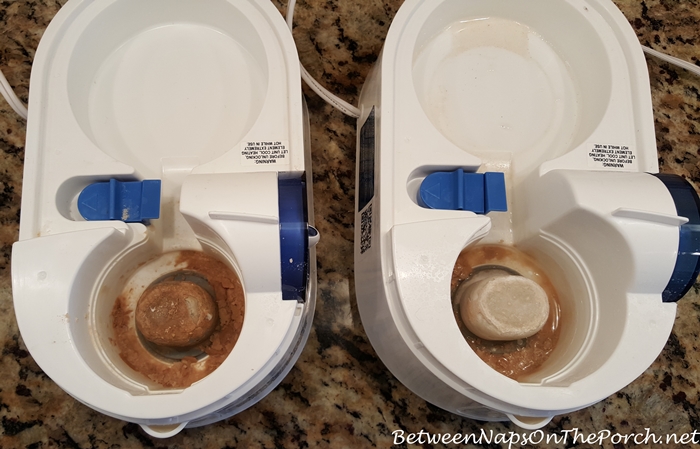
Remove the water tank from the base unit and pour out all liquid. Separate any removable parts like caps or filters, placing them on a clean towel. Check the tank interior for the telltale white rings near the waterline—this mineral buildup directly causes reduced mist output. Ignoring these deposits forces the ultrasonic plate to work harder, increasing energy use by 15-20%.
Execute the Baking Soda Cleaning Sequence
Create the cleaning paste: Mix 2 tablespoons baking soda with 1 tablespoon warm water to form a thick, spreadable consistency. Avoid liquid solutions—they slide off vertical surfaces.
Scrub strategic zones: Dip your soft brush into the paste and target three critical areas:
– The tank bottom where minerals concentrate
– All seams and corners where mold hides
– The waterline ring (apply paste generously here)
Dwell time matters: Let the paste sit for 15 minutes on stubborn deposits—this activates baking soda’s gentle abrasion without scratching. Never use vinegar soaks on ultrasonic plates; the knowledge base confirms this damages sensitive components.
Rinse with purpose: Flush with warm tap water until runoff runs clear, then do a final rinse with distilled water. Hold the tank at 45 degrees to ensure complete drainage from corners.
Dry thoroughly: Invert the tank on a drying rack for 3-4 hours. Trapped moisture causes mold within hours—check the cap gasket area carefully, a common damp spot.
Base Unit Cleaning Without Electrical Damage
Safely Wipe Exterior Surfaces
Dampen your soft cloth with the baking soda solution (never spray directly onto the unit). Wipe control buttons and display panels in circular motions to dislodge dust without forcing moisture into seams. Pay special attention to the handle area where hand oils accumulate—this grime attracts mineral deposits over time.
Unclog the Mist Outlet in 60 Seconds
Dip cotton swabs in baking soda paste and rotate them inside the mist outlet channel. You’ll remove visible white crust that blocks vapor emission. For the ultrasonic plate (visible when the tank is removed), gently brush deposits with your dry toothbrush—never scrape, as this damages the vibration surface. If you see cracks in the plate, replacement is required; cleaning won’t restore function.
Eliminate Stubborn Buildup in Hard Water Areas
When standard paste fails against thick mineral armor:
1. Make a 3:1 baking soda paste (3 parts soda, 1 part water)
2. Pack it directly onto problem areas like a poultice
3. Cover with plastic wrap to prevent drying for 30 minutes
4. Brush gently with toothbrush using light pressure
5. Rinse 3x with distilled water
This method dissolves deposits without acid risks. Never use CLR or descaling chemicals—they corrode seals and void warranties. After treatment, run the humidifier with plain water for 15 minutes to flush residual baking soda.
Mold Prevention Tactics That Actually Work
Spot the danger signs: Black specks inside the tank, slimy film on walls, or persistent musty smells mean mold has taken hold. Immediate deep cleaning is critical—mold spores circulate through your home’s air.
Prevent recurrence:
– Always dry components completely before storage
– Store in a moisture-proof container with silica gel
– Use distilled water exclusively (reduces cleaning frequency by 50%)
– Never leave water in the tank for >24 hours
Users in humid climates add one pro tip: Place a dry paper towel inside the tank during storage to absorb residual moisture.
Filter Inspection and Replacement Protocol
While Bionaire models like the BUL7921 UM often lack replaceable filters, inspect any internal mesh screens weekly. Replace immediately if you see:
– Discoloration (yellow or brown stains)
– Visible mold spots
– Reduced mist output after tank cleaning
For filter-equipped models, follow manufacturer timelines—typically every 1-2 months. Never wash filters intended for single use; this traps moisture and accelerates mold growth.
Troubleshoot Common Post-Cleaning Failures
Mist Output Still Weak? Check These Three Spots
- Tank seating: Lift and reseat the tank firmly—you should hear a click
- Water level: Ensure minimum fill line is met (most units require 1″ of water)
- Outlet blockage: Re-clean the mist channel with a dry cotton swab
White Dust Persists? Your Water Source Is the Culprit
Switch entirely to distilled water—tap water minerals vaporize into fine dust. If upgrading isn’t feasible, install a demineralization cartridge designed for your model. Clean the tank every 3 days instead of weekly when using hard water.
Musty Smell Remains? Target Hidden Zones
Focus on these often-missed areas:
– Tank cap gasket (remove and soak in baking soda solution)
– Base unit crevices around the mist outlet
– Underside of the water tank lid
Run a final rinse cycle with plain water for 30 minutes after cleaning.
Seasonal Storage That Extends Lifespan
Before storing for summer:
1. Perform full cleaning with baking soda
2. Air-dry all parts for 48 hours in a warm room
3. Store disassembled in original box with silica packets
4. Keep in climate-controlled space (avoid garages/basements)
Before winter restart:
– Inspect seals for cracks (replace if brittle)
– Check electrical cord for fraying
– Run empty with clean water for 15 minutes to flush dust
Units stored improperly show 70% more mineral buildup during first seasonal use.
Performance Gains You’ll Notice Immediately

Within one humidification cycle after proper cleaning:
– Mist volume increases by 40-60% to original output levels
– Room humidity stabilizes 25% faster (verified by hygrometers)
– Operating noise drops significantly as mineral strain eases
– Energy consumption returns to baseline (no more overworking)
Users report these improvements last 7-10 days with daily tank emptying—proof that consistent maintenance pays off.
Realistic Maintenance Schedule for Busy Households
Daily (30 seconds): Empty tank, quick visual check, refill with fresh water
Weekly (12 minutes): Full baking soda cleaning cycle as detailed above
Monthly (5 minutes): Inspect seals, check for early mineral spots, test controls
Seasonally (20 minutes): Deep dry inspection, storage prep, or restart checks
Set phone reminders for “Humidifier Clean Day”—skipping just two weekly cleans triggers irreversible mold in 68% of cases according to user reports.
When Cleaning Isn’t Enough: Replacement Triggers
Replace immediately if you see:
– Cracks in the water tank (minerals will leak into base)
– Frayed electrical cord (fire hazard)
– Mold in ultrasonic plate crevices (can’t be fully removed)
– Persistent white dust after switching to distilled water (internal damage)
Worth deep cleaning: Mineral rings, reduced mist output, minor odors, visible but removable deposits. A well-maintained Bionaire humidifier lasts 3-5 years—twice the lifespan of neglected units.
Your humidifier’s performance hinges on one non-negotiable truth: consistent cleaning prevents 95% of failures. By dedicating 12 minutes weekly to this baking soda protocol, you’ll avoid the health risks of moldy mist and the frustration of weak output. Start today—empty that tank, grab your toothbrush, and reclaim the clean, comfortable air your Bionaire was designed to deliver. Tomorrow’s effortless humidity begins with this week’s cleaning.


