
Dry indoor air steals your comfort, triggers allergies, and dries out your skin—especially during winter months. When your new Carepod humidifier arrives, proper setup transforms it from an unboxing puzzle into your personal comfort solution within minutes. Whether you chose the compact Carepod One for your bedroom, the premium Cube Plus for large spaces, or the portable Mini for travel, this guide delivers exact instructions from first power-on to daily operation. You’ll master water requirements that prevent damaging mineral buildup, placement tricks that eliminate annoying condensation, and maintenance routines that extend your white wand’s lifespan to years. Stop guessing what those blinking lights mean—let’s get your Carepod working perfectly today.
Assemble Your Carepod Without Leaks
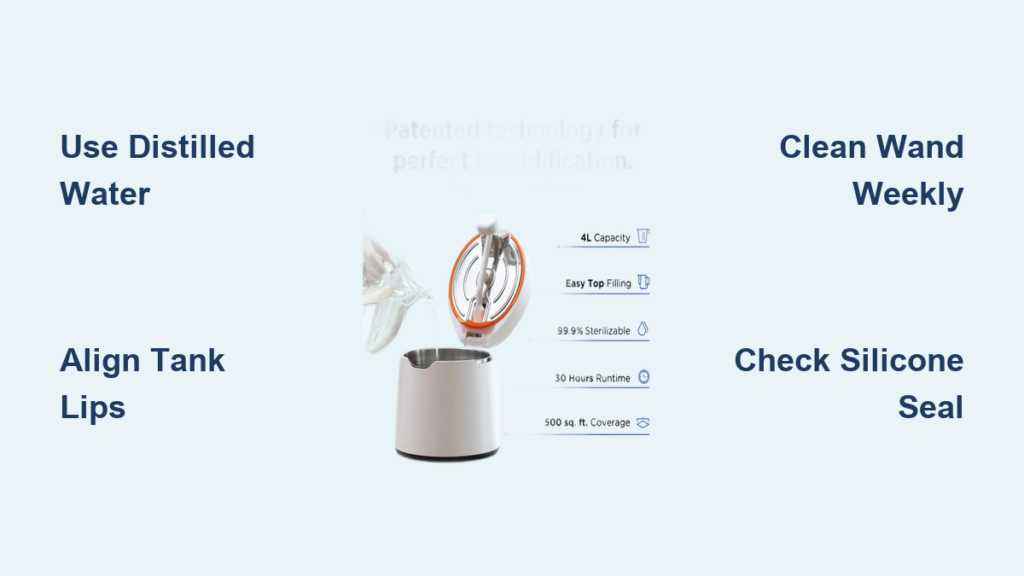
Align Tank and Body Lips Precisely
Water leakage always stems from misalignment. Slide the stainless steel water tank onto the main unit while visually matching the tank’s lip to the main body’s lip. You’ll feel subtle resistance when both lips click into their grooves. If water pools under your unit later, disassemble and repeat this step—never force the tank into position.
Secure the Inner Lid and Silicone Seal
Press the inner lid cover firmly into place using the white knob as your anchor point. Now run your finger around the entire silicone seal edge—any gap wider than a business card causes leaks. If you detect unevenness, lift the inner lid and reseat it in a clockwise motion until the seal sits uniformly flush. This watertight barrier is non-negotiable for safe operation.
Power Up and Verify Initial Function
First-Time Activation Sequence
Plug in your adapter while the unit sits on a dry surface. Blue display lights instantly illuminate confirming power connection—no manual startup required. Before adding water, perform this critical check:
– Gently shake the assembled unit
– Listen for sloshing (indicates seal failure)
– Inspect the base for dampness
If either test fails, disassemble and reseat the silicone seal. Proceed only when the unit feels completely dry and solid.
Fill with Correct Water to Prevent Damage

Why Distilled Water Is Non-Negotiable
Tap water’s minerals destroy your white wand within weeks. Geographic variations mean your local water might:
– Coat the wand in chalky deposits that block mist output
– Release white dust into your breathing space
– Trigger frequent error codes from sensor interference
Distilled or filtered water eliminates these issues while extending your wand’s life to 3+ years under normal use. This single choice saves you replacement costs and daily cleaning headaches.
Safe Filling Protocol
- Remove the tank and fill only to the MAX line etched inside (never above)
- Use room-temperature water—hot water warps stainless steel components
- Wipe exterior moisture before reassembly
- Discard unused water daily to prevent bacterial growth
Position for Optimal Mist Distribution
Eliminate Floor Condensation in 3 Steps
Place your Carepod minimum 24 inches above floor level on a stable surface like a nightstand or shelf. If water still pools beneath it:
1. Reduce mist intensity to Level 1 (Low) immediately
2. Move unit away from cold windows or AC vents
3. Ensure room temperature stays above 65°F (18°C)
This prevents wood warping or mold growth while maintaining healthy humidity levels between 30-50%.
Control Mist Output Like a Pro
Decode Your Control Panel Buttons
Your Carepod’s buttons adjust two critical functions:
– Left button: Cycles through 3 mist intensity levels
– Level 1: Ideal for bedrooms (silent operation)
– Level 2: Standard living spaces
– Level 3: Quick humidity boost for dry climates
– Right button: Sets 4/6/8-hour timers matching your schedule
Pro Tip: Run Level 1 for 4 hours in bedrooms overnight—this maintains comfort without over-humidifying.
Activate Night Mode on Plus Models
Only for Carepod One Plus/Cube Plus:
1. Tap and hold any button for 2 seconds
2. Watch display lights fade to complete darkness
3. Confirm by hearing the alert beep (lights remain off)
This preserves sleep quality in light-sensitive environments. Reactivate normal mode by pressing any button—the unit remembers your settings.
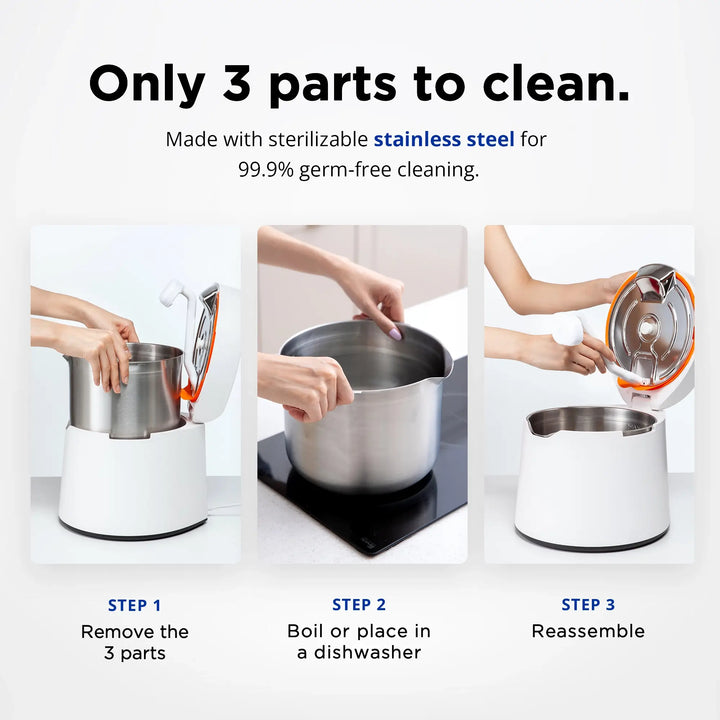
Clean Components Without Causing Damage
Daily Tank and Lid Routine
After emptying yesterday’s water:
– Rinse the stainless steel tank with cool water
– Wipe the inner lid cover with a microfiber cloth
– Never immerse the white wand’s top half—only clean its lower section
Critical Warning: Submerging the wand’s connection point causes permanent electrical damage. Dry all parts thoroughly before reassembly.
Weekly Deep Cleaning Against Mineral Buildup
- Hand-wash the tank and lid with mild dish soap
- Scrub the wand’s bottom half with a soft toothbrush
- For stubborn deposits: Dip wand base in boiling water for 1-2 seconds max
- Air-dry all components for 2 hours before reuse
Spot Identification: Pink or brown wand discoloration signals mineral buildup—switch to distilled water immediately.
Fix Cube Plus Sanitization Cycle Errors
Manually Trigger Thermal Cleaning
If the Cube Plus fails to auto-sanitize:
1. Press and hold the Heater button until it beeps (5+ seconds)
2. Left LED turns solid white = confirmation
3. Right LED blinks red = cycle scheduled
4. Wait for water level to drop before activation
Safety Alert: Water reaches 167°F (75°C) during sanitization—never open the tank mid-cycle.
Troubleshoot 3 Top Carepod Failures

Stop Water Leakage in Under 60 Seconds
Leaking always traces to one misaligned component:
1. Tank lip: Re-seat while aligning manufacturing marks
2. Inner lid: Push down firmly at 12/3/6/9 o’clock positions
3. Silicone seal: Check for hair or dust trapped under the rim
Reassemble in this exact order: tank → seal → inner lid → wand.
Decode Dripping Sounds
Normal operation: A gentle plink-plink from condensation dripping off the inner lid into the tank. This confirms proper humidity collection—no action needed. If sounds become loud splashes, reduce mist intensity immediately.
Restore Weak Mist Output
When vapor production drops:
– Clean the white wand with vinegar-soaked cloth (bottom half only)
– Verify water is filled to MAX line
– Switch to distilled water if using tap water
– Check for obstructions around the mist outlet
Maximize Wand Lifespan with Daily Habits
4 Rules for 2+ Year Wand Performance
- Water discipline: Distilled water only—no exceptions
- Gentle handling: Never yank the wand during cleaning
- Storage: Keep in original box when traveling
- Cleaning rhythm: Wipe weekly even with filtered water
Warranty Insight: The white wand carries a 2-year manufacturer’s warranty—but only if you use distilled water and register online.
Register Warranty and Access Support
Activate Coverage Before First Use
Visit Carepod’s website with your order number to:
– Unlock the full 2-year wand warranty
– Schedule sanitization reminders via their app
– Download replacement part diagrams
Critical Deadline: Registration must occur within 30 days of purchase.
Get Instant Help for Persistent Issues
Contact Carepod’s support team when:
– Leaks continue after reassembly
– Display shows error codes (e.g., rapid red blinking)
– Sanitization cycle fails on Cube Plus models
Direct Lifelines:
– Phone: 1-800-227-3663 (8 AM–8 PM EST)
– Live Chat: Via Carepod mobile app
– Email: support@carepod.com (response within 24 hours)
Final Note: Your Carepod humidifier delivers hospital-grade air quality when operated correctly—distilled water and weekly cleaning are your non-negotiable foundations. Remember that condensation means your mist intensity is too high for the room size, while weak output signals mineral buildup needing immediate wand cleaning. Register your warranty today, and you’ll enjoy silent, reliable comfort for years. For Cube Plus owners: manually schedule sanitization monthly to maintain peak performance. Now take that deep, comfortable breath you deserve.


