

Your humidifier has stopped misting, and you know cleaning is needed—but that seamless plastic shell seems impossible to crack open. You’re not alone; millions of frustrated users each year struggle to access the inner components of their humidifiers without causing damage. The wrong technique can crack plastic housings, void warranties, or even create electrical hazards that turn a simple cleaning into a costly replacement.
Knowing exactly how to open a humidifier correctly separates those who extend their device’s lifespan from those who buy new units annually. This guide delivers precise opening instructions for every major humidifier type, including specific pressure points, hidden latches, and safety-critical waiting periods you won’t find in generic manuals. You’ll gain confidence to access filters, clean mineral buildup, and perform maintenance while avoiding the top 5 mistakes that ruin 30% of DIY repair attempts.
Identify Your Humidifier Type Before Opening
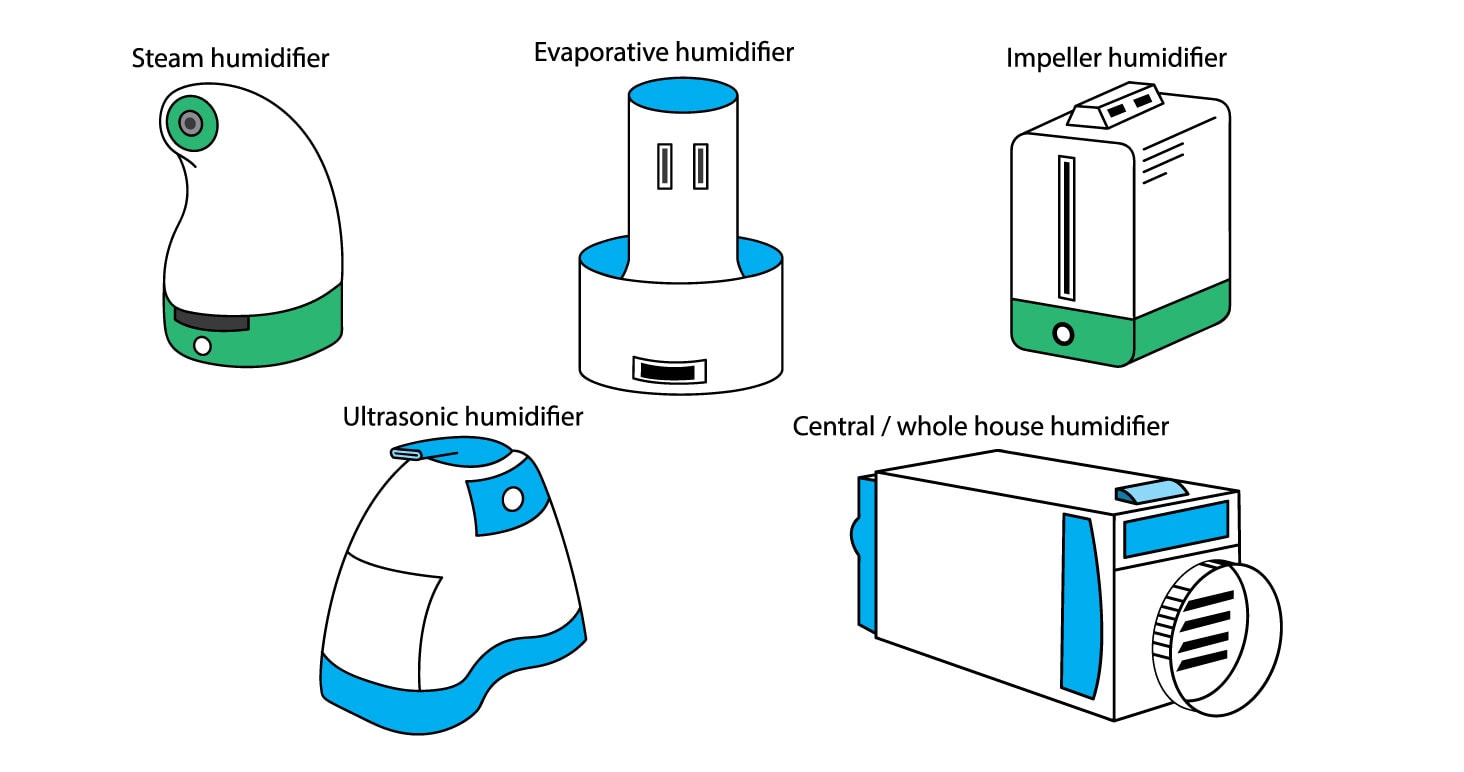
Ultrasonic Models Access Points
Your top water tank and base unit panel require different opening techniques than other humidifier types. These models use twist-lock tabs or snap-fit lids that need precise pressure application—forcing them causes hairline cracks that lead to leaks. Premium models like Dyson feature magnetic closures requiring simultaneous button presses to release the loop amplifier.
Hidden compartments often contain essential oil trays beneath the main tank that slide out separately. Check for small indentations along the tank’s rim indicating secondary access points. Never pry around the entire circumference—most units have specific release zones that require targeted pressure.
Evaporative System Entry
Filter housing doors dominate evaporative designs with side-release buttons or front-loading panels that swing open like cabinet doors. The wick filter slides out on rails after opening the filter door—never force it as mineral buildup creates resistance that feels like a lock mechanism but requires soaking instead.
Top-lift tanks simply pull straight up after releasing side latches. Some models like the Honeywell HCM-350 have dual-stage access—first removing the tank, then lifting the base reservoir for deep cleaning. Always check for float valves that pop out separately for descaling.
Steam Vaporizer Safety Protocols
Steam chamber caps require heat-resistant handling due to residual temperatures exceeding 212°F. These units use safety-lock mechanisms preventing opening during operation—never bypass these as scalding steam could erupt. Pressure-release valves must vent completely before attempting access.
Critical timing is non-negotiable—wait 2+ hours after use before touching steam models. Test base temperature with your knuckles (more heat-sensitive than fingertips); if warm, wait another 30 minutes. Never submerge the base unit in water as electrical components remain active even when unplugged.
Honeywell Opening Sequences
HCM-350 Quick Access
Empty the tank completely before starting. Press both tank release buttons simultaneously—these sit flush against the tank sides and require firm thumb pressure. Lift straight up—the tank uses guide rails that prevent tilting. The base reservoir lifts out for cleaning without tools once the tank is removed.
Pro tip: The antimicrobial tank has a secondary float valve that pops out for cleaning—gently pry up from the front edge using a plastic spudger. Never use metal tools as they scratch surfaces where bacteria can hide.
HUL535 Twist Method
Twist the entire water tank counterclockwise 1/4 turn—you’ll feel resistance at the detent position before it releases. Lift straight up without tilting. The tank cap twists off separately for deep cleaning. Four bottom screws grant base access on HEV320 variants—these hide beneath rubber feet that pry out easily with a fingernail.
Vicks Model Procedures

V745A Medicine Cup First
Lift the small medicine cup straight up—it sits atop the main tank and often gets overlooked. This reveals the primary water tank which lifts up after pressing the release tabs on both sides. The base heating chamber unscrews counterclockwise for mineral removal—turn slowly to avoid cross-threading.
Warning: The V745A base contains electrical heating elements—never submerge the base unit in water. Wipe with a damp cloth only, ensuring all ports are dry before reassembly.
V4600 Side Release System
Press the release tabs on both tank sides while lifting with steady upward pressure. The tank slides up on angled rails—maintain upward force until completely clear of the base. Bottom panel access requires removing six screws—the panel lifts off revealing the wick filter housing.
Levoit Modern Designs
LV600HH Slide-and-Lift
Power down completely before starting. Press the tank release buttons (large rectangular buttons below the tank). Slide the tank forward 1 inch—this disengages the rear locking tabs that prevent accidental removal. Lift straight up without tilting. The bottom panel removes with four Phillips screws—rubber feet conceal screw heads.
Classic 300S Top Removal
This model simplifies access—the entire top section lifts straight up as one piece with no buttons or latches required. The water tank remains in the base; simply lift it out for filling or cleaning. Filter access requires removing the side panel using the thumb tab—pull outward while lifting slightly.
Universal Safety Rules
Electrical Disconnection Protocol
Unplug immediately—never rely on power buttons alone as capacitors maintain charge. Wait 30 minutes for ultrasonic/cool mist models before opening. Wait 2+ hours for steam/warm mist units—internal components stay dangerously hot. Dry your hands before touching any components as moisture conducts electricity.
Hidden power hazards exist in smart models—some maintain Bluetooth connectivity even when “off.” Check your manual for complete power-down procedures before opening connected humidifiers.
Water Management
Empty completely—residual water creates weight that stresses plastic components during removal. Place towels around the unit—hidden reservoirs often contain 1-2 cups of water that spill when opened. Check water level sensors—these float mechanisms break if tanks are removed while full.
Stuck Unit Solutions
Mineral Buildup Release
White vinegar soak: Apply vinegar-soaked cloths to connection points for 30 minutes to dissolve calcium deposits. Gentle twisting: Combine vinegar application with back-and-forth rocking motion—never force beyond light resistance. Rubber grip pads: Improve leverage when plastic becomes slippery from cleaning solutions.
Prevention: Monthly vinegar cleaning prevents future seizure—run a 1:1 vinegar-water solution for 30 minutes monthly.
Over-Tightening Recovery
Warm water expansion: Run warm (not hot) water over plastic threads—expansion creates clearance without damaging components. Rubber strap wrenches: Provide grip without marring plastic surfaces. Sequence correction: Some caps require partial counterclockwise turn, then clockwise reset, then final removal to realign threads.
Troubleshooting Common Opening Failures
Tank Won’t Release
Hidden button check: Look for flush-mounted buttons that require precise finger placement—some need thumb and forefinger simultaneously. Rails obstruction: Mineral buildup on guide rails prevents smooth movement—clean with vinegar-soaked cotton swabs. Lock override: Some models require simultaneous button presses while lifting at specific angle.
Cap Cross-Threading Fix
Reverse threading: Apply gentle counterclockwise pressure while rocking cap back and forth to free seized threads. Thread inspection: Check for plastic burrs—remove with fine nail file using light strokes. Lubrication: Apply food-grade silicone to threads—never use petroleum products in humidifiers as they degrade plastic.
Reassembly Without Leaks
Component Alignment Checklist
Gasket seating: Ensure all rubber seals sit flush—twisted gaskets cause leaks that damage floors. Directional markers: Align all arrows and alignment dots before securing—reversed installation reduces efficiency by 40%. Float valve freedom: Verify float moves up and down smoothly before replacing tank. Electrical connections: Check all plug connections before closing panels.
Final Validation Steps
Opening mechanism test: Verify all latches and buttons function after reassembly. Leak check: Fill tank, check connection points for seepage over 10 minutes. Safety lock engagement: Confirm child safety locks click into place. Test cycle: Run for 5 minutes—strange noises indicate misalignment requiring disassembly.
Quick Reference Chart
| Brand | Model | Tank Release | Base Access | Special Notes |
|---|---|---|---|---|
| Honeywell | HCM-350 | Side buttons | Bottom screws | Antimicrobial tank |
| Vicks | V745A | Lift straight up | Not user accessible | Separate medicine cup |
| Levoit | LV600HH | Slide then lift | 4 bottom screws | Warm/cool mist |
| Crane | Drop | Twist base 45° | Not user accessible | Dishwasher safe |
| Dyson | AM10 | Side buttons | Twist-lock grille | Heavy loop assembly |
Opening your humidifier correctly prevents damage and maintains warranty coverage. When in doubt, consult your model-specific manual—manufacturers often publish detailed PDF guides online. For sealed units or electrical issues, contact customer support rather than forcing access. Proper technique extends your humidifier’s life by 2-3 years while ensuring clean, healthy mist output.


