
Waking up with a sandpaper throat and itchy sinuses isn’t just uncomfortable—it’s a sign your home’s humidity has dropped below the healthy 30-50% range. If your current humidifier runs constantly yet leaves your skin cracking and wooden furniture warping, you’ve likely chosen the wrong type for your specific space. The right humidifier transforms your home from a desert into a comfortable sanctuary, but selecting one requires more than just matching tank size to room dimensions. This guide reveals exactly how to choose a humidifier that solves your unique dry air problems without wasting money on unnecessary features.
Identify Your Humidity Problem Before Buying
Pinpoint Your Specific Dry Air Symptoms
Your symptoms dictate the humidifier type you need. If you’re constantly clearing your throat or noticing static shocks when touching doorknobs, cool mist ultrasonic models provide immediate relief without adding heat. For persistent nighttime congestion during cold season, warm mist units deliver therapeutic steam that loosens mucus while killing airborne bacteria through their boiling process.
Critical symptom matching:
– Cracked lips/skin: Requires consistent output (evaporative or ultrasonic)
– Wooden floor gaps: Needs precise humidity control (ultrasonic with hygrometer)
– Nasal congestion: Demands warm therapeutic steam (warm mist only)
– Pet respiratory issues: Requires quiet operation (ultrasonic under 30 dB)
Determine Your Primary Usage Location
Bedrooms demand near-silent operation below 35 decibels—ultrasonic models excel here since they lack fans. For nurseries, prioritize cool mist safety to eliminate burn risks from hot water. Large living areas with open floor plans need evaporative humidifiers that self-regulate output to prevent window condensation. Never place warm mist units in already-heated rooms as they’ll over-humidify and create moisture damage.
Location-specific solutions:
– Bedrooms: Ultrasonic with nightlight mode
– Nurseries: Cool mist with no heating elements
– Basements: Evaporative to combat dampness
– Home offices: Small cool mist with directional nozzle
Calculate Exact Gallon Capacity for Your Bedroom Size
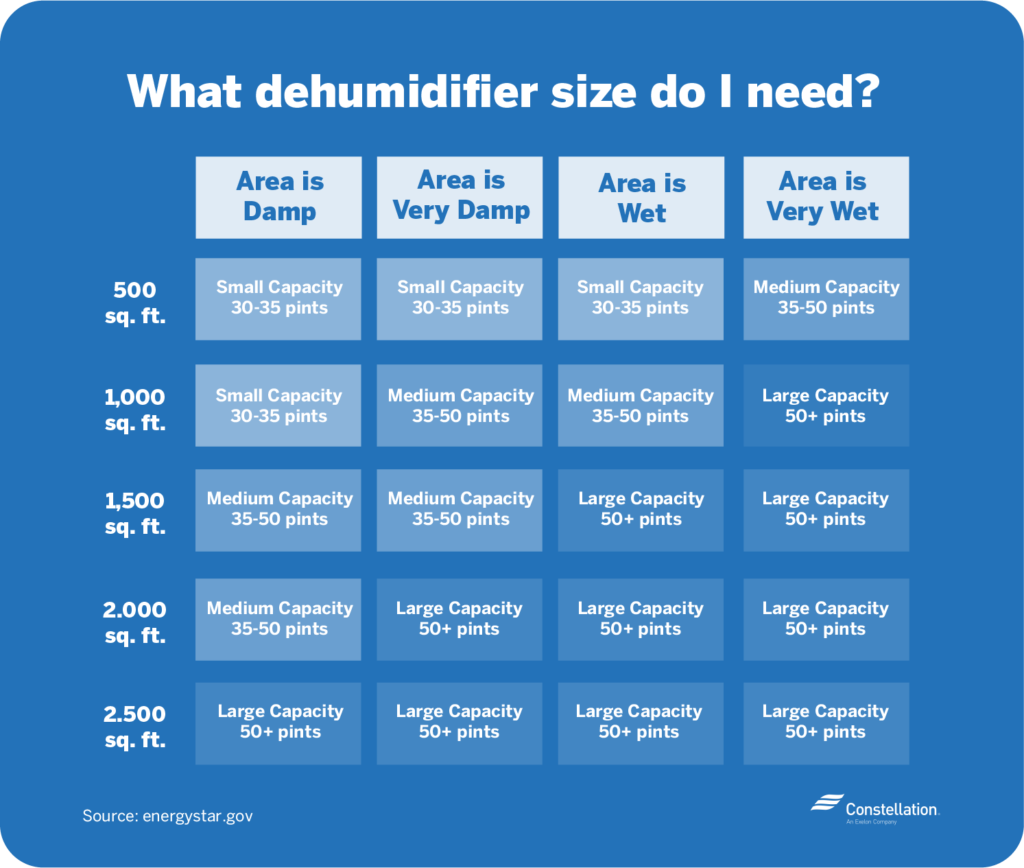
Measure Square Footage Like a Pro
Grab your tape measure—guessing room size wastes money. Multiply length by width, then add 25% for vaulted ceilings or open-concept spaces. A 12×15 ft bedroom (180 sq ft) with 10-foot ceilings needs capacity for 225 sq ft. Undersized humidifiers run nonstop without reaching target humidity, while oversized models create condensation that ruins walls and furniture.
Tank capacity cheat sheet:
– 100-300 sq ft: 1-gallon tank (lasts 12-24 hours overnight)
– 300-500 sq ft: 1.5-2 gallon tank (covers full workday)
– 500-800 sq ft: 2.5-3 gallon tank (avoids 3am refills)
– 800+ sq ft: 4+ gallon console unit (whole-room coverage)
Match Output to Your Climate Zone
Dry desert climates like Arizona need higher output (3+ gallons/day) than humid coastal areas. If your home stays below 30% humidity in winter, prioritize evaporative or ultrasonic models with 2.5+ gallon/day output. For allergy sufferers in pollen-heavy regions, warm mist units provide dual benefits of humidity and germ reduction through boiling.
Climate-based output guide:
– Arid Southwest: 3.5+ gallons/day for 500 sq ft
– Cold Northeast: Warm mist 2.0 gallons/day
– Humid Southeast: Evaporative with auto-shutoff
– Variable Midwest: Ultrasonic with adjustable mist
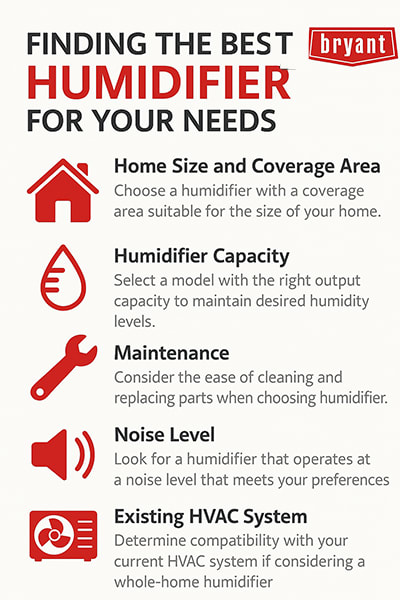
Prioritize Maintenance-Friendly Features
:max_bytes(150000):strip_icc()/humidifiers-ultrasonic-vs-evaporative-humidifiers-1908160-final-5c93ceaa4cedfd0001f1695a.png)
Avoid Hidden Filter Costs That Drain Your Budget
That $50 humidifier could cost $200 annually in proprietary filters. Evaporative models require monthly wick replacements ($8-$15 each), while ultrasonic units with washable filters save hundreds yearly. Check Amazon for filter prices before purchasing—some brands charge $30 for a single filter.
Budget-smart filter strategies:
– Choose ultrasonic models with dishwasher-safe tanks
– Verify universal filter compatibility (e.g., “F712” fits multiple brands)
– Skip “antimicrobial” filters—they’re marketing gimmicks
– Calculate 3-year filter costs before buying
Demand Realistic Runtime Estimates
Manufacturers exaggerate runtime by testing at lowest mist setting. A “24-hour” 2-gallon tank actually lasts 14 hours on medium output. For uninterrupted sleep, require 10+ hours runtime at your preferred setting. Models with water level indicators prevent 3am refills—critical for light sleepers.
True runtime indicators:
– Tank capacity ÷ (gallons/hour at medium setting) = actual runtime
– Look for “all-night mode” specifications
– Check user reviews for “runtime” complaints
– Avoid units needing refills during 8-hour sleep cycles
Skip These Costly Humidifier Selection Mistakes
Never Buy Based Solely on Tank Size
A giant 4-gallon tank means nothing if the output can’t humidify your space. An evaporative humidifier with a 1.5-gallon tank often outperforms ultrasonic models with larger tanks in rooms over 400 sq ft due to self-regulating output. Always cross-reference tank size with moisture output (gallons per day).
Output vs. tank size reality check:
– 500 sq ft room needs 2.5+ gallons/day output
– 2-gallon tank running 12 hours = 0.17 gallons/hour output
– Verify output matches room requirements (not just tank volume)
Avoid Tap Water in Ultrasonic Models
Using tap water creates white mineral dust that coats furniture and damages lungs. Ultrasonic humidifiers require distilled or filtered water—a hidden ongoing cost many overlook. Evaporative and warm mist models handle tap water safely since minerals stay trapped in wicks or boiled away.
Water type requirements by model:
– Ultrasonic: Distilled water only (prevents white dust)
– Warm mist: Tap water acceptable (minerals settle in tank)
– Evaporative: Tap water with monthly descaling
– Cool mist: Filtered water extends wick life
Optimize Placement and Operation Immediately
Position for Maximum Airflow Without Damage
Place humidifiers 3-4 feet from walls on waterproof surfaces—never directly on wood floors. Elevate units 2-3 feet using a stool to improve mist distribution. Keep at least 6 feet from electronics to prevent moisture damage. For whole-room coverage, position near your bed’s headboard rather than tucked in a corner.
Placement disaster zones to avoid:
– Against curtains (causes mold growth)
– Near heating vents (dries mist prematurely)
– On carpet (traps moisture underneath)
– Under ceiling fans (disperses mist unevenly)
Establish Your First-Week Break-In Routine
Your humidifier’s first 7 days determine its lifespan. On day one, run a vinegar solution cycle to neutralize manufacturing residues. For days 2-3, operate at 30% output to identify leaks. By day 4, calibrate with a separate hygrometer—most built-in sensors are inaccurate. Never skip the vinegar cleaning cycle; mineral buildup starts within 48 hours.
Critical first-week checklist:
1. Sanitize all water-contact parts with 1:1 vinegar/water
2. Test lowest mist setting for 2 hours
3. Verify no leaks at base or tank connections
4. Cross-check humidity reading with external hygrometer
5. Run full cycle with distilled water only
Your Key Takeaway: Choosing the right humidifier starts with diagnosing your specific dry air symptoms—not room size alone. An ultrasonic model solves throat irritation in bedrooms, while warm mist targets congestion in nurseries. Prioritize maintenance costs over upfront price, and always verify output capacity matches your square footage. Remember: the perfect humidifier runs quietly through your sleep cycle without creating window condensation.
Immediate Next Step: Grab a $10 hygrometer from Amazon today. Place it across the room from your current humidifier—most units falsely report humidity levels 15-20% higher than reality. This simple tool prevents over-humidification damage and verifies your new purchase actually solves your problem. Stop guessing—measure and fix your dry air crisis within 48 hours.


