A chirping CPI smoke detector is more than just an annoyance. It’s a warning signal that something needs attention. Whether you hear a single beep every 30 seconds or a persistent chirp at 2 a.m., that sound means your unit is trying to tell you something. Most often, a beeping CPI smoke detector signals a low battery, but the cause can also be dust buildup, electrical interference, or a unit past its lifespan. Ignoring the noise risks your safety, since a malfunctioning alarm may fail during a real fire. The good news is that in most cases, you can fix the issue in minutes with simple steps like replacing the battery, resetting the unit, or cleaning internal components.
This guide walks you through every possible cause and solution for CPI smoke detector beeping. You’ll learn how to identify the exact problem, apply the right fix, and prevent future chirping. Each section builds on the last, so follow the steps in order for the fastest results.
Replace the Battery First
Confirm It’s a Low Battery Chirp
A single chirp every 30 to 60 seconds is the universal sign of a weak battery. CPI detectors use this pattern to alert you before total failure. Even hardwired units have a 9-volt backup battery, and they will chirp if that battery is dead. Don’t assume your detector is battery-free just because it’s wired into your home’s electrical system. If the chirping is rhythmic and consistent, start with a battery replacement.
Install a Fresh 9V Battery Correctly
- Flip open the battery compartment (usually on the side or bottom)
- Remove the old battery
- Insert a new 9-volt battery, matching the positive and negative terminals exactly
- Close the compartment and wait 60 seconds
Use a name-brand alkaline battery for best results. Cheap or expired batteries may not deliver full voltage. If the chirping continues after replacement, the issue may be a loose connection, corroded contacts, or stored fault memory in the unit.
Fix Post-Replacement Beeping
Even with a new battery, chirping can persist due to:
• Loose fit: Battery not seated fully in the compartment
• Corroded contacts: White or green crust on metal terminals
• Fault memory: The alarm remembers the low-battery state
Clean the contacts with a cotton swab and a small amount of baking soda solution if corrosion is visible. Then perform a full reset to clear stored error codes and force the unit to recheck its power status.
Reset Your CPI Smoke Detector
Reset Hardwired (AC) Units
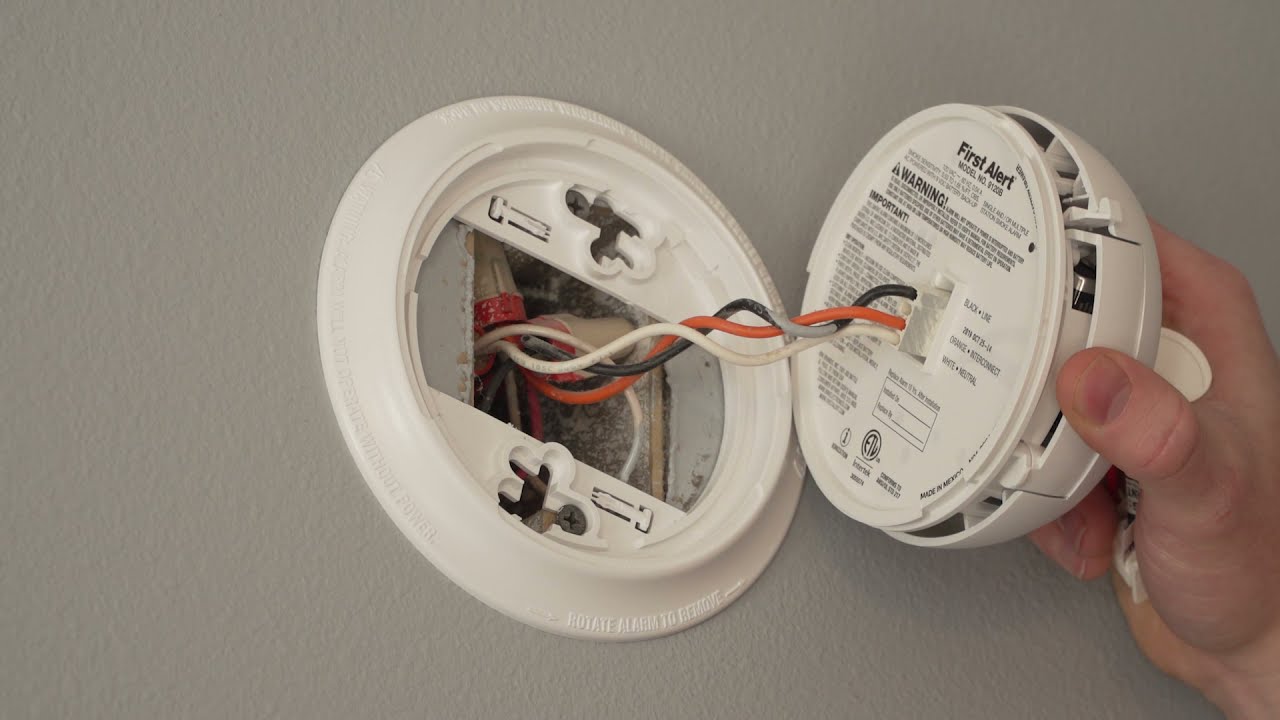
If your detector connects to household power, follow this complete reset procedure:
- Turn off power at the circuit breaker
- Unscrew the unit from the mounting bracket
- Disconnect the wiring harness (a small plastic plug)
- Remove the backup battery
- Press and hold the test button for 30 seconds
• You may hear a brief chirp or alarm, which is normal - Reconnect the battery, plug in the harness, and remount
- Restore power at the breaker
This drains residual power from internal capacitors and resets the processor. The unit may chirp once when powered back on but should stay silent afterward.
Reset Battery-Only (DC) Units
For standalone battery-powered detectors:
- Remove the battery
- Press and hold the test button for 15 to 30 seconds
- Reinsert the battery
Wait 60 seconds. If the chirping stops, the reset worked. If not, move to cleaning the unit.
Clean Dust and Debris
Why Dirt Causes False Chirping
Over time, dust, lint, and cooking particles clog the ionization chamber inside your detector. This sensor is what detects smoke, and when it’s dirty, it can trigger false alarms or intermittent beeping. Units in kitchens, hallways, or near vents are especially prone to buildup. Cleaning restores proper airflow and sensor function.
Safely Clean the Interior
- Remove the detector from the ceiling or wall
- Use a vacuum cleaner with a soft brush attachment to gently suction dust from vents and seams
• Alternative: Use compressed air, but hold the can upright and use short bursts to avoid moisture damage - For deep cleaning, press the three housing tabs (with a flathead screwdriver if needed) to open the cover
- Blow out or vacuum debris from the ionization chamber and sensor
- Reassemble and reinstall the unit
Avoid touching internal circuits with your fingers. Never wash the unit or use liquid cleaners, as moisture can damage sensitive components.
Check Battery Contacts
Poor contact equals false low-battery signals. Inspect the metal terminals and ask yourself:
• Are they bent or compressed inward?
• Is there visible corrosion (white or green residue)?
Gently bend the terminals outward for a better grip. Clean any corrosion with a cotton swab dipped in vinegar or baking soda paste. Let everything dry completely before reinserting the battery.
Check for Environmental Triggers
Stop Steam and Humidity Beeping
High humidity, shower steam, or cooking vapor can set off ionization sensors. If chirping happens after these activities:
• Taking a hot shower
• Boiling water
• Running the dishwasher
You may need to relocate the detector. Install it at least 10 feet from bathrooms and kitchens. Consider switching to a photoelectric model, which is less sensitive to steam and cooking fumes.
Eliminate Electrical Interference
If chirping occurs when specific appliances run, you may have electrical noise or power surges. Common culprits include:
• The furnace kicking on
• A garage door opener running
• Other appliances cycling on the same circuit
Try moving suspect devices to a different circuit or installing a surge protector. If the pattern repeats daily, consult an electrician. Daily chirping at the same time can indicate utility grid switching, which requires professional attention.
Test Unit Age and Lifespan
Find the Manufacture Date
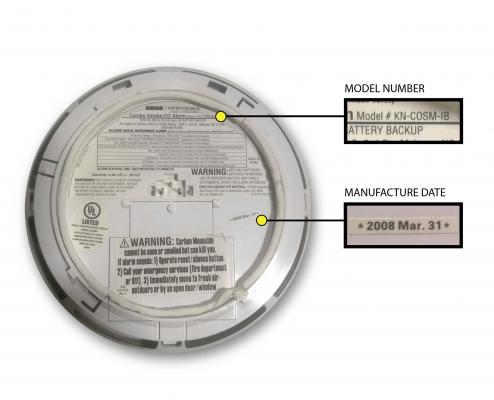
Flip the detector over and look for a date code or label on the back. CPI and most brands recommend replacement every 10 years for smoke alarms and 7 years for combination smoke and CO units. If your unit is older than 10 years, replace it immediately. Even with a fresh battery, aging sensors and electronics fail silently, creating a serious safety risk.
Recognize End-of-Life Signals
CPI detectors may chirp continuously when nearing end-of-life. Watch for these warning signs:
• Frequent false alarms
• Chirping that continues after battery replacement and reset
• Faded or cracked casing
• “Check” or “Replace” message on digital models
Don’t waste time troubleshooting an expired unit. Replace the entire detector to restore reliable protection.
Replace Faulty or Outdated Units
:max_bytes(150000):strip_icc()/install-hardwired-smoke-detectors-1152329-08-7adda3e3f25b408ca859f1f792f626e3.jpg)
Choose a Modern Replacement
Upgrade to a 10-year sealed battery model. These units offer several advantages:
• Never need battery changes during their lifespan
• Last the full 10-year period
• Auto-shut off at end-of-life
• Reduce maintenance and false chirps
Look for additional features like a hush or silence button for temporary quiet during false alarms, interconnect capability if you’re replacing multiple units, and photoelectric sensors for fewer cooking-related false alarms.
Install the New Detector
- Turn off power at the breaker (for hardwired units)
- Remove the old unit and disconnect the wiring harness
- Connect the new unit (match white to white and black to black for wired models)
- Snap it into the mounting bracket
- Insert the battery if required
- Test the unit by pressing the button
Replace all detectors at the same time. Mixing old and new models can cause communication issues and inconsistent performance.
Prevent Future Beeping
Follow a Maintenance Schedule
Stay on top of detector care with these regular tasks:
• Monthly: Test each detector by pressing the test button
• Every 6 months: Clean with a vacuum or compressed air
• Yearly: Check the battery and expiration date
• Every 10 years: Replace all smoke alarms
Set calendar reminders so you never miss these critical maintenance tasks. Treat detectors like the life-saving devices they are.
Avoid Common Mistakes
Steer clear of these frequent errors:
• Assuming hardwired units don’t need batteries
• Using rechargeable or expired batteries that don’t hold full voltage
• Ignoring chirps because you assume it’s just a battery issue
• Tilting compressed air cans, which can spray liquid and damage the unit
Stick to fresh alkaline 9V batteries and proper reset procedures for the best results.
Frequently Asked Questions About CPI Smoke Detector Beeping
Why does my CPI smoke detector beep every 30 seconds?
A chirp every 30 seconds usually indicates a low battery, but it can also signal dust buildup, end-of-life, or a faulty unit. Start by replacing the battery. If chirping continues, clean the interior, check the unit’s age, and perform a full reset.
How do I stop a hardwired CPI smoke detector from chirping?
Hardwired units have a 9-volt backup battery that often causes chirping. Turn off power at the breaker, remove the unit, disconnect the wiring harness, take out the battery, and hold the test button for 30 seconds. Then reconnect everything and restore power.
Can dust make a smoke detector beep?
Yes. Dust, lint, and cooking particles clog the ionization chamber and trigger false alarms or chirping. Clean the unit with a vacuum brush attachment or compressed air every six months to prevent buildup.
How long do CPI smoke detectors last?
Standard smoke alarms should be replaced every 10 years. Combination smoke and carbon monoxide units last 5 to 7 years. Check the manufacture date on the back of your unit to determine its age.
Will a new battery stop the beeping immediately?
In most cases, yes. Insert the battery correctly, close the compartment, and wait 60 seconds. If chirping continues, perform a full reset to clear any stored error codes.
When should I replace my CPI smoke detector instead of repairing it?
Replace the unit if it’s more than 10 years old, if chirping continues after battery replacement and reset, or if you see visible damage like cracks or fading. Old detectors can fail silently and put your family at risk.
Key Takeaways for Silencing Your CPI Smoke Detector
A beeping CPI smoke detector is fixable in most cases. Start with battery replacement, then move to a full reset, and finish with thorough cleaning. If chirping persists after all three steps, check the unit’s age and replace it if it’s over 10 years old.
Remember these critical points: never ignore the beep, always replace batteries in hardwired units too, and replace all detectors simultaneously when upgrading. If your unit is within warranty and problems continue, contact CPI Product Support at 1-800-880-6788 for assistance.
Your next step is simple. Grab a fresh 9-volt alkaline battery, follow the replacement and reset instructions above, and test your detector. If the chirping stops, you’ve solved the problem in minutes. If not, you’ll know exactly which step to take next.