

That faint rattling sound from your Vicks warm-mist humidifier isn’t normal operation—it’s mineral deposits cracking on your heating element. When hard water evaporates during use, calcium and other minerals solidify into a concrete-like crust that strangles your unit’s performance. Left untreated, this buildup forces your humidifier to work 40% harder while producing weaker steam, eventually leading to permanent damage. The solution? A simple vinegar soak that costs less than $2 and requires zero special tools.
This proven vinegar cleaning method dissolves even the toughest mineral deposits by leveraging acetic acid’s natural chelating properties. Unlike harsh chemical cleaners, vinegar safely breaks down crust without damaging sensitive components. By following these exact steps, you’ll restore full steam output to your Vicks humidifier in under 5 hours—no disassembly required beyond basic tank removal. Let’s rescue your unit from mineral suffocation.
Identify Critical Mineral Buildup Before Cleaning
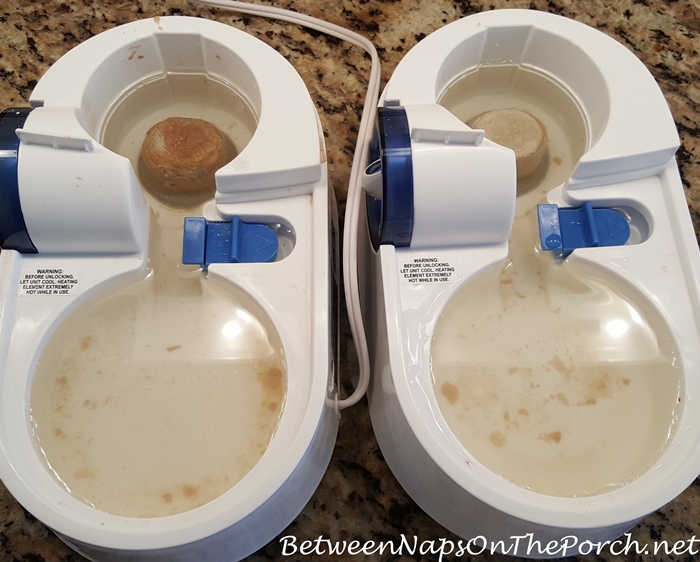
Don’t wait for complete failure—spot dangerous mineral accumulation early by checking two key indicators. First, remove your water tank and peer into the base unit. Look for hard, off-white crust completely encasing the coiled heating element, not just surface film. Second, test steam output: weak, intermittent mist or unusual sputtering sounds signal advanced buildup.
Critical warning signs:
– Steam output reduced by half compared to when new
– Visible white flakes in water tank after operation
– Heating element appears dull gray instead of metallic silver
– Unit shuts off prematurely during operation
Heavy users (8+ hours nightly) need cleaning every 3-4 weeks, while occasional users can stretch to 6-8 weeks. Ignoring buildup beyond 2 months risks permanent heating element damage requiring full replacement.
Essential Supplies for Effective Vinegar Cleaning
Gather these before starting:
– White vinegar (16 oz standard 5% acidity; cleaning vinegar 6% for extreme cases)
– Soup bowl (to angle base during soak—critical for component protection)
– Soft microfiber cloth (never use abrasive pads—they scratch heating elements)
– Small cup (for precise vinegar pouring)
Skip these dangerous “shortcuts”:
– ✘ Lemon juice (insufficient acidity)
– ✘ Baking soda (creates abrasive paste when mixed with vinegar)
– ✘ Metal scrubbers (cause irreversible pitting on heating coils)
Pro tip: Buy vinegar in bulk—it doubles as your monthly maintenance solution. Keep your supplies in the humidifier’s storage box so cleaning never gets delayed.
Prepare the Perfect Vinegar Solution for Your Model

Match solution strength to your buildup severity:
| Buildup Level | Vinegar Ratio | Soak Time |
|---|---|---|
| Light (monthly maintenance) | 1:1 vinegar to water | 2-3 hours |
| Moderate (visible crust) | Full-strength vinegar | 4-5 hours |
| Severe (knife-hard deposits) | Full-strength vinegar + replace after 3 hours | Overnight |
Why full-strength works best: Standard vinegar’s 5% acetic acid concentration creates immediate bubbling action that chemically dissolves calcium carbonate. The effervescence you see is carbon dioxide releasing as vinegar breaks mineral bonds—no scrubbing required. For Vicks models with the blue slide assembly (common in 2018+ units), always prop the base to protect the spring mechanism.
Execute the Vinegar Cleaning Process Step-by-Step
Unplug and Cool the Humidifier Completely
Wait at least 2 hours after last use before cleaning. Heating elements retain dangerous heat long after shutdown—test by placing your palm 2 inches above the base. If you feel warmth, wait longer. Remove the water tank and empty any residual water. Never handle internal components while the unit is warm.
Position for Maximum Vinegar Exposure
Here’s the pro technique Vicks technicians use:
1. Tilt the base upward at 30-degree angle
2. Slide a soup bowl under the lower edge to hold position
3. Pour vinegar slowly until heating element is submerged (about 1 cup)
4. Watch for instant bubbling—this confirms active mineral dissolution
This angled positioning pools vinegar over the heating coil while keeping it away from the blue slide assembly’s spring mechanism. Without this step, vinegar seeps into sensitive components causing corrosion.
Time Your Soak for Optimal Results
Set precise intervals based on buildup:
– 4 hours: Minimum for light crust—check for bubbling slowing
– Overnight (8+ hours): Required for knife-hard deposits
– Vinegar refresh: If bubbling stops after 3 hours, drain and add fresh vinegar
Never exceed 12 hours—prolonged exposure can degrade rubber seals. During soaking, you’ll hear faint crackling as deposits release. Heavy buildup may require two cycles: first soak overnight, then repeat after brushing loosened debris.
Rinse Away Residue Without Damage
After soaking:
1. Empty vinegar carefully (wear gloves—acetic acid stings cuts)
2. Gently wipe heating element with microfiber cloth—never scrub
3. Rinse base 3x with cold water, swirling vigorously each time
4. Wipe tank and cap with vinegar solution, then rinse 2x
Critical step: Sniff the unit after final rinse. Any vinegar odor means insufficient rinsing—repeat until scent-free. Residual vinegar creates dangerous chlorine gas when heated with tap water minerals.
Verify Full Steam Restoration
Reassemble and test properly:
1. Fill tank with distilled water (prevents immediate re-buildup)
2. Place on stable surface away from walls
3. Run at highest setting for 10 minutes
4. Confirm consistent, opaque steam output
If steam remains weak, repeat the full-strength vinegar soak. Some units with years of neglect need two treatments 24 hours apart. Never operate with visible mineral deposits—this risks overheating and electrical failure.
Prevent Future Buildup With Smart Maintenance
Monthly cleaning schedule:
– Week 1: Full vinegar soak if using tap water
– Week 2: Quick tank wipe with vinegar-dampened cloth
– Week 3: Check heating element visibility through base
– Week 4: Deep clean if steam output dips
Switch to distilled water immediately after cleaning—it reduces mineral intake by 98% compared to tap water. This simple change extends time between vinegar cleanings from monthly to quarterly. Always finish seasonal use with a final vinegar treatment before storage—dormant minerals crystallize harder over summer.
Non-Negotiable Safety Protocols
Must-follow precautions:
– ⚠️ Unplug 2 hours minimum before handling—residual current risks electrocution
– ⚠️ Never mix vinegar with bleach—creates toxic chlorine gas
– ⚠️ Check model number—older Vicks units lack corrosion-resistant coatings
– ⚠️ Test on counter first—steam should clear in 3 seconds; slow dissipation indicates incomplete cleaning
If your humidifier shows electrical burning smells or water leakage after cleaning, stop use immediately. These indicate internal damage requiring professional repair—don’t risk fire hazards.
Confirm Your Cleaning Success Visually
True success indicators go beyond steam output:
– Heating element reflects light metallically (no chalky residue)
– Water tank shows zero white flakes after 1-hour operation
– Unit runs silently—no crackling or popping sounds
– Steam appears consistently thick (not wispy) for 30+ minutes
Failed cleaning signs: Weak steam within 15 minutes, metallic taste in mist, or visible white particles. If these occur, repeat the vinegar process immediately—your humidifier is actively deteriorating.
Regular vinegar cleaning transforms your Vicks humidifier from a mineral-clogged liability into a reliable moisture machine. That monthly 30-minute investment prevents $50 replacement costs while ensuring your bedroom maintains healthy 40-60% humidity levels all winter. Remember: distilled water after cleaning extends your next vinegar session by 6-8 weeks, and the angled soak technique protects sensitive components others miss. Your sinuses deserve clean, consistent mist—and now you have the exact method to deliver it. Grab that vinegar bottle tonight; your humidifier’s steam power is waiting to be restored.


