
That chalky white residue creeping across your Homedics humidifier tank isn’t just ugly—it’s a breeding ground for mold that pumps contaminated mist into your bedroom air. When your humidifier develops that musty odor or starts leaving white dust on furniture, it’s screaming for attention. This how to clean Homedics humidifier guide delivers the exact procedures to restore safe, efficient operation across all models—from the compact UHE-CM25 to warm mist WM70 units. You’ll discover why vinegar outperforms chemical cleaners, how to eliminate dangerous mold hiding in crevices, and the 15-minute weekly routine that extends your humidifier’s life. Skip these steps, and you’re risking respiratory irritation and costly replacements.
Essential Cleaning Supplies Checklist
Gather these exact items before starting your how to clean Homedics humidifier session. White distilled vinegar (5% acidity) dissolves mineral scale without damaging components. Pair it with a soft toothbrush dedicated solely for cleaning—never use kitchen brushes that harbor bacteria. Include microfiber cloths to wipe delicate parts without scratches, plus mild dish soap for odor removal. Cotton swabs reach threaded caps and mist nozzles where mold hides.
Must-Have Items:
– White distilled vinegar (5% acidity)
– Soft-bristled toothbrush (cleaning-specific)
– Microfiber cloths
– Mild dish soap (non-bleach formula)
– Cotton swabs
– Clean water
Never Use:
– Bleach (except 1 tsp per gallon ratio)
– Abrasive scrubbers
– Metal tools
– Ammonia-based cleaners
Quick Safety Steps Before Cleaning
Unplug immediately and wait 15 minutes if the unit was recently running—electrical components stay live even when off. Empty all water into the sink to prevent spills during disassembly. Place the humidifier on a towel-covered counter to catch drips. Critical warning: Never submerge the base unit. Water intrusion into electrical components causes dangerous short circuits. If cleaning a warm mist model like the WM70, allow 30 minutes for the heating element to cool completely.
Disassemble Homedics Models Correctly
Water Tank Removal
Grip the handle firmly and lift straight up. Newer models (UHE-CM25) release with no buttons, but older units may require pressing side-release tabs. Place the tank upside down immediately to drain residual water. Note the water level markings—they guide proper reassembly.
Filter System Access
Demineralization cartridges twist counterclockwise and slide out from inside the tank—never use vinegar on these porous filters. Wick filters pull straight from side compartments; handle wet filters gently as they tear easily. For UV models, twist off the cap to access the bulb chamber—but never touch the UV-C bulb with bare fingers.
Base Component Breakdown
Remove the mist nozzle first (it either pops off or twists counterclockwise). Lift out the water reservoir tray to expose the ultrasonic transducer disk—a silver component that vibrates to create mist. Handle this disk with extreme care; scratches render it useless. Clean the float mechanism thoroughly, as sticky floats trigger false “empty tank” errors.
Vinegar Deep Cleaning Process
Tank Descaling Method
Mix 1 cup vinegar with 1 cup water in the tank. Swirl to coat all surfaces, especially threads and outlet valves where scale hides. Soak 20 minutes for light buildup or overnight for heavy crust. Scrub corners with your toothbrush using circular motions—never scrape. Rinse 3-4 times until vinegar odor vanishes. For stubborn deposits, warm (not hot) vinegar softens scale faster.
Base Unit Cleaning
Submerge only water-contact parts in vinegar solution. Focus on the transducer disk: gentle circular brushing dissolves white mineral flakes. Clean the float assembly meticulously—sticky floats cause automatic shutoffs. Never immerse electrical components; wipe bases with vinegar-dampened cloths instead.
Filter Maintenance Rules
Demineralization cartridges need only cool water rinses monthly and replacement every 30-40 fillings. Wick filters require weekly cool-water rinses and replacement every 4-8 weeks when brown discoloration appears. Air-dry all filters completely before reuse—never squeeze wet wicks.
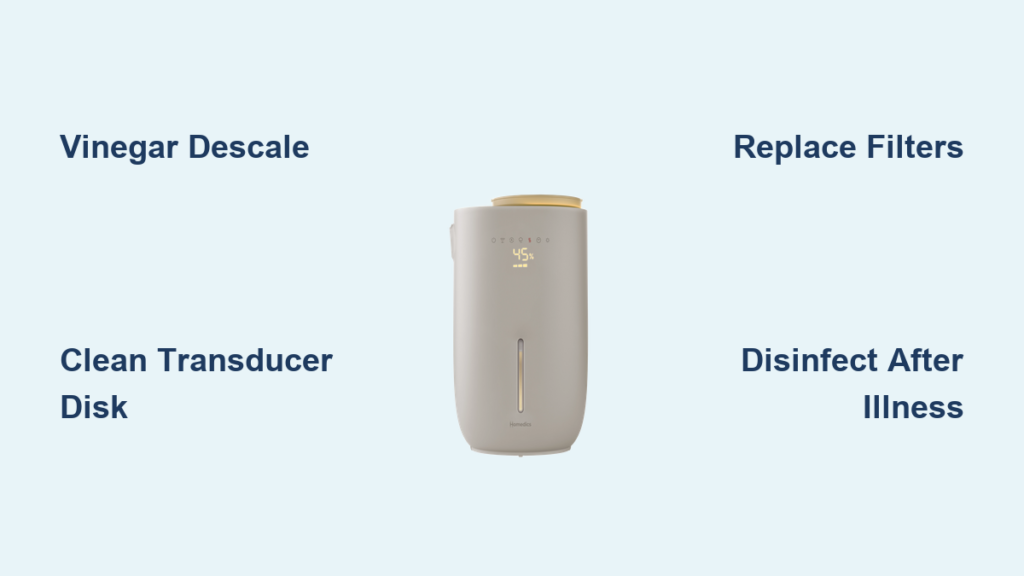
Disinfect After Every Illness
Hydrogen Peroxide Method
Mix 1 teaspoon 3% hydrogen peroxide per cup of water. Fill the tank, wait 30 minutes, then rinse 3-4 times. This kills bacteria without harsh fumes. Reserve bleach only for severe mold: use exactly 1 teaspoon per gallon of water, soak 30 minutes max, and rinse 5+ times until no chlorine smell remains. Never mix vinegar and bleach—toxic gas forms instantly.
Model-Specific Cleaning Differences
UHE-CM25 Deep Clean
Twist the top-fill lid counterclockwise to access the demineralization cartridge. Clean the 360-degree mist nozzle separately with cotton swabs—debris here blocks airflow. The transducer disk sits under a twist-off base cap; scale here causes weak mist.
UHE-WM70 Warm Mist
Wait 30 minutes after use—the heating chamber stays scalding hot. Soak the chamber 2x longer in vinegar due to concentrated mineral deposits from boiling. Clean the safety float mechanism weekly; mineral buildup triggers premature shutoffs.
UHE-OC1 Night Light Model
Keep the LED chamber bone-dry during cleaning. Remove the separate aroma tray for individual washing with mild soap—water exposure damages light components. The smaller tank opening requires a bottle brush for thorough scrubbing.
Fix Common Cleaning Problems

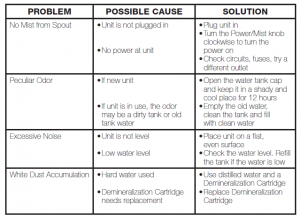
White Dust Issues
This signals hard water minerals overwhelming your demineralization cartridge. Replace cartridges every 20 fillings (not 30) and clean the transducer disk weekly. Switch to distilled water to stop dust permanently.
Mold Detection Checklist
Inspect these hidden spots weekly:
– Tank cap threads
– Base corners where water pools
– Inside mist nozzles
– Under the reservoir tray
For black/green mold, use 2:1 vinegar-water solution followed by hydrogen peroxide disinfection.
Persistent Odors
Apply baking soda paste to affected areas. Let sit 15 minutes, scrub gently, and rinse. Replace all filters immediately—odors embed permanently in porous materials.
Weekly Maintenance Schedule
Daily (30 seconds):
– Empty tank completely
– Wipe dry with microfiber cloth
– Leave cap off for air circulation
Weekly (15 minutes):
– Vinegar descale tank and base
– Clean transducer disk with soft brush
– Rinse filters and check for damage
– Verify float movement
Monthly (30 minutes):
– Inspect all seals and O-rings
– Test mist output strength
– Check air intake vents for blockages
– Replace demineralization cartridges if due
Reassemble Without Leaks
Ensure every component is 100% dry—moisture causes electrical shorts. Replace demineralization cartridges now if you’ve used 30+ tank fillings since last change. Test for leaks by filling the tank halfway, placing it on the base, and gently tilting. Immediate dripping means a damaged O-ring or misalignment.
Troubleshoot Post-Cleaning Issues
No Mist Output
Check these in order:
1. Transducer disk for white film (re-clean if present)
2. Water level above minimum line
3. Tank properly seated on base
4. Air intake vents unblocked
Water Leaks After Assembly
Most leaks come from:
– Damaged tank cap O-ring (replace immediately)
– Overfilling past the MAX line
– Uneven base placement
– Cracks from over-tightening components
Musty Smell Returns
Repeat the full disinfection process. Replace all filters regardless of appearance. Clean the water level sensor cavity with a cotton swab—this tiny spot harbors stubborn mold.
Water Quality Impact Guide
Hard Water Areas (>180 ppm)
Clean every 2-3 days. Use demineralization cartridges without fail. Watch for white dust on furniture—it means minerals are escaping into your air. Distilled water reduces cleaning frequency by 60%.
Well Water Users
Expect iron staining and extra minerals. Replace filters every 3 weeks instead of 8. Pre-filter water through a Brita pitcher to remove sediments before filling the tank.
Distilled Water Benefits
Cuts cleaning frequency to weekly. Extends filter life 3x longer. Prevents transducer scale buildup entirely. Use it exclusively for optimal performance and air quality.
Storage Between Seasons
Short-term (1-2 weeks):
Complete a full clean and dry cycle. Store with tank cap off for ventilation. Keep in a dust-free cabinet away from humidity.
Long-term (months):
Perform deep cleaning and disinfection. Ensure 100% dryness before packing. Store filters in sealed plastic bags to prevent moisture damage. Check O-rings for cracks before next season’s use.
Clean Homedics humidifiers don’t just run quieter—they protect your family from airborne contaminants. Set a recurring phone reminder for weekly maintenance; this 15-minute habit prevents the 3-hour emergency deep clean when mold takes over. Your lungs will thank you for mastering how to clean Homedics humidifier correctly.


