
That musty odor creeping from your humidifier? The white dust settling on your furniture? These are dead giveaways your humidifier wick is clogged with mineral buildup and biological gunk. When this critical component gets coated in crusty deposits, your unit stops releasing clean moisture and starts circulating contaminants into your breathing space. The good news is you can revive most wicks to like-new condition using just vinegar and an old toothbrush—no special skills required. This guide delivers the exact cleaning protocol medical studies confirm restores proper filtration for allergy and asthma sufferers, plus clear indicators when replacement is non-negotiable.
Most homeowners don’t realize evaporative humidifiers rely entirely on the wick’s paper fibers to trap minerals and impurities before mist enters your air. When neglected, these filters become breeding grounds for mold and bacteria, defeating their core purpose. By following these vetted techniques, you’ll ensure your humidifier delivers the clean, therapeutic moisture your respiratory system needs—not a cloud of contaminants. Let’s restore your unit’s performance with a cleaning method proven to dissolve stubborn buildup safely.
Why Your Humidifier Wick Clogs With White Crust
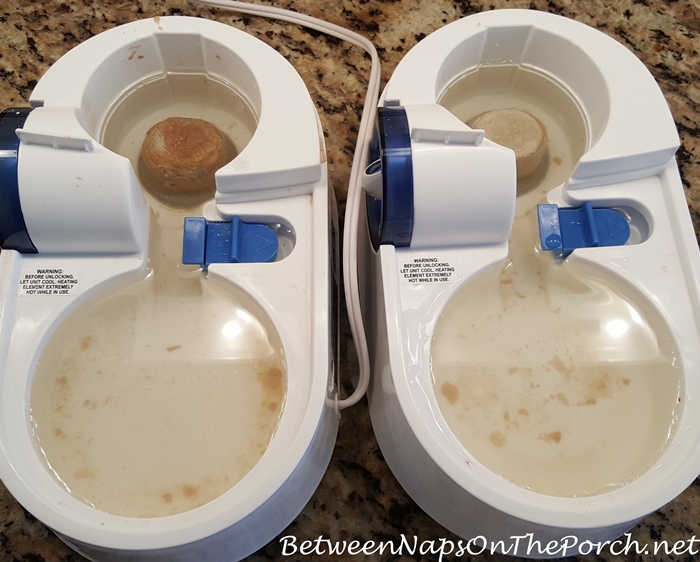
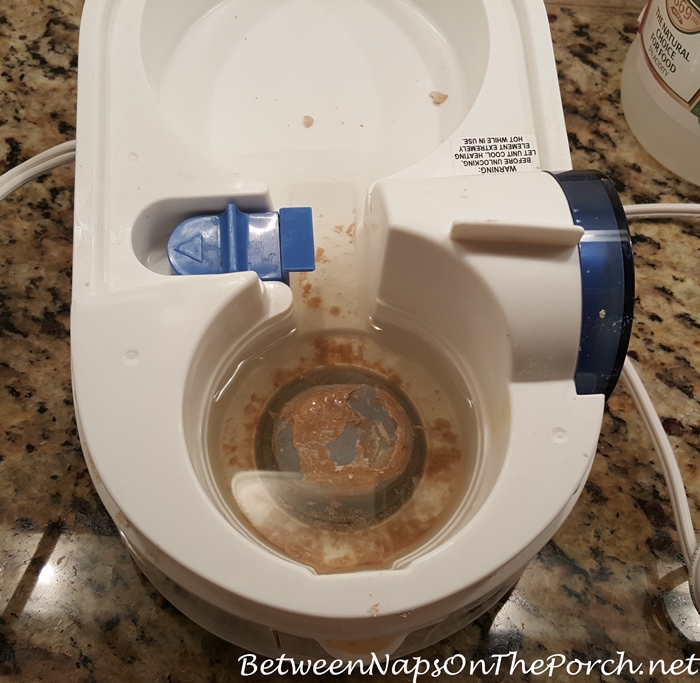
Evaporative humidifiers pull water through the wick’s paper fibers using capillary action, then blow air across the moist surface to create vapor. As this happens, the wick traps minerals like calcium and magnesium from your tap water—preventing that annoying white dust on furniture. But hard water areas accelerate this process, forming rock-hard mineral deposits that block airflow and reduce output. Medical research confirms this filtration system also captures airborne allergens, making regular wick maintenance essential for asthma and allergy sufferers. When the paper fibers become saturated with debris, your unit can’t humidify properly and may even release trapped contaminants back into your environment.
Essential Tools for Humidifier Wick Cleaning Success
Gather these before starting:
– Your humidifier owner’s manual (critical for model-specific steps)
– White vinegar (distilled works best for mineral dissolution)
– Large bowl or pot (must fully submerge the wick)
– Soft-bristled toothbrush (never use metal brushes)
– Gentle scrub brush with natural fibers
– Clean towels for drying
– Access to warm running water
Pro Tip: If your manual is lost, search “[Your Brand] + [Model Number] wick removal” online—most manufacturers like AIRCARE provide video tutorials on YouTube showing exact disassembly steps. Never skip this verification step; forcing the wick out can damage internal mechanisms.
Safely Removing Your Humidifier Wick in 3 Critical Steps

Power Down and Unplug Immediately
Turn off your humidifier at the control panel, then physically unplug it from the wall outlet. Never attempt wick removal while plugged in—even “off” units maintain electrical connections to safety sensors. Wait 5 minutes for residual power to dissipate before proceeding. This prevents accidental activation during cleaning that could damage motor components.
Accessing the Wick Compartment Without Damage
Remove the water tank to expose the wick housing. Most models (including AIRCARE and Holmes units) require gently wiggling the wick filter side-to-side while applying upward pressure. If resistance exceeds light finger pressure, STOP. Consult your manual—some units have locking tabs or screws securing the wick. Forcing it out cracks plastic housings, creating costly repairs. Hard water deposits often fuse wicks to housing; if stuck, pour warm vinegar into the base and let it sit 20 minutes before retrying.
Documenting Wick Placement Before Removal
Snap a clear photo of the wick’s orientation in the housing with your phone. Note any directional arrows or alignment tabs—reinstalling it backward blocks water absorption. Most wicks have a textured side facing the water tank and smooth side toward the fan. This 10-second step prevents reassembly errors that cause leaks or poor performance.
Deep Clean Your Wick: Vinegar Soak That Removes Mineral Buildup
Initial Rinse to Dislodge Surface Contaminants
Hold the wick under warm running water (not hot—paper fibers degrade above 120°F), focusing on visibly crusty areas. Use the soft toothbrush to gently scrub the surface in circular motions, dislodging loose debris. Continue for 2-3 minutes until rinse water runs mostly clear. Critical check: If water drains through the wick freely at this stage, mineral buildup is light—proceed to soak. If water pools on top, deposits are severe—extend soak time by 15 minutes.
Preparing the Perfect Vinegar Soak Solution
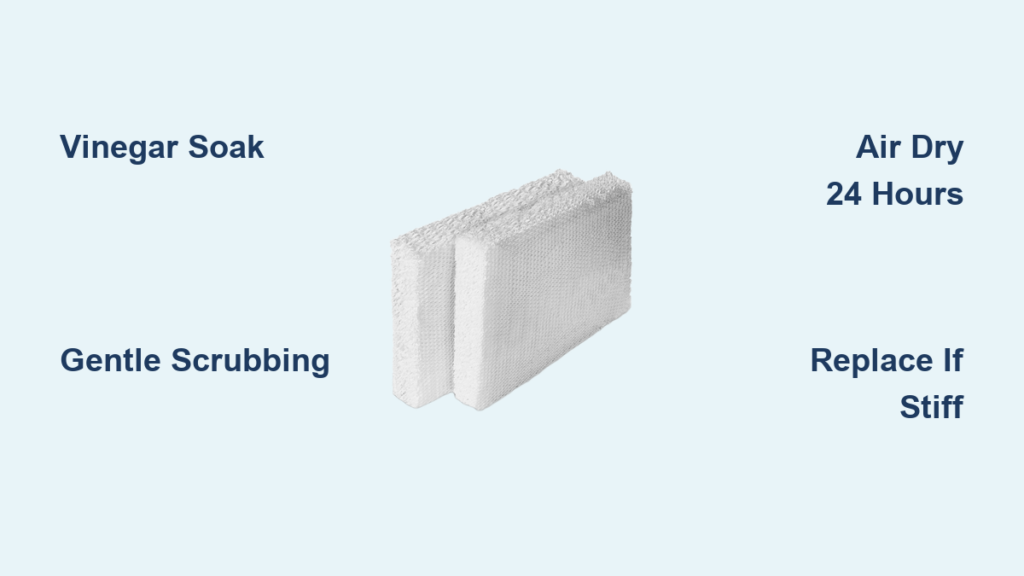
Mix equal parts white vinegar and cool water in your bowl (e.g., 2 cups each). Submerge the wick completely, pressing it down to eliminate air pockets. The acetic acid dissolves mineral crystals without degrading paper fibers—unlike harsh bleach that ruins filtration capacity. Soak for exactly 45-60 minutes; longer durations weaken the wick structure. Never use undiluted vinegar—it’s too acidic for prolonged exposure.
Scrubbing and Final Rinse for Crystal-Clear Results
After soaking, gently scrub stubborn spots with the soft brush using light pressure—wicks tear easily when wet. Rinse under cool water until runoff is completely clear (usually 1-2 minutes). Hold the wick up to light; replacement is mandatory if any section remains gray/brown or feels stiff. Blot excess water with a towel, then air-dry upright for 24 hours in a well-ventilated area. Never reinstall a damp wick—it breeds mold inside the housing.
Prevent Mold: Your 5-Minute Weekly Wick Maintenance Routine
Skip deep cleaning between monthly sessions with this quick protocol: After unplugging, remove the wick and rinse under warm water for 60 seconds while lightly brushing. Shake off excess water and reinstall—no soaking required. Simultaneously clean the water tank and base with a vinegar solution to prevent cross-contamination. This 5-minute ritual stops mineral accumulation before it hardens, extending wick life by 30-50%. In hard water areas, perform this twice weekly—visible white residue on tank walls means minerals are overwhelming your filter.
7 Warning Signs Your Humidifier Wick Needs Replacement Now
When Cleaning Isn’t Enough: The Replacement Timeline
Replace wicks every 30-60 days in hard water areas (test kits measure hardness) or 60-90 days with soft water. Critical exception: If you see white dust within 2 weeks of installation, cut replacement intervals in half—your water is harder than anticipated. Bacteriostat treatments like AIRCARE 1970 can stretch timelines by 15-20 days by killing microbial growth that clogs fibers.
Critical Indicators That Demand Immediate Wick Replacement
- Persistent discoloration: Wick remains yellow/gray after thorough cleaning
- Reduced output: Humidifier runs longer but room humidity doesn’t rise
- Musty odor: Smell lingers after cleaning (indicates embedded mold)
- Visible debris: Particles blow from the unit into the air
- Stiff texture: Wick doesn’t flex when dry (minerals have crystallized fibers)
- Water pooling: Liquid accumulates under the unit (blocked absorption)
- Shortened runtime: Humidifier shuts off prematurely despite full tank
Never reinstall a wick showing these signs—it compromises air quality and strains the motor.
What NOT to Do: 4 Mistakes That Destroy Humidifier Wicks
Aggressive Scrubbing Tears Absorbent Paper Fibers
Wicks are engineered like high-absorbency paper towels—rough brushing creates micro-tears that reduce filtration efficiency. Always use feather-light pressure with soft brushes. If debris won’t loosen after soaking, the wick is beyond saving—replace it.
Running Without a Wick Creates “Dirty Vapor” Hazard
Operating your humidifier sans wick turns it into a contaminated mist generator. Minerals and microbes bypass filtration, coating surfaces in white dust and potentially triggering respiratory issues. The wick is non-optional—if yours is damaged, unplug the unit until replaced.
Dishwasher Cleaning Melts Wick Structure
High heat and detergent destroy the paper matrix in 1-2 cycles. Never submerge wicks in dishwashers—vinegar soaking is the only safe method. Similarly, avoid bleach or hydrogen peroxide that degrades fibers.
Skipping Drying Causes Internal Mold Growth
Reinstalling a damp wick traps moisture against plastic components, growing mold in hidden areas. Always air-dry 24 hours—microwaving or oven-drying causes instant disintegration.
Upgrade Your Air Quality with Dual-Layer Humidifier Filters
If your model accepts 1050 or 1051 filters (check manual), install these advanced options for medical-grade air cleaning. They add two critical layers: an electrostatic sheet capturing 95% of airborne particles like pollen, and activated carbon neutralizing odors from pets or cooking. While the wick handles water filtration, these filters tackle airborne contaminants—ideal for severe allergy sufferers. Replace every 60 days alongside your standard wick for comprehensive protection.
Humidifier Wick Cleaning Checklist: Never Miss a Step
Pre-Cleaning Verification:
– [ ] Unit fully unplugged and cooled
– [ ] Water tank emptied and removed
– [ ] Wick placement photo taken
– [ ] Vinegar solution mixed (1:1 ratio)
During Cleaning:
– [ ] Initial rinse until water runs clear
– [ ] 45-60 minute vinegar soak (timed)
– [ ] Gentle scrubbing of stubborn areas
– [ ] Final rinse until completely clear
– [ ] Wick air-drying upright for 24h
Post-Cleaning Validation:
– [ ] Wick pure white with flexible texture
– [ ] No odor after drying
– [ ] Humidifier output restored to normal
– [ ] Replacement scheduled per water hardness
A properly maintained wick ensures your humidifier delivers the clean, therapeutic moisture your health depends on—without the white dust or musty smells of neglect. By implementing this vinegar-based cleaning method monthly and replacing filters on schedule, you’ll maximize air quality while extending your unit’s lifespan. Remember: when mineral buildup resists cleaning or discoloration persists, immediate replacement isn’t optional—it’s essential for healthy indoor air. Keep this checklist visible near your humidifier, and you’ll never wonder how to clean humidifier wick again. Your lungs will thank you.


