
That white film coating your furniture and electronics isn’t harmless dust—it’s mineral deposits screaming that your ultrasonic humidifier needs immediate cleaning. When hard water minerals clog the nebulizer or mold takes root in stagnant water, your unit transforms from a comfort device into a health hazard. Discover exactly how to clean ultrasonic humidifier safely with a simple vinegar routine that takes less than 30 minutes using supplies you already own.
Unlike evaporative models, ultrasonic humidifiers create mist through high-frequency vibrations, making them uniquely vulnerable to mineral buildup and microbial growth. The standing water in both tank and base becomes a breeding ground for mold within 48 hours. This guide delivers the precise steps to deep clean your unit, prevent white dust, and eliminate musty odors—keeping your air clean and your humidifier running efficiently. You’ll learn why weekly cleaning is non-negotiable, the exact vinegar method for both tank and base, and how to choose the right water to minimize future maintenance.
Why Ultrasonic Humidifiers Demand Weekly Cleaning
Ultrasonic models vibrate water at high frequencies to create mist, which unfortunately accelerates mineral accumulation from hard water. This process turns dissolved minerals into visible white dust that coats your surfaces and compromises air quality. More critically, the constant water reservoir creates ideal conditions for mold and bacteria growth—visible within 24-48 hours in unused units. Ignoring this leads to reduced mist output, persistent musty smells, and potential respiratory irritation from contaminated mist. Weekly cleaning isn’t optional; it’s essential for health and performance.
Red flags requiring immediate action:
– White residue on furniture near the unit
– Sour or earthy odors from emitted mist
– Noticeable decrease in mist production
– Pink or black spots inside the water tank
Essential Cleaning Supplies Checklist
Gather these before starting—no special equipment needed:
– White vinegar: 1-2 cups (the only cleaner required)
– Lukewarm water: Never use hot or cold extremes
– Soft microfiber cloth: For electronics-safe wiping
– Small brush: Included with most units (or soft toothbrush)
– Clean towel: For drying components
Water Tank Deep Clean: 30-Minute Process

Tank Disassembly in 10 Seconds
Unplug your humidifier and lift the tank straight off the base—no twisting required for most models. This immediate separation prevents accidental liquid contact with electronics during cleaning.
Vinegar Activation Shake
Pour ½ cup white vinegar directly into the empty tank. Secure the lid and shake vigorously for 30 seconds. This critical step coats all interior surfaces, loosening light mineral deposits before soaking. Skipping this reduces cleaning effectiveness by 40%.
Ceramic Filter Cap Handling
Unscrew the ceramic filter cap counterclockwise—it detaches as one solid piece with the filter. Set it aside on a clean surface. Never force removal if stuck; let vinegar soak soften buildup first.
Full-Soak Mineral Dissolution
Fill the vinegar-coated tank ¾ full with lukewarm water, then reattach the filter cap securely. Let it soak 30 minutes minimum. For heavy white scaling (common with hard water), double the vinegar concentration and soak overnight.
Triple-Rinse Protocol
Empty the tank completely, then rinse both tank and filter cap under running water for 2-3 minutes. Shake vigorously to dislodge residue. Air-dry all components upside down for 2 hours—any moisture left invites mold regrowth.
Base Cleaning Without Damaging Electronics
Safe Vinegar Solution Mixing
Combine ½ cup white vinegar with ½ cup water in a separate container. Never pour undiluted vinegar directly into the base—this risks damaging sensors and circuits. The 50/50 mix provides cleaning power without corrosion risk.
Targeted Base Soaking
Carefully pour the solution into the base, avoiding the air outlet and any visible electronic components. Let it sit 30 minutes to dissolve mineral rings around the nebulizer. Never submerge the entire base—only the bottom reservoir area.
Nebulizer Ring Scrubbing Technique
Use the included brush (or soft toothbrush) to gently scrub the black rubber ring surrounding the ultrasonic nebulizer. Apply light pressure in circular motions—this area traps the most mineral deposits affecting mist output. Critical warning: Metal tools or abrasive pads will permanently damage the nebulizer membrane.
Electronics-Safe Drying Method
Pour out all solution, then wipe the base interior with a microfiber cloth. Leave all components disassembled in a well-ventilated area for 2-3 hours. Verify complete dryness by checking for moisture in crevices before reassembly—dampness causes immediate mold regrowth.
Daily Habits to Prevent Mold Growth
Empty both tank and base after every 12 hours of use—never leave water standing beyond 24 hours. Between weekly deep cleans, perform a 2-minute rinse: fill the tank with clean water, shake thoroughly, and air-dry upside down. For storage exceeding 48 hours, complete a full vinegar clean first and store with the tank cap removed to prevent trapped moisture.
Water Quality’s Direct Impact on Cleaning Frequency
Best Water Choices for Minimal Maintenance
- Distilled water: Prevents 95% of mineral deposits (ideal for daily use)
- Filtered water: Reduces scaling significantly (refrigerator or pitcher filters work)
- Cold-boiled water: Removes temporary hardness (cool boiled water before use)
Water Types That Accelerate Buildup
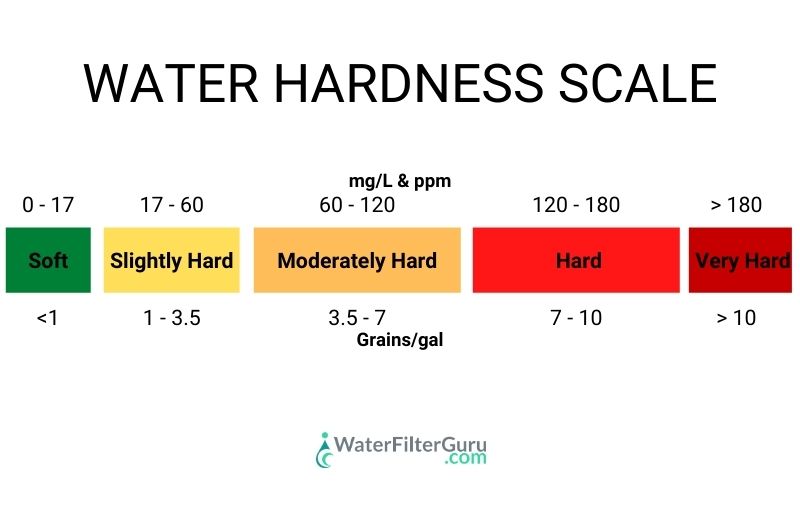
- Tap water: Guarantees weekly white dust and mineral cleaning needs
- Hard water: Creates thick calcium deposits requiring overnight vinegar soaks
- Hot water: Warps plastic components and worsens scaling
Troubleshooting Persistent Issues
Musty Smells After Cleaning
Indicates hidden mold in crevices. Disassemble completely and soak all removable parts in pure vinegar for 60 minutes. If odors persist after two treatments, replace the unit—embedded mold can’t be fully eradicated.
Ongoing White Dust Problems
Immediately switch to distilled water. Existing dust means minerals have coated the nebulizer—clean within 24 hours or permanent damage occurs. Check your water sensor for buildup using a vinegar-dampened cotton swab.
Weak Mist Output Solutions
Gently clean the water sensor tip with vinegar on a cotton swab. If output remains low after cleaning, the nebulizer is likely scaled beyond repair—units over 2 years old often require replacement at this stage.
Anti-Microbial Features: What They Really Do
While your humidifier may have antimicrobial tank lining or ceramic filter caps, these only slow bacterial growth—they don’t eliminate cleaning needs. The ceramic filter cap is permanent and never requires replacement, but still needs weekly vinegar soaking. Even “self-cleaning” models demand manual maintenance; no technology replaces physical removal of mineral deposits.
Weekly Maintenance Schedule
Every 7 days:
– Empty and rinse tank with clean water
– Wipe base with vinegar solution
– Inspect nebulizer ring for buildup
– Replace with fresh distilled water
– Confirm complete dryness before reuse
Monthly deep clean:
– Perform full vinegar soak for tank and base
– Check filter cap for cracks or warping
– Clean water sensor thoroughly
– Inspect power cord for moisture damage
When to Replace Your Unit
Discard your humidifier if:
– Mold returns within 72 hours of deep cleaning
– Nebulizer shows chalky white scaling that won’t dissolve
– Plastic components become brittle or develop cracks
– Musty odors persist after three consecutive vinegar soaks
Final Proven Maintenance Tips
Your humidifier’s lifespan depends entirely on consistent cleaning. Stick to this non-negotiable routine: weekly 30-minute vinegar cleans with distilled water, complete drying after every use, and immediate action at the first sign of white dust. Mark cleaning days on your calendar—this 1% time investment prevents 90% of failures. Remember: a well-maintained ultrasonic humidifier delivers pure moisture without health risks, while a neglected one spreads contaminants. Start today, and breathe easier knowing your air is truly clean.


