
That gentle mist from your Vicks cool mist humidifier soothes dry air while you sleep, but hidden mineral deposits and invisible bacteria could be circulating through your bedroom. When mineral scale coats the ultrasonic nebulizer or mold takes root in the water tank, your humidifier stops working efficiently and may even spread contaminants. Learning how to clean Vicks cool mist humidifier components properly isn’t just maintenance—it’s essential for protecting your family’s respiratory health and ensuring consistent performance. Without weekly cleaning, you’ll notice reduced mist output, strange odors, and potentially harmful microorganisms released into your breathing space.
This step-by-step guide reveals the exact process Vicks technicians use to remove stubborn buildup and eliminate bacteria. You’ll discover why vinegar dissolves mineral deposits faster than commercial cleaners, how to disinfect without damaging sensitive components, and critical mistakes that could ruin your unit. Most importantly, you’ll reclaim just 15 minutes each week to prevent performance issues and extend your humidifier’s lifespan by years. Let’s restore your device to like-new condition with methods proven safe for all Vicks cool mist models.
Critical Safety Steps Before Humidifier Cleaning
Power down and unplug your unit immediately before touching any component—this isn’t optional. Electricity and water create lethal shock hazards, so verify the power cord is fully disconnected from the wall outlet. Never attempt cleaning while the unit remains plugged in, even if it appears switched off. This single step prevents electrocution risks and protects internal circuitry from accidental activation during maintenance.
Work exclusively in water-safe zones like your kitchen or bathroom near a sink. These areas contain potential spills and provide instant access to running water for rinsing. Lay down towels to catch drips, but never place your humidifier directly on wood surfaces where moisture could cause warping. Always handle components over the sink basin to avoid countertop flooding.
Never submerge the base unit in water or cleaning solutions. While water tanks and removable parts can be soaked, the base houses electrical components that will short-circuit if immersed. Tilt the base carefully over the sink to drain residual water, but keep all openings angled upward to prevent liquid ingress. This protects your $50+ investment from irreversible damage during routine maintenance.
Must-Have Supplies for Vicks Humidifier Cleaning
Gather these exact items before starting to avoid mid-process interruptions:
• Undiluted white vinegar (for dissolving mineral scale)
• Household bleach (for bacterial disinfection)
• Soft-bristled toothbrush (nylon bristles only—no metal)
• Cotton swabs (for precision nebulizer cleaning)
• Microfiber cloths (lint-free drying)
• ½-gallon container (for bleach solution prep)
• ½-teaspoon measuring spoon (critical for safe dilution)
Why these specific items? Vinegar’s acetic acid safely breaks down limescale without scratching, while the precise bleach ratio kills 99.9% of bacteria without leaving toxic residues. Metal tools will permanently damage the ultrasonic disc, and paper towels leave fibers that clog mist pathways—always use soft cloths.
Eliminate Mineral Buildup: Nebulizer Descaling Guide
Why Your Mist Output Drops Weekly
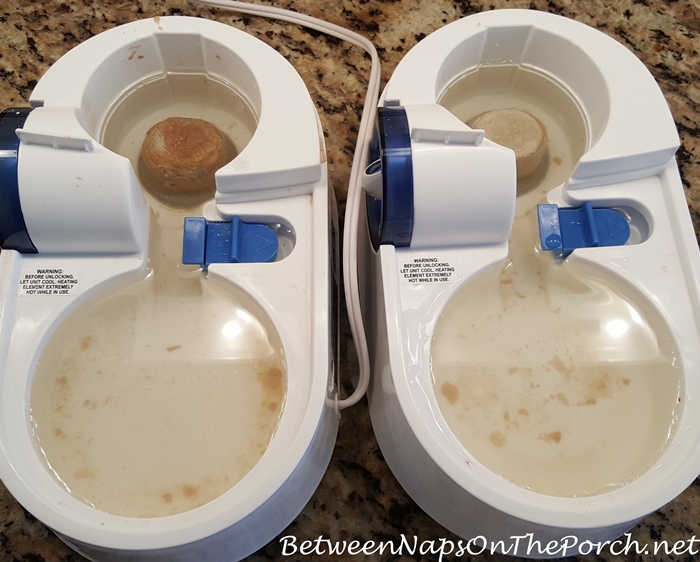
The round nebulizer disc in your humidifier’s base vibrates ultrasonically to create mist, but minerals from tap water rapidly coat its surface. Within days, this chalky white layer acts like a brake pad, slowing vibrations and cutting mist production by up to 70%. You’ll notice weaker airflow and dry patches in the room—classic signs your unit needs descaling. Ignoring this causes permanent nebulizer damage requiring costly replacement.
Step-by-Step Nebulizer Cleaning Process
Step 1: Unplug unit and remove the water tank. Empty all remaining water from both tank and base into sink. Visual cue: Look for white crust around the base rim—that’s mineral scale.
Step 2: Pour undiluted white vinegar directly into the base until the nebulizer disc is fully submerged (about ½ cup). Pro tip: Warm vinegar (not hot) works 30% faster—microwave for 30 seconds.
Step 3: Soak for minimum 20 minutes. For heavy buildup (thick white coating), extend to 4+ hours. Critical action: Gently rub the nebulizer surface with a cotton swab during soaking to lift deposits—never scrape.
Step 4: Empty vinegar and rinse the base 3-4 times with cold water until the sharp vinegar smell disappears. Check point: Smell the base after each rinse—residual vinegar damages components if left.
Never operate your humidifier with vinegar inside—this corrodes metal contacts and creates hazardous fumes. Complete rinsing is non-negotiable for safety.
Bacteria-Killing Disinfection Protocol
Prepare the Exact Bleach Solution
Mix ½ teaspoon bleach per ½ gallon (1.9 L) of cool water in your container. This ratio is scientifically calibrated: stronger solutions damage plastic components, while weaker mixtures won’t kill mold spores. Never eyeball measurements—use the ½-teaspoon spoon for safety.
Disinfect Water Tank and Internal Components
Tank treatment sequence:
1. Pour solution into the empty water tank
2. Place the mist nozzle inside the tank
3. Cap the tank and swirl gently for 15 seconds
4. Set tank on base—solution automatically drains into the reservoir
5. Soak exactly 20 minutes (set a timer—over-soaking cracks plastic)
Post-soak critical steps:
– Empty solution slowly to avoid splashing
– Rinse tank 4+ times with cold water
– Odor test: Hold tank to nose—if you detect any bleach smell, repeat rinsing. Residual bleach releases toxic vapors when operating.
Clean Float Paddle and Accessory Parts
Lift the float paddle straight up from the reservoir—it regulates water levels and must move freely. Rinse under running water while wiggling it to dislodge debris. Visual check: If it sticks when lowered, mineral deposits remain—re-soak in vinegar.
Wipe these surfaces with your bleach solution using a cloth:
– Base interior (avoiding electrical ports)
– VapoPad medicine cup (if your model has one)
– Mist outlet chimney
– Exterior housing
Never use bleach on the nebulizer disc—vinegar is the only safe cleaner for this component.
Reassemble Without Common Mistakes

Dry all parts completely before reassembly—damp components cause immediate mold regrowth. Use a microfiber cloth to wipe the float paddle channel, then test movement by pressing down; it should spring back smoothly. Position the paddle so its tab aligns with the reservoir groove (consult your manual if unsure).
Critical error to avoid: Forcing the water tank onto the base. If it doesn’t seat with light pressure, check float paddle alignment—mispositioning causes leaks and error codes. Your unit should click securely into place with zero resistance.
Prevent Buildup Between Cleanings
Stick to distilled water—it reduces mineral deposits by 90% compared to tap water. While purified water works, distilled contains zero dissolved solids that create scale. This simple switch extends time between deep cleanings and preserves nebulizer performance.
Monitor these failure signs weekly:
– Reduced mist output: Indicates 48+ hours of mineral accumulation
– Musty odor from tank: Signals bacterial growth requiring immediate disinfection
– Cloudy water: Shows contamination needing full cleaning
Set phone reminders every 7 days—cleaning takes just 15 active minutes but prevents 2 hours of troubleshooting later. Consistent maintenance doubles your humidifier’s lifespan from 2 to 4+ years.
Fix Post-Cleaning Performance Issues

Stubborn Mineral Deposits That Won’t Dissolve
If white crust remains after vinegar soaking, repeat the process with extended time—soak nebulizer overnight in undiluted vinegar. Never use CLR, lemon juice, or abrasive pads; these scratch the disc’s vibration surface. For extreme cases, gently rub with a vinegar-soaked cotton swab in circular motions—never sideways.
Lingering Bleach Smell After Rinsing
This means residual disinfectant remains. Empty and refill the tank 5 times with cold water, shaking vigorously each time. Run the humidifier without water for 5 minutes—this evaporates hidden traces. Safety note: Never operate with water until odor is 100% gone.
Weak Mist Output After Cleaning
Check two critical points:
1. Nebulizer positioning: Ensure the disc sits flat with no debris underneath
2. Float paddle freedom: Lift and release—it must drop smoothly without sticking
If issues persist, unplug for 10 minutes to reset electronics. Most “malfunctions” after cleaning stem from improper reassembly, not component failure.
Cleaning your Vicks cool mist humidifier weekly with this 15-minute routine guarantees hospital-grade air quality while preventing costly repairs. You’ve now mastered the vinegar descaling trick that dissolves minerals faster than store-bought cleaners and the precise bleach ratio that eliminates bacteria without damaging components. Most importantly, you’ve learned to spot early warning signs—reduced mist, odd odors, or cloudy water—that signal immediate cleaning is needed. Stick to distilled water and set calendar reminders, and your humidifier will deliver whisper-quiet, contaminant-free moisture for years. Remember: Those few minutes of maintenance protect your family’s lungs every single night. For model-specific diagrams, always check Vicks’ official support site using your unit’s exact product code.


