
That comforting mist from your Vicks humidifier disappears when the filter clogs with mineral deposits. You’re left with dry air that aggravates sinuses and sore throats just when you need relief most. Replacing the filter takes under 10 minutes and instantly restores proper moisture output. This complete guide shows exactly how to install Vicks humidifier filter correctly—avoiding common mistakes that cause leaks, odors, or poor performance. You’ll learn model-specific tricks, troubleshooting fixes, and maintenance secrets to keep your unit running efficiently all season.
Gather Essential Tools Before Starting
Never skip preparation when handling electrical appliances near water. Begin by switching off your humidifier and unplugging it from the wall socket. Drain every drop from the water tank using the drain spout—any residual moisture causes spills during filter replacement. Lay down towels to protect surfaces from accidental drips.
You’ll need these specific items ready:
– Correct Vicks replacement filter for your model
– Clean microfiber cloth or paper towels
– Shallow bowl for filter soaking
– Scissors (only if trimming is necessary)
– Flashlight to inspect housing tracks
Pro tip: Keep two filters on hand. Most Vicks units require replacements every 30-60 days during heavy use. Buying in pairs prevents emergency runs to the store when performance drops.
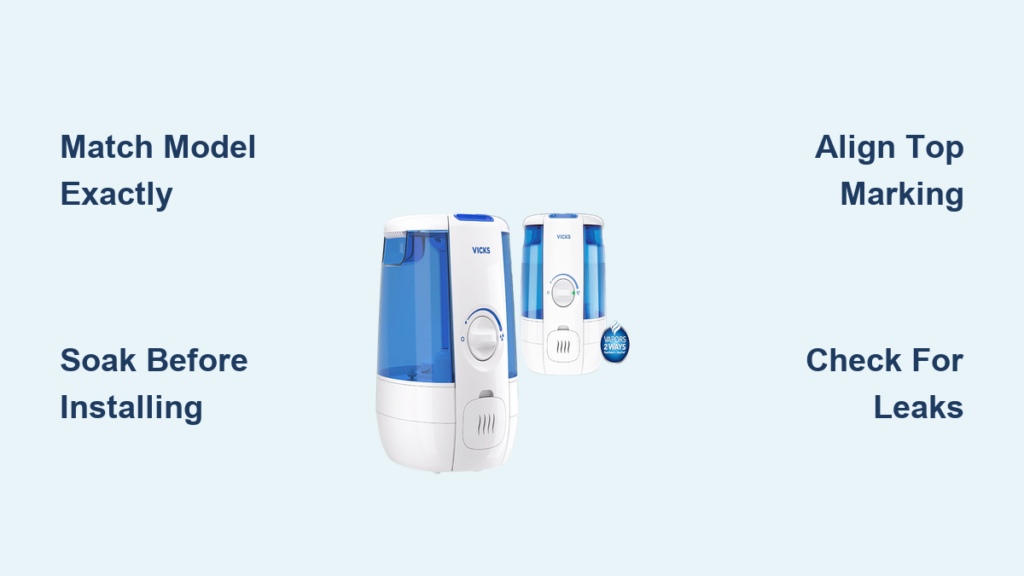
Match Filter to Your Exact Vicks Model
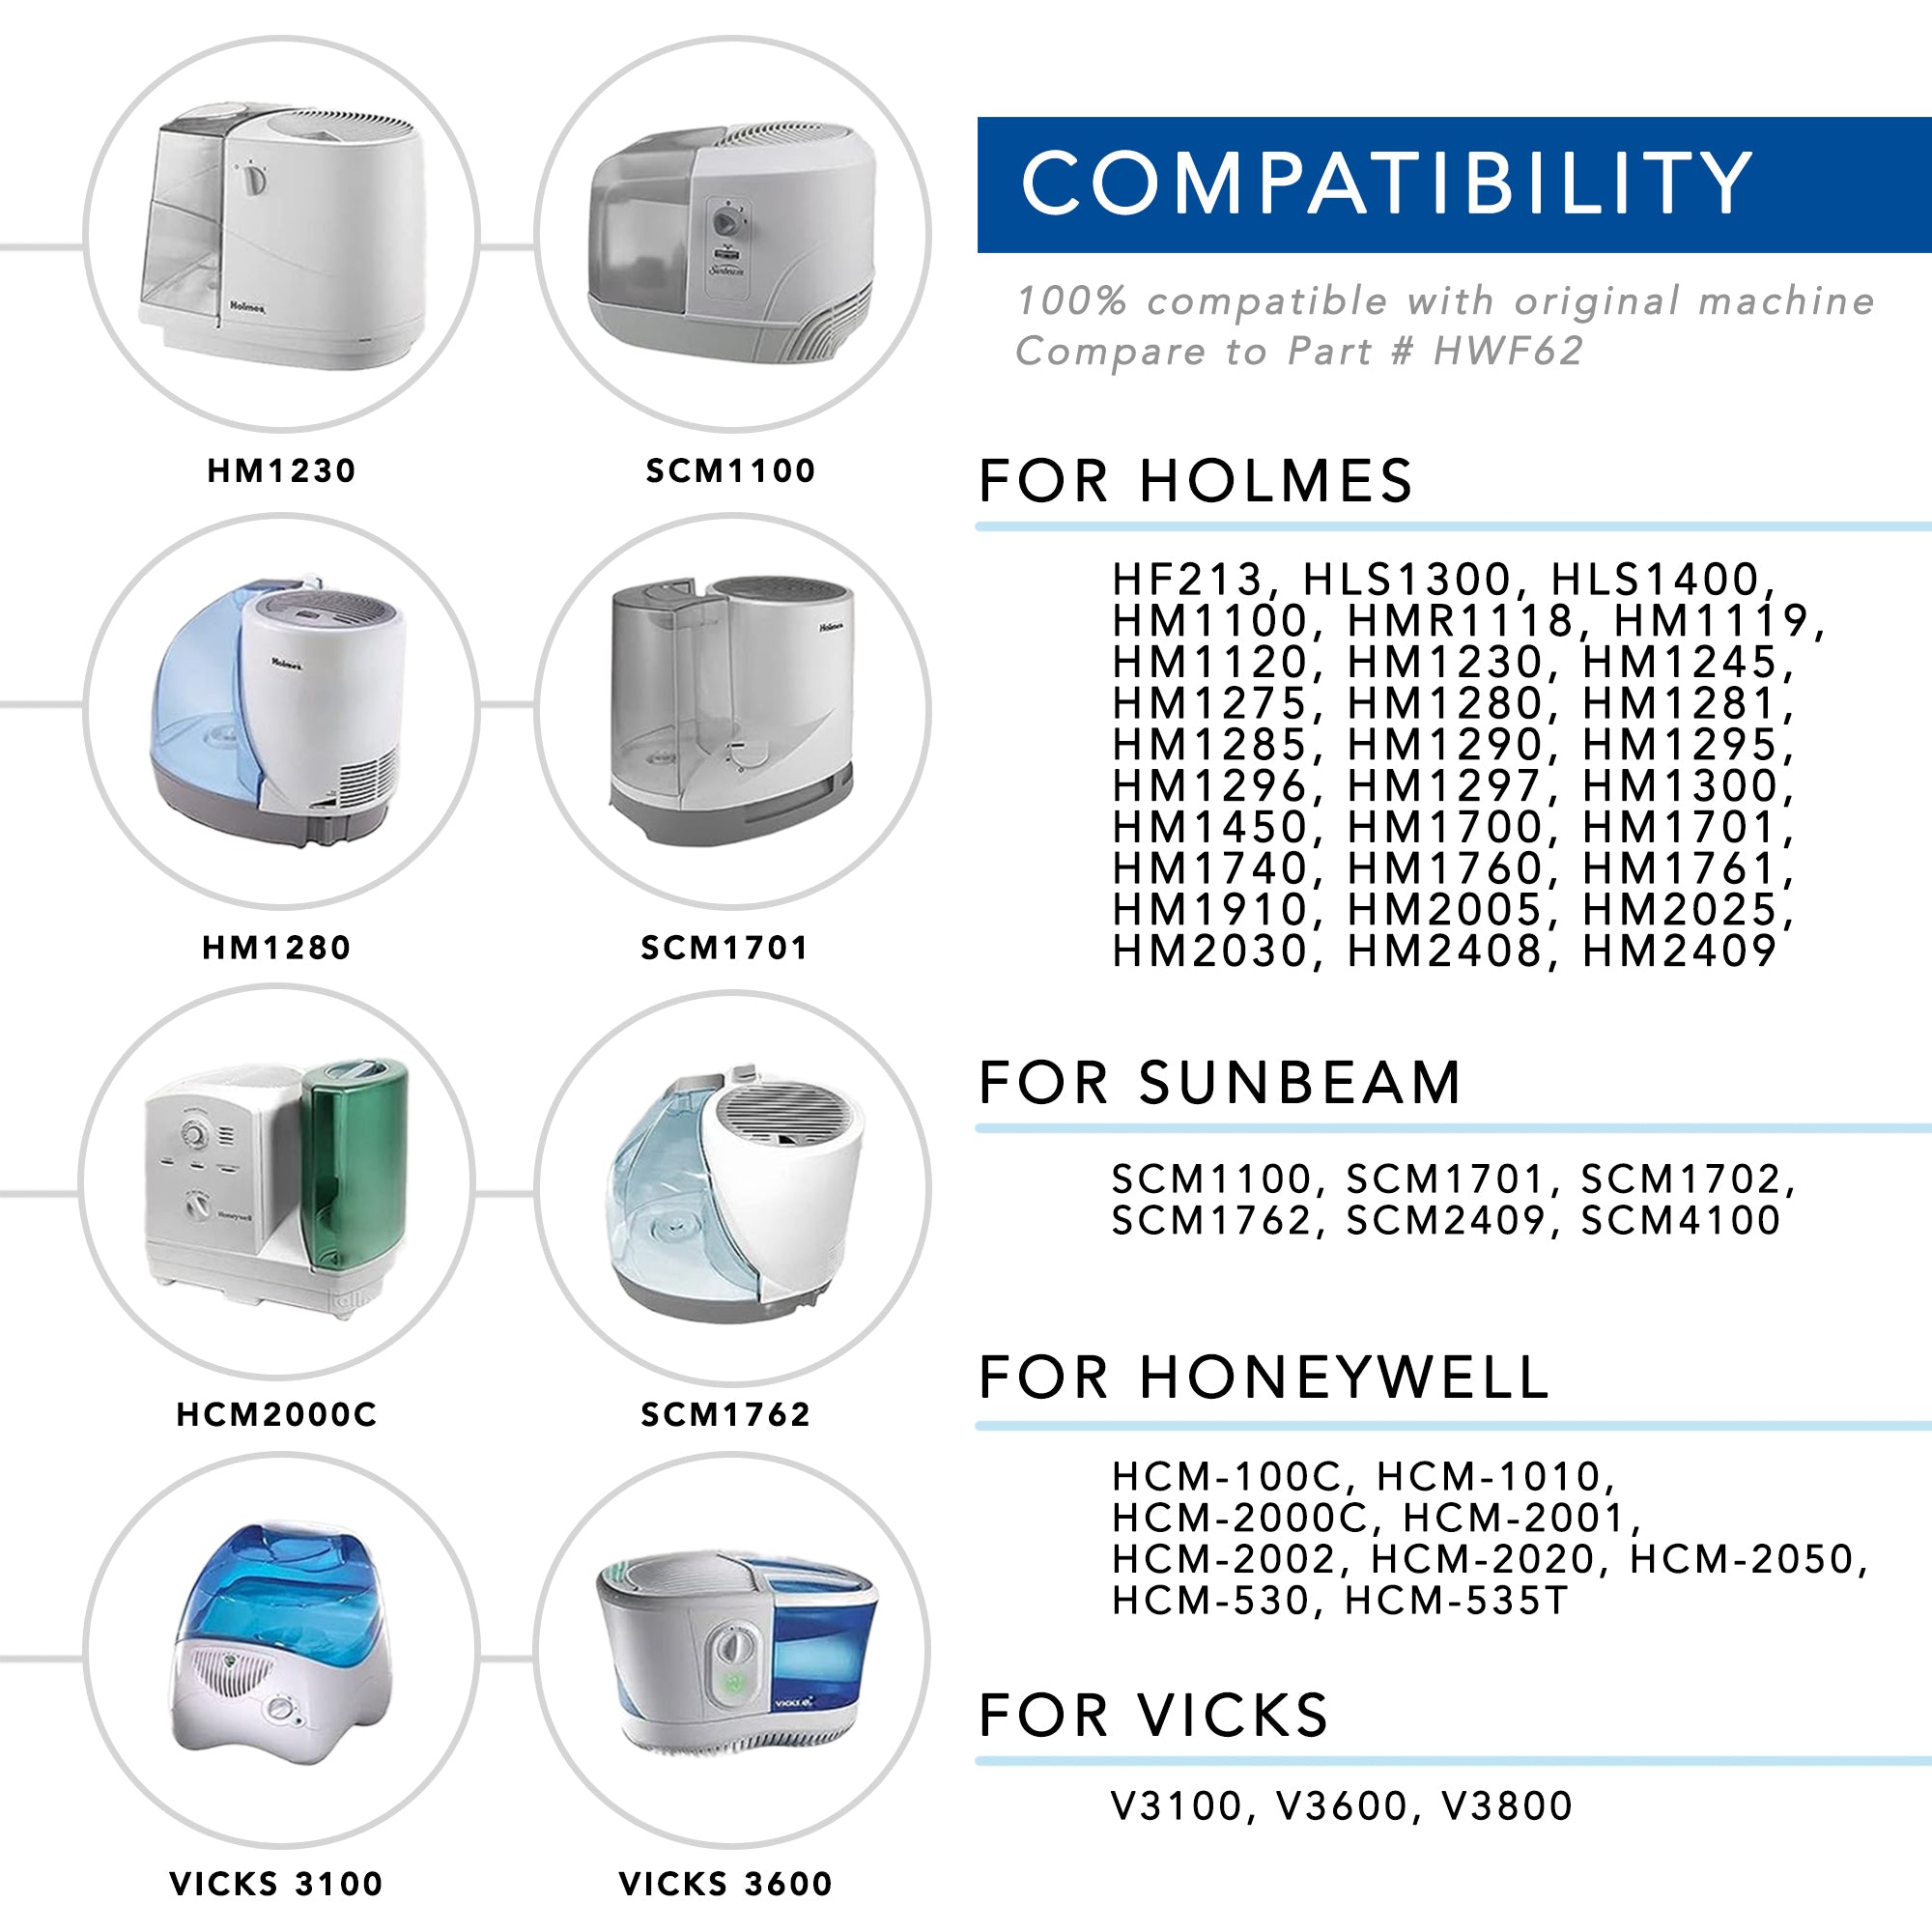
Installing the wrong filter causes leaks and poor mist output. Vicks uses distinct filters across models—never assume compatibility. Locate your unit’s model number in these three spots:
- Baseplate: Check the molded imprint on the bottom plastic surface
- Rear panel: Look for a white sticker near the power cord entry
- Tank interior: Open the water reservoir lid and inspect the underside
Critical filter-model pairings:
– V3700 series → WF2 filter
– V3900 series → WF3 filter
– V4600 series → WF4 filter
– Starry Night editions → SCWF2 filter
Verify before opening packaging: Hold the new filter box against your old unit. The packaging diagram must mirror your humidifier’s housing shape. If uncertain, search “[Your Model] Vicks filter” online using your smartphone—never guess.
Remove Contaminated Old Filter Safely
Step 1: Find the filter compartment—typically a rectangular slot on the unit’s back or side with visible release tabs.
Step 2: Press both tabs inward simultaneously while pulling the housing straight out. Forcing it sideways cracks the plastic tracks.
Step 3: Slide the saturated filter from the housing. It will feel heavy (waterlogged) and appear dark gray or brown from mineral buildup.
Step 4: Note the orientation markings—a raised “TOP” symbol or directional arrow stamped on the frame.
Critical warning: Discard the old filter immediately in a sealed plastic bag. These harbor mold spores and bacteria that spread through mist if left exposed.
Activate New Filter With Proper Soaking
Recommended soaking method:
1. Fill a bowl with cool tap water (no hot water—it damages fibers)
2. Submerge the new filter completely for 5-10 minutes
3. Lift out and gently squeeze sides to release excess water
4. Stop when it feels uniformly damp—not dripping
Quick alternative: Hold under cool running water for 120 seconds, rotating constantly to wet all pleats.
Inspect before installation:
– Confirm no tears in the paper membrane
– Check plastic frame isn’t warped during shipping
– Verify thickness matches old filter (compressed filters won’t seal properly)
Insert Filter Into Housing Correctly

Step 1: Align the “TOP” marking upward—reversing it blocks water absorption.
Step 2: Slide the filter straight into housing tracks until it seats fully. It should glide smoothly without resistance.
Step 3: Press lightly across the top edge to ensure flush contact with housing walls.
Step 4: If wobbling occurs, check for missed plastic packaging strips—some filters ship with protective sleeves.
Trimming only when essential: If the new filter extends 1/4 inch beyond the housing base, use sharp scissors to make one clean cut across the bottom edge. Never trim the sides or top.
Reassemble Unit Without Leaks
Filter housing installation:
– Slide the loaded housing straight back into the unit until you hear a distinct click
– Test stability by tugging gently—no movement should occur
– Confirm zero gaps around the housing perimeter
Water tank preparation:
– Rinse tank thoroughly with cool water (no soap—it leaves residue)
– Fill only with cool, clean water to the MAX line
– Screw the cap on tightly with quarter-turn clicks
Power-up sequence:
1. Plug into outlet away from water sources
2. Set to lowest mist level first
3. Listen for consistent low hum (grinding sounds indicate errors)
4. Verify visible mist within 5 minutes
Fix Immediate Installation Problems
Filter Housing Won’t Lock Into Place
- Recheck model compatibility—WF2 won’t fit V3900 units
- Remove all plastic wrapping from new filter
- Shine flashlight into housing tracks—bent tabs require gentle realignment with a flat screwdriver
- Compare dimensions: New filter should match old unit exactly
No Mist Despite Full Water Tank
- Confirm filter soaked for minimum 5 minutes (dry filters block water)
- Check water level covers the tank’s internal float sensor
- Verify filter orientation—reversed filters absorb but won’t release mist
- Run vinegar solution through system to dissolve hidden mineral crust
Musty Odor After New Filter Installation
- Operate unit on high for 30 minutes to flush manufacturing residues
- Empty and refill tank with fresh water
- Add 2 drops white vinegar to water reservoir for first use
- Replace water daily for 7 days to eliminate processing chemicals
Implement Weekly Filter Care Routine
After every 3 days of use:
– Power down and unplug the unit
– Remove filter and rinse under cool water
– Gently shake to dislodge trapped minerals
– Wipe housing tracks with vinegar-dampened cloth
– Inspect filter for dark spots indicating early mold
Monthly deep maintenance:
– Soak filter in 50/50 white vinegar solution for 20 minutes
– Rinse under running water until vinegar smell vanishes
– Clean tank interior with soft brush and vinegar solution
– Replace filter immediately if discoloration persists after cleaning
Replace filters when you see:
– Gray/brown color throughout (not just edges)
– Lingering musty smells after vinegar cleaning
– Reduced mist despite full water tank
– Visible white mineral crust on housing
Maximize Filter Longevity With Smart Habits
Water quality is critical:
– Distilled water eliminates 90% of mineral buildup
– Install an affordable faucet water filter
– Never leave stagnant water in tank for >24 hours
Optimize unit placement:
– Position at least 3 feet from walls to ensure airflow
– Avoid direct sunlight (accelerates algae growth)
– Keep away from heating vents (dries filters prematurely)
Storage protocol for off-season:
– Remove filter and dry completely for 48 hours
– Store in sealed container with silica gel packets
– Always replace filter after 3+ weeks of storage
Schedule Ongoing Maintenance After Installation
Your correctly installed Vicks humidifier now delivers hospital-grade moisture control. Mark your calendar for the next filter swap based on usage—replace every 30 days during flu season or 60 days in moderate climates.
Add these to your maintenance checklist:
– Monthly tank descaling with vinegar solution
– Quarterly inspection of demineralization cartridges
– Bi-annual power cord examination for fraying
– Annual housing track cleaning with cotton swabs
A properly installed Vicks humidifier filter transforms dry, irritating air into soothing moisture that eases breathing all night. Spend two minutes now verifying your installation—check for steady mist output and silent operation. When you wake to comfortable humidity instead of scratchy throats, you’ll know those 10 minutes of filter replacement paid off. Your lungs will thank you tonight.


