
Waking up to cracked lips and a parched throat because your humidifier ran dry overnight is more than annoying—it sabotages your sleep quality and respiratory health. If you’ve ever spilled water while refilling your unit or wondered why mineral deposits keep clogging your mist output, you’re not alone. Mastering how to put water in a humidifier correctly prevents leaks, extends your device’s lifespan, and ensures consistent moisture where you need it most. This guide cuts through the confusion with model-agnostic steps that work whether you own a basic evaporative unit or a high-tech ultrasonic model. You’ll learn exactly how to fill your humidifier safely, avoid common pitfalls, and keep it running efficiently for years.
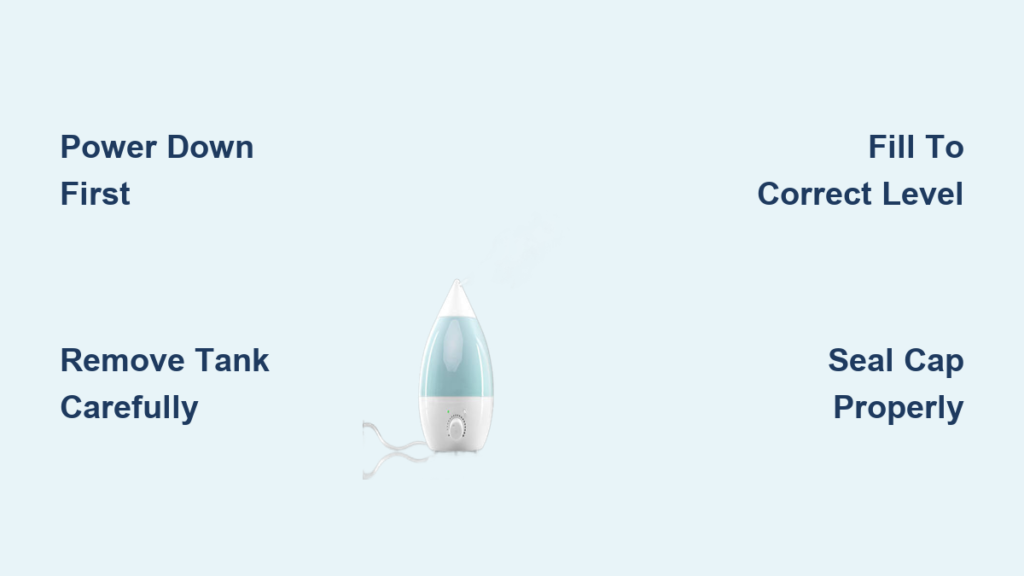
Power Down Before Touching Water
Electricity and water don’t mix—period. Skipping this step risks short-circuiting your humidifier or causing electrical shock. Always disconnect power completely before handling the water tank.
Critical Shutdown Sequence
- Press the power button to deactivate the unit (don’t assume turning off the mist setting is enough)
- Unplug the cord directly from the wall outlet—power strips can still deliver current
- Wait 30 seconds for residual electricity to dissipate from internal components
- Confirm the display panel is dark or shows “OFF” status
Pro tip: If your humidifier has been running for hours, let the base cool for 2 minutes. Heating elements in warm-mist models stay hot enough to cause burns even after shutdown. Never pour cool water into a hot tank—it can warp plastic or crack ceramic parts.
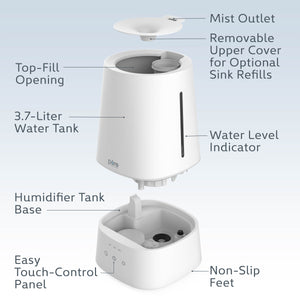
Remove the Water Tank Without Spills

Yanking the tank sideways is the #1 cause of accidental flooding. How you lift it determines whether water stays inside or soaks your nightstand.
One-Hand Stability Method
Place your palm flat against the humidifier base to anchor it. Grip the tank handle (or sides if no handle exists) and lift vertically in one fluid motion. If water sloshes inside, pause halfway to let it settle before continuing upward. Set the tank on a folded towel to catch drips from residual moisture.
Heavy Tank Handling for 2+ Gallon Units
For larger console models, cradle the tank’s base with both palms while keeping it perfectly level. Never tilt it toward you—water will rush to the lowest point and spill from the fill opening. Move slowly across the room to maintain balance, especially if carrying it to a sink.
Locate and Open the Fill Cap Correctly
Misaligned caps cause 70% of leaks. Knowing your tank’s fill design prevents stripped threads and slow drips that ruin furniture.
Identify Your Fill System Fast
- Top-fill tanks: Look for a screw cap or push-button lid on the tank’s upper surface (common in bedside models)
- Bottom-fill tanks: Flip the tank upside down—the cap sits beneath near the base connector (typical in console units)
- Front-access tanks: Press the release lever on the tank’s side to swing open the fill door
Leak-Proof Opening Technique
Hold the tank inverted over a sink to drain any leftover water. Rotate the cap counter-clockwise until it releases—never force it if stuck. Inspect the rubber gasket for hairline cracks; replace it if damaged (most manufacturers sell spares). Set the cap on a clean paper towel to avoid grit contamination.
Fill with the Right Water at Correct Levels

Using hot water or additives voids warranties and creates breathing hazards. Your humidifier’s performance lives or dies by this step.
Precision Fill Guidelines
- Maximum line: Stop ¼ inch below the “MAX” mark to allow expansion space
- Minimum line: Never fill below the “MIN” indicator—this strains the pump
- Ideal fill: Target 1 inch below max for 8-12 hour runtime without overflow
Water Type Cheat Sheet
| Water Type | Best For | Why Avoid Otherwise |
|---|---|---|
| Cool tap water | Soft water areas | Causes heavy mineral buildup in hard water zones |
| Filtered water | Moderate hard water | Slows but doesn’t prevent scaling |
| Distilled water | Ultrasonic models/hard water | Prevents white dust and clogs (worth the cost) |
Critical warning: Never use hot water—thermal shock cracks tanks. Skip essential oils unless your model has a dedicated diffuser tray. Salt water or medications corrode internal parts and release harmful vapors.
Seal the Cap Like a Pro
A loose cap guarantees leaks, but over-tightening strips threads. Get this right to avoid midnight cleanup emergencies.
Finger-Tight Security Test
Align cap threads perfectly before turning. Rotate clockwise until snug, then add one-quarter turn max with your fingertips. Test security by trying to twist it further—it shouldn’t budge. If you need tools to tighten, you’ve gone too far.
10-Second Leak Check
Hold the filled tank inverted over a sink for 10 seconds. Any drips mean:
– Cap isn’t fully seated (realign and tighten)
– Gasket has debris (wipe with damp cloth)
– Threads are damaged (replace cap immediately)
Reinstall the Tank with Perfect Alignment
Misalignment breaks the water seal between tank and base. This single step prevents “phantom leaks” that seem to come from nowhere.
Four-Point Seating Verification
- Visual check: Tank edges should sit flush against the base with no gaps
- Audible confirmation: Listen for the distinct “click” as connectors lock
- Tactile test: Press down firmly—you’ll feel resistance when fully seated
- Stability proof: Gently nudge the tank—it shouldn’t wobble or tilt
Common mistake: Forcing the tank down when misaligned. If it doesn’t slide smoothly, lift and reposition. Never screw the tank into the base—this cross-threads connectors and requires professional repair.
Restart and Validate Operation
Rushing away after refilling causes avoidable disasters. First-time monitoring catches issues before they escalate.
Essential Startup Protocol
Plug directly into a wall outlet (not a power strip). Power on and watch for mist within 90 seconds. Within 5 minutes:
– Check the base for pooling water (indicates cap or tank leak)
– Verify consistent mist output (sputtering means air bubbles)
– Listen for unusual grinding (signals pump strain from low water)
First-Hour Watchlist
Inspect hourly for the first 4 hours:
– Water level dropping steadily (not too fast/slow)
– No condensation on the tank exterior
– Humidity reading rising on your hygrometer
– Zero moisture under the unit
Prevent Recurring Leaks Permanently
Most “faulty humidifier” complaints stem from improper filling habits. These maintenance tweaks solve 95% of chronic issues.
Monthly Cap Maintenance
Remove caps during deep cleaning and:
– Soak in vinegar for 15 minutes to dissolve mineral deposits
– Run a toothpick along thread grooves to clear debris
– Replace rubber gaskets every 6 months (they harden and crack)
Pro tip: Place a water-resistant mat under your humidifier. It catches minor leaks and simplifies cleanup. For hard water areas, switch to distilled water—it pays for itself by reducing descaling frequency from weekly to monthly.
A properly filled humidifier runs silently for 12+ hours, delivers clean moisture, and never leaves puddles on your furniture. How to put water in a humidifier isn’t just about pouring—it’s a precise ritual that protects your health and investment. Stick to cool water, respect the fill lines, and always verify cap security. Do this right, and you’ll breathe easier knowing your unit works flawlessly night after night. Now that you’ve mastered filling, set a monthly reminder to clean your tank—mineral-free internals make refilling even faster next time.


