

Your Shark air purifier works tirelessly to keep your indoor air clean, but when it’s time to replace the filter, many homeowners feel uncertain about the process. Knowing how to replace shark air purifier filter correctly ensures your unit continues capturing 99.98% of airborne particles as designed. A clogged or exhausted filter not only reduces air quality but forces your purifier to work harder, potentially shortening its lifespan. The good news? This essential maintenance task takes just minutes and requires no special tools or technical expertise.
Whether you’ve noticed reduced airflow, increased allergy symptoms, or your filter indicator light has turned on, replacing your Shark filter is simpler than you might think. This guide walks you through each step for popular models like the HP100 series, ensuring you maintain optimal air purification without frustration. By following these instructions, you’ll keep your home’s air fresh, clean, and healthy for everyone who breathes it.
Gather Your Replacement Supplies
Having everything ready before starting makes the filter replacement process smooth and efficient. While Shark air purifiers are designed for user-friendly maintenance, preparing properly prevents unnecessary delays or mistakes that could affect your unit’s performance.
Verify Your Filter Model
Before purchasing a replacement, always check your specific Shark model number—typically found on a label at the back or bottom of your unit. The HE1FKBASMB filter with Anti-Allergen True HEPA technology fits multiple models including HP100, HP153, HP102PET, HP132, and HC450-455 series. Authentic filters carry GTIN 10622356592410 and UPC 622356592413 for verification. Installing an incompatible filter creates gaps that allow unfiltered air to circulate, defeating the purpose of your air purification system.
No Tools Necessary
Shark designed their air purifiers for tool-free filter replacement, making this one of the easiest maintenance tasks you’ll perform. Simply unplug the unit, remove the front panel, swap filters, and restore power—no screwdrivers or special equipment required. For optimal results, have a soft cloth nearby to wipe the compartment and a vacuum with brush attachment for monthly grill cleaning. This preparation ensures your unit operates at peak efficiency after the filter change.
Access the Filter Compartment
Opening your Shark air purifier requires understanding its user-friendly design that balances secure operation with easy maintenance access. The front panel’s release mechanism allows quick filter changes without compromising safety during normal operation.
Locate the Release Mechanism
Your Shark unit features a subtle release tab along the panel’s edge—usually at the bottom or sides. Run your fingers along these areas to feel for a slight indentation or protrusion that serves as the release point. Some models use magnetic attachment rather than clips, so you’ll feel resistance give way smoothly when pressed correctly. Never force the panel—applying excessive pressure can damage internal components and compromise the unit’s structural integrity.
Remove the Front Panel Safely
Press the release tab firmly while simultaneously pulling the panel toward you with your other hand. The front cover should detach cleanly without resistance. Set the panel aside on a soft surface to prevent scratches. Take note of how the panel was positioned so you can reinstall it correctly later—most models have alignment guides that make reattachment straightforward. This careful approach prevents damage to the sensitive clips or magnets that secure the panel during operation.
Remove the Old Filter

With the compartment exposed, you can now address the heart of your air purification system. This step reveals exactly what your filter has captured from your indoor environment over the past several months.
Extract the Filter Carefully
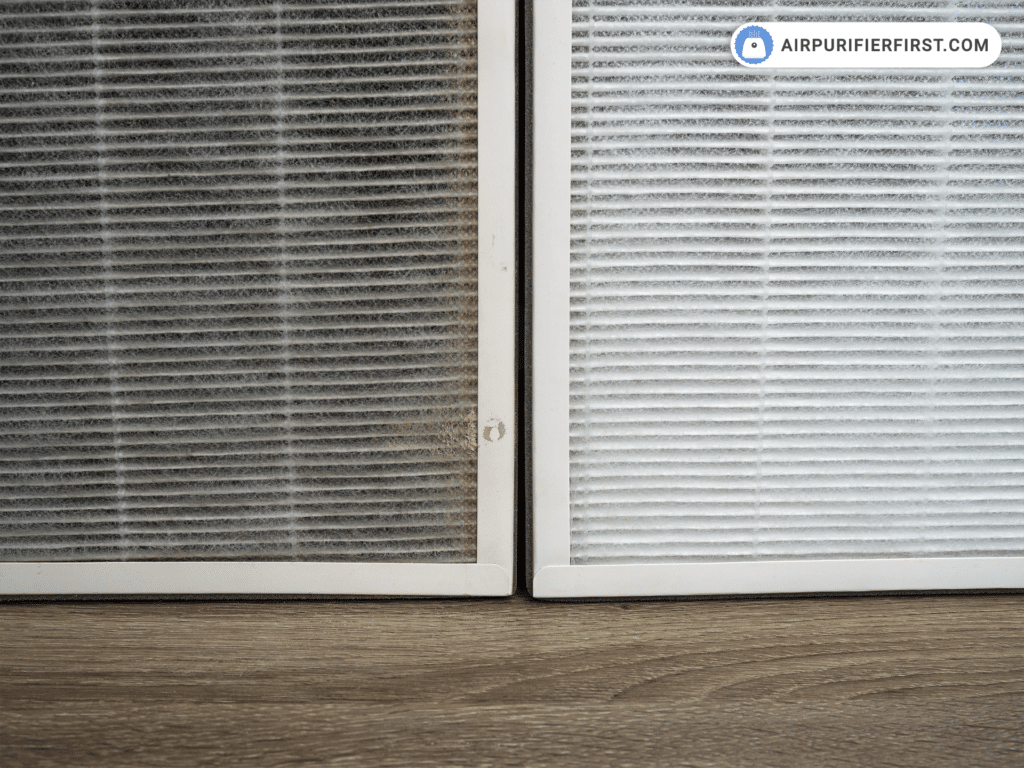
Grasp the old filter firmly at the edges and pull it straight out in a smooth motion. Avoid shaking or bending the filter, as this can release captured particles back into your living space. A properly used filter will show visible dust accumulation concentrated along the pleated edges—a clear sign it’s been effectively capturing airborne contaminants. If the filter appears relatively clean despite months of use, check your unit’s placement; proper positioning is crucial for maximum particle capture.
Assess Filter Condition and Air Quality
Examine your used filter to understand your home’s air quality patterns. Heavy dust buildup indicates high particle levels, possibly from pets, construction, or inadequate ventilation. Uneven accumulation suggests airflow issues that might require repositioning your unit away from walls or obstructions. This visual assessment helps you determine whether you should replace filters more frequently based on your specific environment rather than adhering strictly to the 6-12 month guideline.
Install the New Filter Correctly
Proper installation ensures your Shark air purifier delivers the clean air performance you expect. Taking just a few extra seconds to verify orientation prevents reduced efficiency that could compromise your indoor air quality.
Check Filter Before Installation
Unwrap your new filter and inspect it for shipping damage—look for tears, compressed pleats, or other defects that could affect performance. Verify the arrows indicating airflow direction match your unit’s requirements. Never install a filter with protective plastic still in place—this common mistake completely blocks airflow and renders your purifier ineffective. The filter should feel substantial and rigid, with evenly spaced pleats that maximize surface area for particle capture.
Insert with Proper Alignment
Slide the new filter into the compartment following the same path as the old one, ensuring the airflow arrows point in the correct direction (usually toward the back of the unit). The filter should seat flush against the compartment back without gaps. Gently press along the edges to ensure full contact—any spaces allow unfiltered air to bypass the filtration system. A properly installed filter slides in smoothly; if you encounter resistance, double-check the orientation before forcing it into place.
Close and Restore Power
The final steps ensure your Shark air purifier operates safely and efficiently with its new filter. Rushing this stage could trigger error codes or reduce performance, negating your maintenance efforts.
Reattach the Front Panel
Align the panel with the unit’s frame, matching any notches or guides. Press firmly around all edges until you hear the clips engage or feel the magnets secure the panel. The front cover should sit perfectly flush with the main unit—no gaps, no misalignment. Test the panel’s security by gently tugging at each corner; it should remain firmly attached without rattling or shifting during operation.
Power On and Verify Operation
Plug in your unit and power it on, selecting your preferred fan speed. Listen for normal operation sounds—no unusual vibrations or grinding noises. Check airflow from the exhaust vents to ensure it matches previous performance levels. Most Shark models feature indicator lights that confirm proper installation; watch for any warning symbols that might indicate improper filter seating or other issues requiring attention.
Troubleshooting Common Issues

Even with careful installation, occasional problems may arise. Knowing how to address these ensures your air purifier returns to optimal performance quickly.
Unit Won’t Power On After Replacement
First verify the unit is properly plugged into a working outlet. Check that the front panel is fully secured, as many Shark models have safety switches that prevent operation if the panel isn’t correctly attached. If the unit still won’t power on, unplug it for 30 seconds then try again—this often resets any temporary electrical glitches. Persistent issues may require contacting Shark customer support for further assistance.
Filter Indicator Won’t Reset
Most Shark models require a specific button sequence to reset the filter indicator after replacement. Typically, you’ll need to press and hold the filter reset button for 3-5 seconds until the indicator light changes. Consult your specific model’s manual for exact instructions, as procedures vary between units. If the indicator persists, clean around the sensor area with a soft, dry cloth to remove any dust that might be interfering with the reset process.
When to Replace Your Filter
Understanding replacement timing ensures optimal air quality without unnecessary filter changes. Shark recommends replacing filters every 6-12 months, but your specific environment may require more frequent changes.
Watch for Performance Signs
Replace your filter immediately if you notice:
– Reduced airflow from exhaust vents
– Increased operating noise at normal fan speeds
– More frequent dust accumulation on surfaces
– Worsening allergy symptoms despite unit operation
– Visible filter saturation with dust and debris
These indicators often appear before the filter indicator light activates, especially in homes with pets or high pollution levels. Proactive replacement maintains consistent air quality rather than waiting for performance to decline noticeably.
Optimize Filter Longevity
Extend your filter’s effective lifespan by:
– Running the purifier continuously at lower speeds rather than intermittently at high speeds
– Keeping windows closed during high pollen or pollution days
– Addressing indoor pollution sources at their origin (pet dander, cooking emissions)
– Performing monthly vacuuming of intake grills to prevent premature clogging
These practices reduce the particle load on your filter, allowing it to maintain peak efficiency throughout its service life.
Replacing your Shark air purifier filter doesn’t need to be complicated. By following these straightforward steps, you’ll maintain clean, healthy indoor air while maximizing your unit’s performance and lifespan. Remember to mark your calendar for the next replacement based on your specific household conditions—typically every 6-12 months. With proper maintenance, your Shark air purifier will continue providing exceptional air quality, giving you and your family the peace of mind that comes with breathing truly clean air every day.


