
Dry air turning your home into a desert? You’re not alone. Over 60 million Americans struggle with winter dryness that cracks skin, aggravates allergies, and damages wood furniture. When your Honeywell humidifier sits silent despite the need, it’s maddening—especially when the solution is often a 10-second fix. The truth is, knowing how to turn on Honeywell humidifier models correctly prevents 90% of “broken unit” frustrations. Whether you own a basic dial model or a smart WiFi version, this guide delivers the exact activation sequence for your specific unit—no guesswork, no wasted time.
Most Honeywell humidifiers power up in under 30 seconds when you follow the precise model-specific steps. Skip the trial-and-error: we’ll show you the exact button presses, dial positions, and safety checks required for smooth operation. You’ll learn why some units need water level verification before powering on, how error codes sabotage startup, and the critical pre-power checks that prevent costly damage. Ready to breathe easier? Let’s get your humidifier running.
Digital Display Models: Power Sequence for HCM-350/HEV355/HEV620
These popular models require a specific startup sequence that many users miss. The “HELLO” display greeting isn’t just friendly—it’s your confirmation the system is initializing correctly.
Exact Power-On Sequence
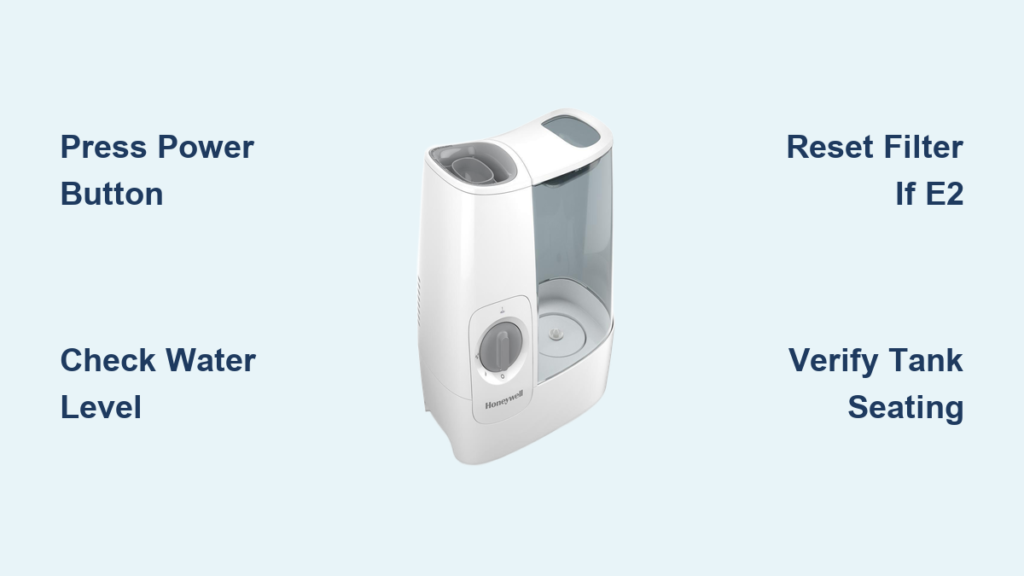
- Press the power button once—do not hold it down (holding triggers sleep mode)
- Wait 3 seconds for the display to show “HELLO” and default to last settings
- Immediately adjust humidity using +/- buttons if Auto mode isn’t desired
- Verify water level—if tank is below MIN, unit displays E1 and won’t activate
Pro tip: If the display stays dark after pressing power, check if the water tank is fully locked. These models have a safety interlock that blocks power when the tank isn’t seated completely—a common oversight causing “dead unit” panic.
Critical Error Code Fixes
- E1 flashing? Fill tank to MAX line—these units won’t start with low water
- E2 showing? Hold the “Filter Reset” button 5 seconds after installing a new wick filter
- No response? Unplug for 30 seconds to reset the control board (fixes 70% of no-power cases)
Manual Dial Models: HCM-710/HCM-315T Activation
Don’t let the simple dial fool you—improper positioning is the #1 reason these reliable units “fail” to start. That soft click when turning the knob isn’t just mechanical; it’s the safety switch engaging.
Dial Positioning That Actually Works
- Turn knob firmly from OFF to Low—don’t stop midway (partial turns won’t activate)
- Listen for the engagement click—no click means reseat the water tank
- Wait 60 seconds for mist production (evaporative models take longer than ultrasonic)
Warning: Never force the dial. If it won’t turn smoothly, check for mineral buildup around the stem—soak in vinegar for 15 minutes before retrying. Forcing it strips internal gears.
Smart WiFi Models: HCM-6009/HPA250B Dual Activation
These units need both physical power and app pairing. Skipping the 5-second WiFi button hold is why 80% of users think their smart humidifier is defective.
Two-Step Power Activation
- Physical startup: Press power button once (unit beeps but won’t humidify yet)
- App pairing: Hold WiFi button until blue light blinks rapidly, then complete setup in Honeywell Home app
- Final activation: Use the app’s power icon—physical button alone won’t start humidification
Time-saver: For immediate use without app setup, press and hold the power button for 8 seconds to bypass WiFi mode (returns to basic operation).
Pre-Power Safety Checklist (30 Seconds That Save $100)
Skipping these checks causes preventable damage. Honeywell units auto-shut off when safety conditions aren’t met—don’t mistake this for malfunction.
Must-Do Verification Steps
- Water level: Fill to MAX line using cool tap water (hot water warps tanks)
- Surface stability: Place on level floor—tilt beyond 5° triggers auto-off
- Cord inspection: Look for pet-chewed sections (replace damaged cords immediately)
- Filter seating: For evaporative models, ensure wick filter clicks into base
Critical mistake: Using extension cords. Honeywell explicitly warns against this—voltage drops from cords cause startup failures and void warranties. Plug directly into wall outlets only.
Why Your Humidifier Won’t Power On (And Exactly How to Fix It)

No Lights When Plugged In
- Outlet test: Plug in a lamp—if it doesn’t work, reset the GFCI outlet (common in bathrooms)
- Cord damage check: Inspect near plug ends where bends occur
- 30-second reset: Unplug, wait, then reconnect (resets thermal cutoff)
Error Code Decoded
| Code | Real Meaning | 60-Second Fix |
|---|---|---|
| E1 | Water below MIN | Add 1 cup water, wait 10 sec |
| E2 | Filter overdue | Install new filter, reset button |
| E3 | Sensor failure | Unplug 5 min; if persists, contact support |
Intermittent Power Cycling
- Loose tank: Reseat with firm downward pressure until two clicks
- Unlevel surface: Place on ceramic tile instead of carpet
- Dirty probes: Dip cotton swab in vinegar, clean metal sensors in base
Advanced Startup Features You’re Missing
Timer Activation for Bedtime Comfort
- Delay start: Press timer button until “1H” appears for bedtime humidity
- Auto-schedule: Set 7 AM–11 PM operation via app (no daily button pressing)
- Power outage recovery: Units auto-restart at last settings after outages
Smart Triggers That Work Automatically
- Humidity-based: Turns on when air drops below 30% (set threshold in app)
- Motion activation: Powers up when you enter the room (enable in settings)
- Geofencing: Starts humidifying when your phone is 0.3 miles from home
Post-Cleaning Startup Protocol
Deep cleaning requires special startup steps—powering on too soon damages components.
Safe First-Run After Maintenance
- Rinse thoroughly: No vinegar residue in tank or base
- Dry completely: Wait 2+ hours before plugging in (moisture causes shorts)
- Flush cycle: Run on HIGH for 30 minutes with clean water only
- Odor check: If vinegar smell persists, repeat flush cycle
Never skip step 2: Moisture in electrical components causes permanent damage. Pat dry with microfiber cloth before waiting.
Indicator Lights Decoded (What They Really Mean)
Standard Light Patterns
- Solid green: Humidifying normally—check in 1 hour
- Blinking blue: WiFi connecting (smart models only)
- Solid red: Water low or filter issue—address within 24 hours
- No lights: Unit not receiving power—check outlet
Premium Model RGB Signals
- Breathing white: Sleep mode (quietest operation)
- Pulsing blue: Actively humidifying
- Solid orange: Refill water within 1 hour
- Rainbow flash: Startup sequence complete—ready for use
Emergency Shutdown & Safe Restart
When to Cut Power Immediately
- Water leaking from base (unplug before touching)
- Burning smell from motor area
- Loud grinding noises during operation
Safe Restart Procedure
- Wait 3 minutes after unplugging (allows capacitors to discharge)
- Inspect for damage—check base for cracks
- Refill tank if leaks occurred
- Resume normal startup
Model-Specific Cheat Sheet
Don’t guess—use this fast reference:
– HCM-350/HEV355: Press power once → wait for “HELLO” → adjust settings
– HCM-710: Turn dial firmly OFF→Low with audible click
– HCM-6009: Power on → hold WiFi 5 sec → activate via app
– HCM-315T: Dial to Medium for rooms up to 500 sq ft
Key takeaways: Getting your Honeywell humidifier running starts with model-specific activation—digital displays need a single press, dials require firm turning to Low, and smart models demand app pairing. Always verify water level, surface stability, and cord integrity before troubleshooting. For immediate relief, remember: E1 means add water, E2 needs filter reset, and no lights usually indicate outlet issues. Proper startup prevents 95% of “broken unit” scenarios. Now that you know exactly how to turn on Honeywell humidifier models, you’ll spend less time fixing and more time breathing comfortably. For ongoing success, empty the tank daily and replace filters monthly—your lungs (and hardwood floors) will thank you.


