
If your Honeywell air purifier sits unused in the corner because you’re unsure how to operate it properly, you’re missing out on cleaner indoor air for you and your family. Many homeowners purchase these powerful air cleaning systems only to struggle with basic operation, filter replacement schedules, or optimal placement. The truth is, using a Honeywell air purifier correctly can significantly reduce airborne allergens, pet dander, and household odors—but only when you understand its specific controls and features. In this guide, you’ll discover exactly how to set up your Honeywell unit, select the right operating mode for your needs, and maintain it for peak performance. Whether you have a basic model or a smart-connected version, these actionable steps will transform your air purifier from an expensive paperweight into your home’s most valuable health appliance.
Honeywell Air Purifier Unboxing and Initial Setup
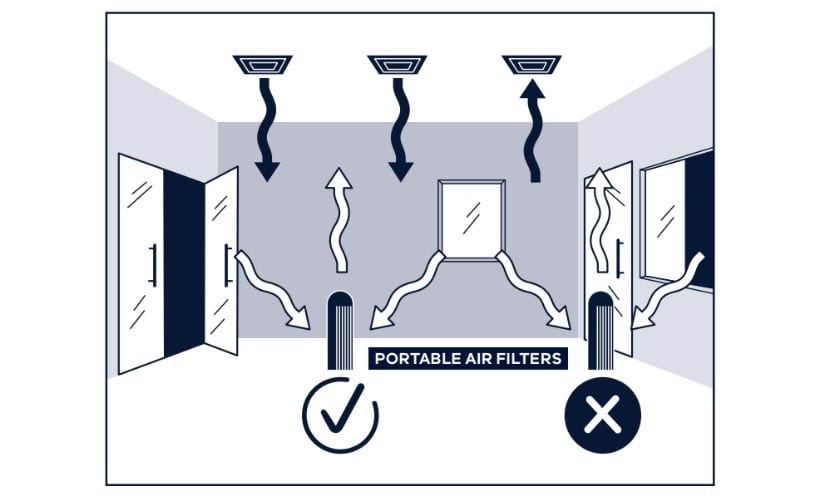
Remove your Honeywell air purifier from its packaging and carefully inspect all components. Most models include the main unit, pre-filter, true HEPA filter, and user manual. Before plugging in your device, locate a suitable placement location—ideally 3-5 feet off the ground with at least 12 inches of clearance on all sides for proper air circulation. Avoid placing your unit in corners, behind furniture, or near walls which restricts airflow and reduces effectiveness. For best results in bedrooms, position the purifier near your bed but not directly pointed at your face while sleeping.
Essential First-Time Configuration Steps
- Insert the pre-filter according to the directional arrows printed on the filter frame
- Place the HEPA filter into its designated compartment, ensuring proper alignment
- Plug the unit into a dedicated wall outlet (avoid extension cords for safety)
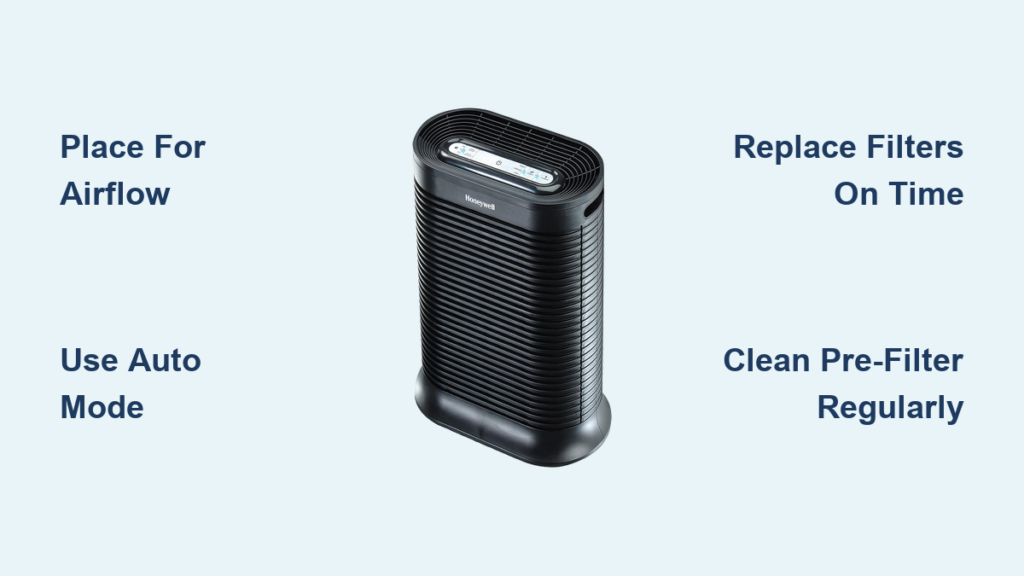
- Press the power button to activate the unit—most models will default to auto mode
- Set your desired fan speed using the control panel or remote (if included)
Common Initial Setup Mistakes to Avoid
Many users immediately reduce fan speed to the lowest setting for quiet operation, but this significantly limits cleaning capacity in larger rooms. Instead, begin with medium or high speed for the first 30-60 minutes to establish clean air, then adjust downward. Another frequent error involves placing the unit in closets or enclosed spaces—Honeywell purifiers require open space to circulate and clean air effectively. If your model has a filter replacement indicator, reset it after installing new filters by holding the designated button for 5-10 seconds until the light changes.
Operating Your Honeywell Air Purifier for Maximum Effectiveness
Run your Honeywell air purifier continuously for optimal air quality rather than intermittent use. Airborne contaminants constantly enter your home through doors, windows, and ventilation systems, so consistent operation maintains clean air rather than playing catch-up. Set the unit to auto mode when available, allowing its sensors to detect air quality changes and adjust fan speed automatically. During high-pollution periods like allergy season or wildfire smoke events, manually select a higher fan speed setting for more aggressive cleaning.
Optimal Placement Strategies by Room Type
Bedrooms: Position near your bed but at least 3 feet away, preferably at breathing level on a nightstand. Run continuously on low or medium speed overnight for quiet operation.
Living Rooms: Place centrally in the room with clear airflow paths, avoiding entertainment centers that create heat and block vents. Use higher speeds during gatherings or cooking hours.
Kitchens: Install away from cooking areas to prevent grease buildup on filters but close enough to capture cooking odors—medium speed works well for everyday use.
Honeywell Air Purifier Control Panel Decoded
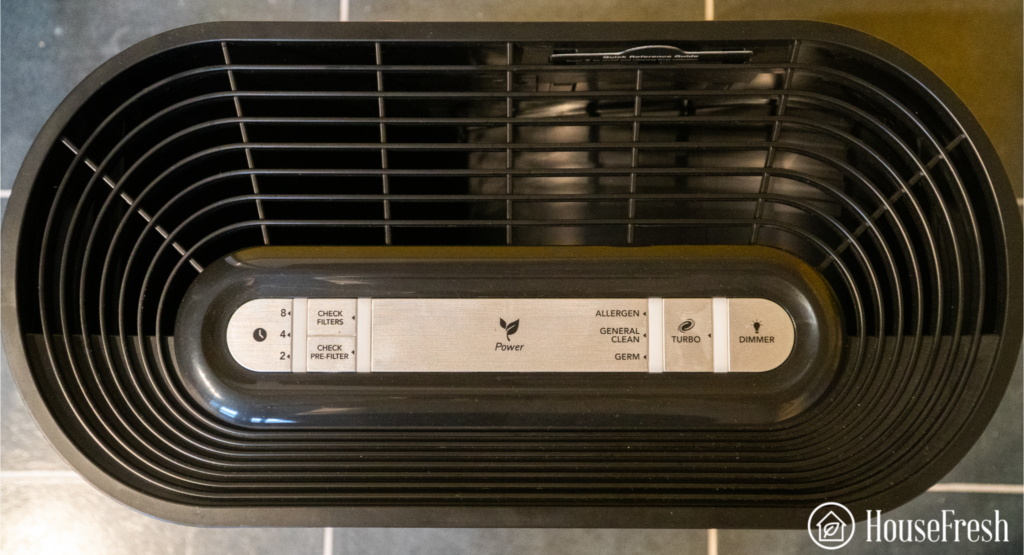
Understanding your specific model’s control panel prevents confusion during daily use. Most Honeywell units feature:
- Power button: Single press for on/off, sometimes a long press for standby mode
- Fan speed controls: Typically 3-5 settings from quiet sleep mode to turbo cleaning
- Auto mode indicator: Illuminates when unit automatically adjusts fan speed
- Filter indicator light: Changes color or blinks when replacement is needed
- Timer function: Sets automatic shut-off after 2, 4, or 8 hours
- Child lock: Prevents accidental setting changes (hold specific button for 3+ seconds)
Troubleshooting Common Honeywell Air Purifier Issues
When your Honeywell air purifier runs but doesn’t seem to improve air quality, check these common issues before assuming the unit is defective. First, verify you’re using genuine Honeywell replacement filters—third-party filters often lack proper filtration efficiency. Next, confirm the unit isn’t placed against walls or furniture blocking air intake vents on the sides or bottom. Many users mistakenly position air purifiers in closets or behind curtains, severely limiting their ability to circulate and clean air.
Why Your Honeywell Air Purifier Makes Unusual Noises
Grinding or rattling sounds: Typically indicates an obstruction in the fan assembly—unplug the unit and carefully inspect for debris like hair or small objects.
Increased humming noise: Often occurs when filters become saturated—replace both pre-filter and HEPA filter if cleaning doesn’t resolve the issue.
Clicking sounds during operation: Usually normal as internal components expand with heat, but persistent clicking may signal electrical issues requiring professional service.
Addressing Filter Replacement Indicator Problems
If your filter replacement indicator remains illuminated after installing new filters, perform a manual reset. Most Honeywell models require holding the filter reset button for 5-10 seconds until the light changes color or turns off. Consult your specific model’s manual as reset procedures vary—some require pressing multiple buttons simultaneously. Never ignore the indicator light for extended periods as operating with expired filters reduces cleaning efficiency by up to 50% and can damage the motor.
Honeywell Air Purifier Maintenance Schedule
Establish a consistent maintenance routine to maximize your Honeywell air purifier’s lifespan and performance. Clean the exterior housing weekly with a soft, dry cloth to prevent dust buildup on sensors. Vacuum the pre-filter every 2-4 weeks using a brush attachment to remove surface debris—this extends the life of your expensive HEPA filter. For permanent pre-filters, rinse under cool water monthly and allow 24 hours to dry completely before reinstalling.
Filter Replacement Timelines by Model Type

Basic models (HFD-120, 50250-S): Replace HEPA filter every 6-12 months depending on usage
Allergen removers (HPA300, HPA600): Replace HEPA filter every 12 months, carbon filter every 3 months
Smart models (HPA725WE): Follow digital indicator but generally replace HEPA filter annually
Commercial units: Replace filters every 3-6 months with continuous operation
Seasonal Maintenance Checklist
Create a seasonal maintenance routine for optimal performance year-round. In spring, replace filters before peak allergy season begins. During summer, increase pre-filter cleaning frequency due to higher pollen counts. Fall requires checking for pet hair accumulation if you have shedding animals. Winter maintenance should focus on addressing dry air issues—consider pairing your purifier with a humidifier as dry air increases static electricity that affects sensor accuracy.
Maximizing Your Honeywell Air Purifier’s Lifespan
Extend your investment’s value by following proper shutdown procedures when not in use for extended periods. Always unplug the unit rather than using standby mode for long-term storage. Remove and properly store replacement filters in sealed bags to prevent moisture damage. Store the main unit in a climate-controlled environment away from direct sunlight which can degrade plastic components over time.
Energy-Saving Operation Tips
Run your Honeywell air purifier on lower speeds during nighttime hours or when rooms are unoccupied to reduce energy consumption without sacrificing air quality. Models with auto mode typically use 30-50% less energy than constant high-speed operation. Close windows and doors in the room being purified to prevent the unit from working unnecessarily hard against outdoor pollutants.
When to Contact Honeywell Support
Contact Honeywell customer service if you experience persistent error codes, complete failure to power on after verifying the outlet works, or unusual burning smells during operation. Have your model number and purchase date ready—most units carry a 5-year limited warranty covering motor and electronic components. For units under warranty, never attempt internal repairs yourself as this voids coverage.
Final Note: Properly using your Honeywell air purifier transforms it from a simple appliance into your home’s invisible health guardian. By following these specific setup procedures, maintenance schedules, and operational best practices, you’ll ensure cleaner air for allergy sufferers, pet owners, and everyone breathing in your home. Remember to reset filter indicators after replacements, maintain proper clearance around the unit, and run it continuously for optimal results. For model-specific guidance, always refer to your original Honeywell documentation as features vary across their extensive product line. With consistent proper use, your Honeywell air purifier will deliver years of reliable service creating a healthier indoor environment.


