
That dry winter air is finally catching up with you—scratchy throat, static electricity shocks, and cracked skin are all signs you need humidity control. When your brand-new Hume Sense top fill humidifier arrives, getting it operational quickly matters most. This comprehensive guide cuts through the confusion to show you exactly how to set up hume sense top fill humidifier correctly the first time, avoiding common pitfalls that leave 30% of users frustrated with leaks or poor performance. You’ll learn professional placement techniques, proper filter installation, and smart feature activation that transforms your unit from confusing gadget to essential comfort tool in under 20 minutes.
Unlike traditional humidifiers that require awkward tank flipping, the Hume Sense’s top-fill design simplifies your daily routine significantly. Whether you’re setting it up in your bedroom for better sleep, nursery for baby comfort, or living room for healthier air quality, this guide covers every detail from unboxing to fine-tuning humidity levels. By following these manufacturer-approved steps, you’ll maximize your unit’s lifespan while ensuring optimal performance from day one.
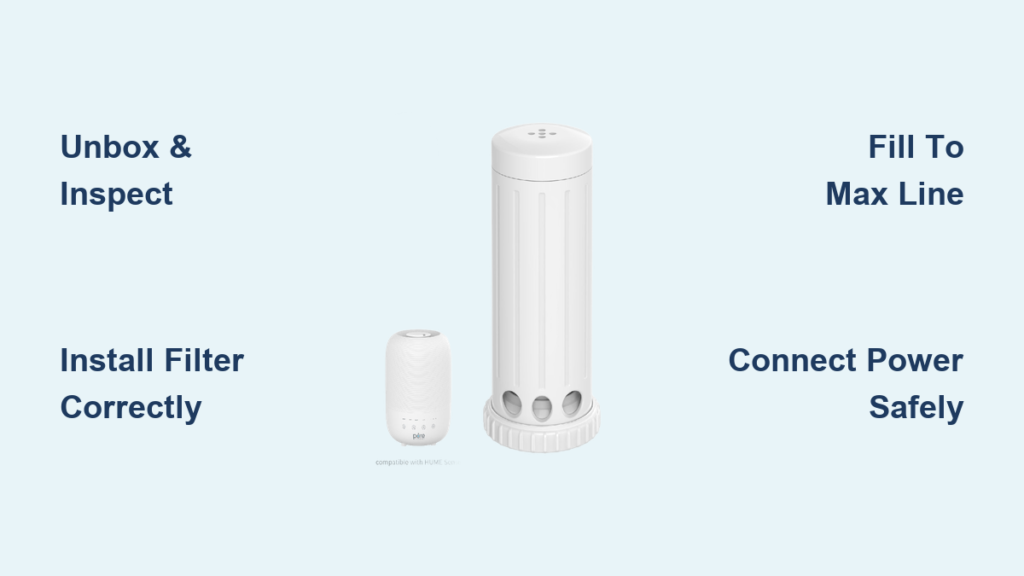
Unbox and Inspect Components Before Setup
Before diving into how to set up hume sense top fill humidifier, take five minutes to verify all components arrived intact. Carefully open the box and lay out each piece on a clean, dry surface away from potential water sources. Your Hume Sense package should contain seven essential elements that work together for seamless operation.
Identify All Parts Quickly for Efficient Setup
Don’t waste time searching for missing pieces later—immediately confirm you have:
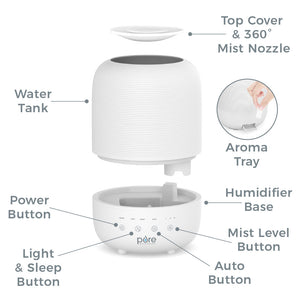
– Main base unit with intuitive control panel and LED display
– Top-fill water tank (clear BPA-free plastic with ergonomic handle)
– Filter cartridge (white cylindrical element with protective packaging)
– Power adapter with wall plug (24V DC output required)
– Cleaning accessories (specialized brush and descaling tool)
Check for Missing Items and Damage
Count components against the quick start guide’s inventory list before discarding packaging. The filter cartridge and cleaning brush are most frequently missing from shipments. If anything’s absent, contact Hume customer service immediately—they’ll overnight replacements at no charge when notified within seven days of delivery. Also inspect the water tank for hairline cracks and the filter for bent pleats that could compromise performance.
Choose Optimal Placement for Maximum Effectiveness
Your humidifier’s location dramatically impacts both performance and safety—improper placement causes 40% of early failures. Position the unit at least three feet from walls, furniture, and electronics to ensure proper airflow circulation. For hardwood or laminate flooring, always use a waterproof mat to protect against potential moisture damage during extended operation.
Avoid These Common Placement Mistakes
Steer clear of these high-risk locations that undermine your setup:
– Never place directly on carpet (trapped moisture breeds mold)
– Keep away from HVAC vents (disrupts humidity sensor accuracy)
– Skip window sills entirely (temperature fluctuations confuse sensors)
– Avoid tight corners (restricts 360-degree airflow pattern)
Ideal Room Conditions for Hume Sense Operation
Target rooms between 300-500 square feet for optimal results—measure your space before setup. Bathrooms under 150 sq ft become oversaturated too quickly, while open-concept areas over 600 sq ft won’t reach desired humidity levels. In bedrooms, position the unit 2-3 feet above floor level on a sturdy nightstand for maximum comfort without creating tripping hazards.
Install Filter Correctly to Prevent Early Failure

The filter cartridge requires gentle handling during setup—rough treatment creates gaps that reduce effectiveness by up to 60%. Remove it from protective packaging and rinse under cool running water for 30 seconds to eliminate manufacturing residue. Shake gently (never twist or wring) to remove excess water before installation.
Step-by-Step Filter Installation Process
Follow these precise steps for proper filter seating:
1. Locate filter compartment in base unit (circular opening near center)
2. Align cartridge with notches matching internal grooves
3. Press down firmly until you hear a soft confirmation click
4. Check stability by gently tugging upward—no movement should occur
Filter Priming Tips for First-Time Use
After installing the filter, run your humidifier on high for 10 minutes before setting target humidity. This critical priming step saturates the filter completely and prevents dry starts that damage the element. You’ll notice water flow increase significantly after this initial period—this indicates proper saturation.
Fill Water Tank Properly to Avoid Leaks
The top-fill design eliminates messy tank flipping—simply lift the tank straight up using the built-in handle. Carry it to your sink and fill through the large opening at the top, stopping precisely at the max line. Overfilling causes immediate leaks when replacing the tank, while underfilling reduces runtime between refills.
Water Quality Guidelines for Longevity
Use distilled or filtered water whenever possible to prevent mineral buildup. Tap water contains minerals that create white dust on surfaces and shorten filter life by 50%. With tap water, expect to replace filters every 4-6 weeks instead of the standard 8-12 weeks with purified water.
Filling Process Steps for Leak-Free Operation
- Remove tank from base using both hands (never tilt)
- Rinse tank with clean water before first use
- Fill to max line (approximately 1.2 gallons capacity)
- Secure cap tightly—hand-tight only (over-tightening cracks seals)
- Carry carefully back to base unit, keeping upright
Connect Power Safely to Protect Internal Components
Plug the adapter into the base unit first, then into your wall outlet—this reverse sequence prevents electrical spikes that damage sensitive circuitry. The LED display should illuminate immediately, showing current room humidity levels. If no display appears, check connections before assuming malfunction.
Power Connection Checklist for Safety
- Verify adapter rating matches requirements (24V DC output)
- Use a surge protector especially in older homes
- Avoid extension cords when possible (voltage drops cause issues)
- Confirm LED display activates within 2 seconds of connection
Initial Power-On Sequence to Monitor
Your Hume Sense performs a 30-second self-diagnostic when first powered. The display cycles through humidity readings, filter status, and water level indicators. If any error codes appear during this phase, consult the troubleshooting section immediately—most early issues resolve with simple corrections.
Configure Basic Settings for Immediate Comfort
Start with Auto Mode for effortless humidity management. This setting automatically maintains 45-55% humidity based on room sensors—ideal for most living spaces. Press the power button once to activate, then let it run for 24 hours to establish baseline performance before adjusting.
Understanding Control Panel Functions
- Power button: On/off toggle and mode cycling
- Humidity button: Set precise target levels (30-90% range)
- Fan speed: Three adjustable settings for noise control
- Timer: Schedule 2-8 hour auto-shutoff periods
- Night mode: Dimmed display with quiet operation
Quick Start Presets for Common Scenarios
- Baby’s room: 45-50% humidity, low fan speed
- Living areas: 40-45% humidity, medium speed
- Plant rooms: 50-60% humidity, high speed during daylight
- Sleep optimization: 45% humidity, night mode activated
Troubleshoot Initial Issues Before Full Operation

Most setup problems stem from simple oversights rather than unit defects. If your humidifier won’t power on, check the adapter connection sequence first. No mist output typically indicates improper filter seating or empty tank—both easily corrected during initial setup.
Common Setup Problems and Solutions
- No power: Verify adapter is plugged into unit before wall outlet
- No mist: Confirm filter is fully seated and tank contains water
- Strange noises: Remove any remaining shipping tape from fan assembly
- Leaks: Ensure tank cap is properly tightened and seated
Error Code Reference for Quick Diagnosis
- Solid red LED: Filter replacement needed immediately
- Blinking red: Refill water tank (sensor triggered)
- Flashing blue: Filter installation requires verification
- No LED display: Power supply connection issue
Maintain Daily Operation for Long-Term Performance
Empty and rinse the tank daily to prevent bacterial growth—this simple step extends your unit’s lifespan by years. The LED display shows filter life remaining; replace when it drops below 10% or every 8-12 weeks with distilled water use. Weekly deep cleaning maintains optimal mist output and prevents mineral buildup.
Daily Maintenance Routine for Peak Performance
- Morning: Check water level and adjust settings if needed
- Evening: Empty and rinse tank before refilling
- Weekly: Wipe down exterior surfaces with damp cloth
- Monthly: Deep clean all components using included brush
Listen for changes in fan noise indicating filter clogging, and check windows for condensation daily during the first week. Track humidity levels morning and evening to establish your home’s unique patterns—this data helps fine-tune settings for maximum comfort with minimal energy use.
Your Hume Sense top fill humidifier should now provide consistent, healthy humidity levels with minimal intervention. Remember that proper setup is just the beginning—monitor performance closely for the first week and adjust settings based on your comfort and seasonal needs. Consistent maintenance ensures years of reliable operation, transforming dry, uncomfortable air into perfectly balanced indoor climate with minimal effort. For ongoing optimization, download the Hume app to unlock smart features that automate humidity control based on your daily routines and preferences.


