Every year, thousands of home fires are caught early thanks to working smoke alarms, yet many of these life-saving devices fail simply because they’re running on the wrong or dead battery. When your smoke detector starts chirping, it’s not just an annoyance. It’s a warning that your home’s first line of defense is compromised. The smoke detector battery size you use matters more than most people realize. Using the wrong type can trigger false alarms, reduce sensitivity, or even cause complete failure during an emergency.
The good news is that identifying the correct battery is straightforward once you know where to look. Most detectors use either 9V, AA, or AAA batteries, while newer models come with sealed 10-year lithium batteries that aren’t replaceable. This guide walks you through identifying your detector’s exact power needs, replacing the battery safely, and keeping your system in top shape. Whether you’re silencing a chirp, upgrading an old unit, or installing a new alarm, you’ll know exactly what battery your smoke detector requires.
Identify Your Detector’s Battery Type

The fastest way to avoid mistakes is confirming your smoke alarm’s exact battery requirement. Guessing can lead to poor performance or even damage. Always verify using one of these three reliable methods.
Check the Battery Compartment Label
Open the battery cover and look inside. Most units have the required size molded or printed directly into the compartment.
- Look for clear labels like “9V,” “AA,” or “AAA”
- Some specify chemistry, such as “9V Alkaline Only” or “Use Lithium Battery”
- Voltage requirements may also be listed (e.g., 9V or 1.5V)
- If the label is faded, check the model number on the back of the unit
This method is the most direct and should always be your first step.
Inspect the Old Battery
If the battery is still inside, remove it carefully and read the label on the casing.
- Standard markings include “9V,” “AA,” “AAA,” “LR03,” or “6LR61”
- Chemistry is usually printed: “Alkaline,” “Lithium,” or “Carbon-Zinc”
- Check the voltage specification on the battery itself
- Note any manufacturer-specific codes
Never reuse old batteries, even if they appear to still work. A photo before removal helps you remember the correct orientation.
Use the Model Number for Exact Specs
When labels are missing or unclear, the model number gives you definitive answers.
Where to find it:
– On the back of the unit
– Printed on a sticker or molded into the plastic
– Common examples include Kidde KN-COS-10 or First Alert SA300
How to use it:
– Search online for “[Model Number] battery type”
– Visit the manufacturer’s website for the manual or spec sheet
– Check retailer listings on sites like Amazon or Home Depot
This method confirms not just size but also chemistry, quantity, and whether the battery is user-replaceable.
Common Smoke Detector Battery Sizes

Not all detectors use the same battery. Knowing which type your unit needs prevents wasted trips to the store and ensures reliable operation.
9V Batteries: Most Common in Older Models
Used widely in older and hardwired alarms with battery backup.
- Voltage: 9 volts
- Shape: Rectangular with a snap connector on top
- Lifespan: 1–2 years (alkaline), up to 10 years (lithium)
- Typical use: First Alert hardwired models and many standalone units
Always align the snap terminals correctly. The negative terminal (larger slot) goes at the bottom.
AA and AAA Batteries: Standard in Newer Units
Increasingly common in modern battery-powered detectors.
- Voltage: 1.5V per battery
- Quantity: Often 2–3 batteries per unit
- Lifespan: 1–2 years (alkaline), up to 10 years (lithium)
- Typical use: Kidde models, smart alarms, and slim designs
Never mix old and new batteries. Replace all of them at the same time.
Sealed 10-Year Lithium Batteries: No Replacement Needed
Built-in, non-replaceable power sources designed to last the alarm’s full life.
- No user-replaceable battery
- Lasts 10 years, matching the detector’s lifespan
- End-of-life chirp signals full unit replacement
- Typical use: UL-listed 10-year sealed alarms like the Kidde 10DC
Do not attempt to open or tamper with sealed battery units.
Alkaline vs. Lithium: Which Battery to Use
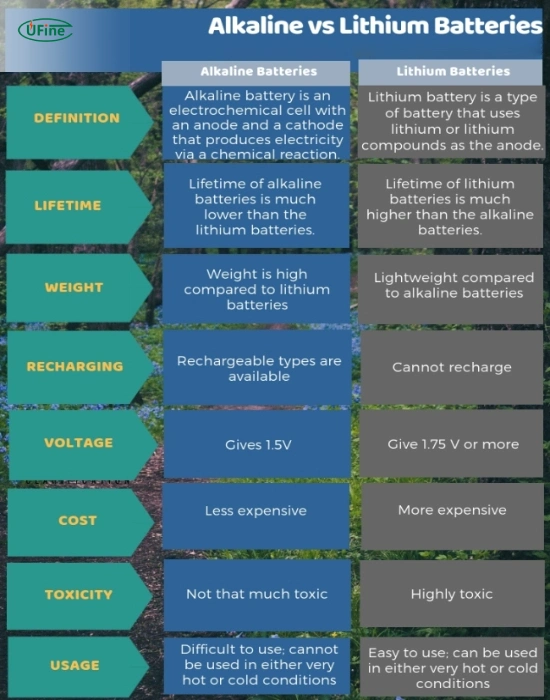
Battery chemistry affects lifespan, reliability, and performance, especially in temperature extremes.
Alkaline Batteries: Affordable and Widely Available
Best for standard replaceable-battery models.
- Cost: Low
- Lifespan: 1–2 years
- Performance: Gradual voltage drop over time
- Risk: Can leak if left in past expiration
Recommended for: annual replacement schedules, moderate climates, and budget-conscious homeowners. Avoid using them in cold basements or hot attics, where performance drops significantly.
Lithium Batteries: Long-Lasting and Reliable
Ideal for extended life and harsh environments.
- Cost: Higher upfront
- Lifespan: Up to 10 years in compatible models
- Performance: Stable voltage output, works in -20°F to 140°F
- Leak risk: Very low
Recommended for: hard-to-reach detectors, extreme temperature zones, and 10-year sealed systems. Lithium 9V batteries cost more but greatly reduce long-term maintenance.
Sealed Lithium Systems: Maintenance-Free for a Decade
These units come with a built-in lithium battery that powers the alarm for its entire operational life.
- No battery changes required
- Unit must be replaced entirely after 10 years
- End-of-life warning chirp differs from a low-battery signal
- Eliminates the risk of forgetting replacements
More expensive initially, but saves time and hassle over the life of the unit.
How to Replace a 9V Battery (First Alert Example)
Follow these steps for hardwired First Alert models, which are common in U.S. homes.
Remove the Detector from the Mounting Bracket
Safety first: disconnect power if the unit is hardwired.
- Turn off the relevant circuit breaker
- Hold the mounting bracket steady with one hand
- Grasp the detector and turn it counterclockwise
- Gently pull down and unplug the white connector cable
The unit should detach smoothly. Don’t force it.
Open the Battery Compartment and Replace
Locate the side compartment and access the battery tray.
- Press the release button
- Slide out the tray
- Remove the old 9V battery
Orientation guide:
– Negative terminal (flat side) → bottom
– Positive terminal (nub) → top
– Match the “–” symbol molded into the tray
Insert the new battery, close the tray, and ensure it clicks shut.
Reinstall and Test the Unit
Reattach the detector securely.
- Align the three pins on the back with the slots in the bracket
- Slide in and rotate clockwise until you hear a click
- Plug the white connector back in
- Restore power at the breaker
Final check:
– Press the test button for 5–10 seconds
– A loud, steady alarm means success
– No sound? Recheck battery orientation and connections
General Replacement Steps for Any Model
While designs vary, the core process is universal across most smoke detectors.
Standard Replacement Procedure
- Remove the detector from its base (twist, slide, or unclip)
- Open the battery compartment (side, front, or back)
- Remove old batteries and note their orientation
- Insert new batteries with correct polarity (+ and – aligned)
- Close the compartment securely
- Reinstall the unit on its mounting base
- Test immediately
Time estimate: 3–5 minutes per alarm
Difficulty: Easy, no tools usually required
The most common mistake is forgetting to test after replacement. Always verify the unit sounds.
Test After Every Battery Change
A new battery isn’t enough. Testing confirms the alarm will actually work when you need it.
Immediate Post-Replacement Test
- Press and hold the test button for 5–10 seconds
- Listen for a loud, continuous alarm
- If there’s no sound:
- Check battery orientation
- Confirm the correct battery type was used
- Ensure the compartment is fully closed
- Try a different battery
Test all alarms monthly, even if no chirp is occurring.
Monthly Maintenance Schedule
- Pick a consistent day (e.g., the 1st of each month)
- Test each alarm by holding the button until it sounds
- Replace batteries annually or when chirping starts
- Replace entire units every 10 years
A helpful habit: replace batteries when you change your clocks for daylight saving time.
Troubleshoot Common Post-Replacement Issues
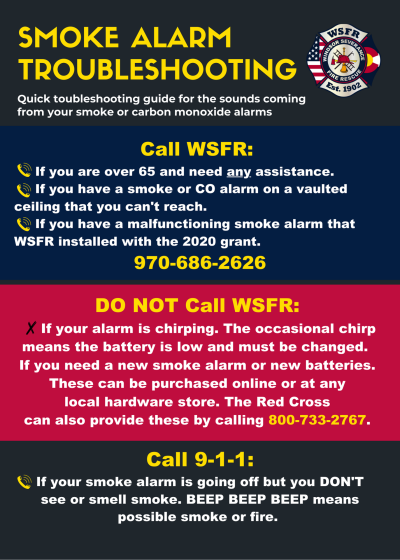
Even with the right battery, problems can still occur.
Chirping After a New Battery
Common causes:
– Battery not fully seated
– Wrong type used (e.g., carbon-zinc instead of alkaline)
– Compartment not closed completely
– Only one battery replaced in a multi-battery unit
How to fix it:
– Remove and reinsert the battery
– Verify the correct type and orientation
– Replace all batteries in multi-battery units
– Clean contact points if you see corrosion
A chirp every 30–60 seconds usually means low battery, even if the battery is new.
False Alarms After Replacement
Possible reasons:
– Incorrect voltage or chemistry
– Dust in the sensor chamber
– Steam or cooking fumes nearby
– Poor battery contact
Solutions:
– Confirm the correct battery type is installed
– Vacuum the detector gently
– Relocate it if it’s near a kitchen or bathroom
– Reset the unit by powering it off and on
Detector Not Responding
Checklist:
– Is the battery inserted correctly?
– Are contacts clean and free of corrosion?
– Is the unit properly mounted?
– Has the alarm reached its 10-year end-of-life?
If nothing works, replace the entire unit.
Best Practices for Battery Selection
Choosing the right battery ensures reliability and prevents future issues.
For 9V Models: Alkaline or Lithium?
- Alkaline: Best for annual replacement routines
- Lithium: Ideal for hard-to-reach locations or longer life
- Avoid carbon-zinc: Shorter life and prone to leakage
Use alkaline 9V unless the manual specifically calls for lithium.
For AA/AAA Models: Replace All at Once
- Use high-quality alkaline or lithium batteries
- Replace all batteries simultaneously
- Don’t mix brands or chemistries
- Match polarity exactly
AA lithium batteries can last up to 10 years in compatible models.
Never Use Rechargeable Batteries
- Voltage is often lower (1.2V vs. 1.5V)
- May not provide consistent power
- Can cause intermittent operation or failure
Most manufacturers explicitly warn against using rechargeable batteries in smoke detectors.
Upgrade to 10-Year Sealed Lithium Alarms
Consider replacing old models with modern sealed units for a decade of hassle-free protection.
Benefits of Sealed 10-Year Alarms
- No battery changes for a decade
- Eliminates chirping from low batteries
- Consistent power delivery
- Fewer maintenance failures
- Often includes CO detection
Ideal for: rental properties, seniors, busy households, and hard-to-reach ceilings.
What to Know Before Upgrading
- Higher upfront cost (around $25–$40 per unit)
- Full unit replacement after 10 years
- Hardwired versions may need an electrician
- Check local codes, as some areas require sealed units
The NFPA recommends replacing all smoke alarms every 10 years. Sealed units simplify compliance.
Maintenance and Safety Checklist
Stay proactive with this essential routine to keep your home protected.
Annual Battery Replacement
- Replace all batteries once a year
- Mark your calendar (New Year’s Day or the DST change works well)
- Keep spares of the correct type on hand
- Store them in a cool, dry place
Monthly Testing and Cleaning
- Test each alarm with the button
- Vacuum detectors gently to remove dust
- Never paint over smoke alarms
- Keep them away from kitchens and bathrooms to reduce false alarms
10-Year Unit Replacement
- Check the manufacture date on the back
- Replace any alarm older than 10 years
- Dispose of old units properly and recycle when possible
- Install new units before the old ones fail
If a unit chirps and won’t stop after a battery replacement, replace the entire alarm.
Frequently Asked Questions About Smoke Detector Battery Size
How do I know what battery my smoke detector needs?
Check the battery compartment label first, then inspect the old battery for size markings. If both are unclear, look up the model number on the manufacturer’s website for exact specifications.
Can I use any 9V battery in my smoke detector?
No. Use the battery type specified by the manufacturer. Alkaline is standard for most models, but some require lithium for optimal performance, especially in sealed 10-year units.
How often should I replace smoke detector batteries?
Replace batteries at least once per year, or sooner if the low-battery chirp begins. Many people tie replacements to daylight saving time changes for consistency.
Why does my smoke detector chirp after a new battery is installed?
Common causes include improper battery installation, the wrong battery type, an incomplete closure of the compartment, or not replacing all batteries in a multi-battery unit. Remove and reinsert the battery, verify the type, and ensure the compartment is fully sealed.
Can I use rechargeable batteries in my smoke detector?
Generally no. Rechargeable batteries often have lower voltage (1.2V vs. 1.5V) and may not provide consistent power. Most manufacturers explicitly advise against their use.
When should I replace my entire smoke detector?
Replace smoke alarms every 10 years. Sealed 10-year units will chirp to indicate end-of-life and must be replaced entirely when that signal occurs.
Final Tips for Long-Term Safety
A working smoke detector can mean the difference between life and death. Protect your home with these expert-backed habits.
- Know your model and keep a record of each unit’s battery type
- Test monthly and replace batteries annually
- Use only manufacturer-recommended batteries for your specific detector
- Upgrade to sealed 10-year models when possible
- Replace all alarms every decade
- Keep spare batteries in a labeled container near your detectors
Your smoke detector is only as good as its power source. By using the correct smoke detector battery size and following a simple maintenance plan, you ensure your family stays protected day and night, year after year. Start tonight by checking one alarm in your home and confirming it has the right battery installed.